DIY Mason Jar Soap Dispenser: Easy Tutorial
This DIY Mason jar soap dispenser turns a pint-size canning jar and a recycled soap pump into a useful farmhouse-style accessory for your kitchen, bathroom or laundry room. With a drill, a few basic tools and about 30 minutes, you can transform an extra jar into a refillable dispenser for liquid hand soap, dish soap or lotion.
Mason jars and I go way back. They remind me of opening jars of homemade preserves, drinking something cold on the porch and catching fireflies for a few glowing minutes before setting them free. They are practical, nostalgic and far too useful to spend the months between canning seasons collecting dust on a shelf.
Why You’ll Love This Mason Jar Soap Dispenser
- It is useful: This is a decorative craft you can use every day.
- It repurposes supplies: Give an extra Mason jar and an empty soap pump a new purpose.
- It is easy to customize: Change the soap color, add a waterproof label or decorate the jar to match your room.
- It is refillable: Unscrew the lid whenever you need to add more soap.
- It makes a thoughtful gift: Fill it with a favorite soap and include it in a housewarming, hostess or holiday gift basket.
About DIY Mason Jars by Melissa Averinos
In DIY Mason Jars, author and illustrator Melissa Averinos takes familiar canning jars beyond the pantry. The book includes 35 projects that turn Mason jars into decorative and functional pieces for the home.
The Homespun Soap Dispenser immediately caught my attention because it combines the charm of a Mason jar with something every kitchen or bathroom needs. It looks rustic and clever, but it is still practical enough for everyday use.
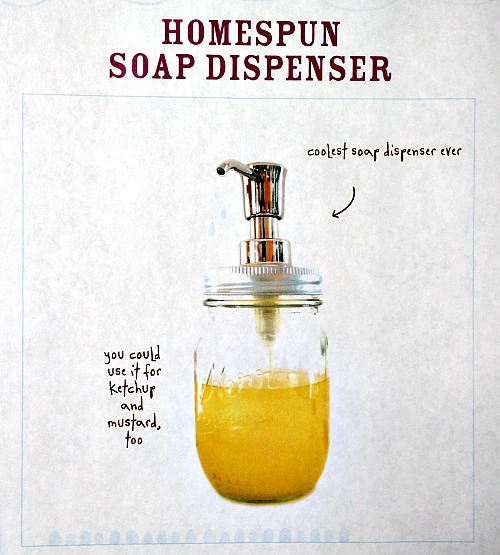
Homespun soap dispenser project from DIY Mason Jars by Melissa Averinos.
DIY Mason Jar Soap Dispenser Supplies
- 16-ounce regular-mouth Mason jar with lid and band
- Ruler
- Permanent marker
- Block of scrap wood
- Small clamp for securing the lid
- Safety glasses
- Power drill
- ⅛- to ½-inch metal step drill bit or a 3/16-inch bit with progressively larger drill bits
- Needle-nose pliers
- Small metal file or fine-grit sandpaper
- replacement soap dispenser pump with a long, trim-to-fit tube
- Utility knife or sturdy scissors
- fine-tip mini hot-glue gun and glue sticks
- Scrap cardboard to protect the work surface
- Liquid hand soap, dish soap or pumpable lotion
Choosing the Right Mason Jar and Soap Pump
A 16-ounce regular-mouth Mason jar is compact enough to sit beside most sinks while still holding a useful amount of soap. You can use a wide-mouth jar, but you will need a matching lid and band.
The pump’s collar should be wide enough to rest securely against the lid. Its dip tube should reach almost to the bottom of the jar. A replacement soap pump with a long tube is easy to trim for a custom fit, but you can also clean and reuse a pump from an empty soap bottle.
Test a recycled pump before building the lid around it. Run warm water through the pump to make sure it is clean, unclogged and working properly.
Why a Step Drill Bit Works Best
A step drill bit made for metal makes this project easier because it enlarges the opening gradually with a single bit. You can stop drilling as soon as the opening is large enough for the soap pump.
If you do not have a step drill bit, begin with a 3/16-inch pilot hole and change to progressively larger bits until the pump fits. Work slowly with either method. It is easy to enlarge the opening, but you cannot make an oversized hole smaller.
Important Safety Notes Before You Begin
An adult should complete all drilling, cutting and hot-glue steps. Wear safety glasses while drilling. Secure the lid to the scrap wood with a clamp rather than holding it with your hand, and keep your fingers away from the drill bit.
Drilled metal can have sharp edges. Stop the drill and set it down before touching the lid. Smooth rough metal carefully and remove every metal shaving before assembling or filling the dispenser.
This handmade version is intended for soap or lotion only. Do not use a recycled soap pump, hot glue or a standard drilled lid to dispense ketchup, mustard or other foods. Food dispensers require purpose-made, food-safe components.
How to Make a Mason Jar Soap Dispenser
- Clean the jar and pump. Wash the Mason jar, lid, band and soap pump. If you are reusing a pump, run warm, soapy water through it until the old product is gone. Rinse everything and allow it to dry completely.
- Find the center of the lid. Separate the flat lid from the screw band. Measure the diameter of the lid with a ruler and use a permanent marker to place a dot in the center.
- Secure the lid. Place the lid right side up on a block of scrap wood. Clamp the lid and wood securely to the work surface so they cannot shift while you drill.
- Begin the opening. Put on your safety glasses. Position the smallest point of the step drill bit over the center mark and slowly drill through the lid into the scrap wood. If you are using standard drill bits, begin with a 3/16-inch pilot hole.
- Enlarge the opening gradually. Continue drilling one step at a time with the step bit, checking the size frequently. If you are using standard bits, replace the pilot bit with a slightly larger bit and continue moving through progressively larger sizes. Stop when the opening is almost as wide as the pump tube.
- Fine-tune the opening. Insert the pump tube to test the fit. If the opening needs to be widened slightly, insert the closed tips of the needle-nose pliers and twist gently. Check the fit after every few turns. The pump should fit snugly without forcing it through the lid.
- Smooth the edges. Examine the drilled opening carefully. Use a small metal file or fine-grit sandpaper to smooth rough edges that could cut you or damage the pump.
- Trim the dip tube. Insert the pump through the lid and hold the assembled lid beside the jar at the height where it will rest. Mark the tube approximately ½ inch above the bottom of the jar. Remove the pump and trim the tube with a utility knife or sturdy scissors. Cut the end at a slight angle so it cannot seal itself against the bottom of the jar.
- Remove the metal shavings. Separate the pump from the lid and thoroughly wipe down the lid, pump and work area. Make sure no metal dust or shavings remain.
- Secure the pump. Place the lid on scrap cardboard. Insert the pump through the opening, lift the pump collar slightly and use a fine-tip hot-glue gun to apply glue beneath the collar where it meets the lid. Press the pump firmly into place and hold it until the glue begins to cool. Add a small amount around the underside if the pump needs additional support.
- Let the glue cool. Allow the glue to cool and harden completely. Check that the pump sits straight and does not wobble before adding soap.
- Fill and assemble the dispenser. Fill the jar with liquid hand soap, dish soap or pumpable lotion. Place the lid on the jar, screw the band into place and press the pump several times to prime it.
Expert Tips for the Best Results
- Enlarge the hole slowly. Stop and test the pump frequently so the opening does not become too large.
- Test a recycled pump first. Make sure it works before attaching it permanently.
- Cut the tube at an angle. This keeps the tube from sealing itself against the bottom of the jar.
- Do not overfill the jar. Leave room at the top so soap does not overflow when you insert the pump.
- Keep the lid dry. Standard canning lids can eventually rust when exposed to standing water.
- Inspect the glue periodically. Heat, water and frequent use can loosen hot glue. Stop using the dispenser and reattach the pump if it begins to wobble.
Ways to Customize Your Soap Dispenser
- Tie twine, ribbon or a fabric strip around the jar.
- Add a waterproof label marked “Hands,” “Dishes” or “Lotion.”
- Use clear or lightly colored soap to show off the glass jar.
- Choose a black, bronze, silver or white pump to coordinate with your fixtures.
- Make matching dispensers for hand soap and lotion.
- Fill the finished dispenser with a favorite soap and include it in a housewarming gift basket.
How to Refill and Clean a Mason Jar Soap Dispenser
Unscrew the band and lift the pump and lid from the jar. Wipe the dip tube before setting the pump aside. Wash the glass jar with warm, soapy water and dry it thoroughly before refilling.
Avoid soaking the drilled lid or pump assembly for long periods. Instead, wipe the lid clean and dry it promptly to help prevent rust. If the pump becomes clogged, remove it and run warm water through the tube until the blockage clears.
Troubleshooting Your Mason Jar Soap Dispenser
Why does the pump wobble?
The opening may be slightly too large or the glue may not be holding securely. Remove the soap, dry the assembly completely and add more hot glue around the pump collar. Allow it to cool before using the dispenser again.
Why won’t the soap pump prime?
Make sure the dip tube reaches the soap and is not pressed flat against the bottom of the jar. Pump several times. If it still does not work, remove the pump and rinse the tube with warm water to clear any dried soap.
Why is soap leaking around the pump?
Check the seal where the pump meets the lid. The pump should fit snugly, and the glue should completely support the collar. Dry the area before repairing the seal.
How do I prevent the lid from rusting?
Wipe away water after using the sink and avoid leaving the dispenser in standing water. Replace the lid when you see rust or corrosion. For a longer-lasting option, replace the handmade lid with a stainless-steel Mason jar soap dispenser lid.
Readers Also Make This Mason Jar Soap Dispenser For
- Kitchen dish soap
- Bathroom hand soap
- Guest-room lotion
- Laundry-room stain treatment
- Housewarming gifts
- Hostess gifts
- Rustic wedding or shower decorations
DIY Mason Jar Soap Dispenser FAQs
Can I use a wide-mouth Mason jar?
Yes. Use a wide-mouth lid and band, and make sure the pump collar is large enough to sit securely over the drilled opening.
Can I reuse a pump from an empty soap bottle?
Yes. Wash the pump thoroughly, test it and make sure its tube is long enough to reach near the bottom of the Mason jar. You can also use a replacement soap pump with a trim-to-fit tube.
Can I make this project without a drill?
Yes. The easiest drill-free option is a stainless-steel regular-mouth Mason jar soap dispenser lid. The pump is already installed in the replacement lid, so you only need to trim the tube and attach the lid to your jar.
Can I put lotion in the dispenser?
Yes, as long as the lotion is thin enough for the pump. Very thick creams may clog a standard soap pump.
Can I use this dispenser for food?
No. Keep this handmade version for soap or lotion. Use a purpose-made food-safe pump, lid and adhesive for anything edible.
Perfect With a Simple Home Refresh
Use your new dispenser beside the kitchen or bathroom sink, then continue the refresh with this DIY gel bead air freshener. In the laundry room, pair it with my homemade fabric softener for another practical, refillable home project.
More Projects from DIY Mason Jars
The Homespun Soap Dispenser is only one of the 35 projects in Melissa Averinos’s book. Other ideas include:
- Pendant lighting
- Reed diffusers
- Sprouting jars
- Seasonal Mason jar decorations
If you enjoy finding creative uses for extra canning jars, DIY Mason Jars by Melissa Averinos offers plenty of inspiration for turning an ordinary jar into something decorative, functional and fun.
Related DIY Projects
- Make a Family Conversation Jar
- Copycat Renuzit Gel Bead Aromatherapy
- DIY Homemade Fabric Softener
- DIY Dishwasher Detergent Cubes
Next Project to Try
Next, turn another empty Mason jar into a family conversation jar filled with questions, activities and prompts for more meaningful family dinners.