
How to Do a Backstitch by Hand
A backstitch is a strong hand-sewing and embroidery stitch made by bringing the needle forward along the design line and then stitching backward into the end of the previous stitch, creating a solid, nearly continuous line.
This beginner-friendly backstitch tutorial shows exactly where the needle enters and exits the fabric, how far apart to place each stitch, and how to keep straight lines, curves, lettering, and hand-sewn seams neat and even.
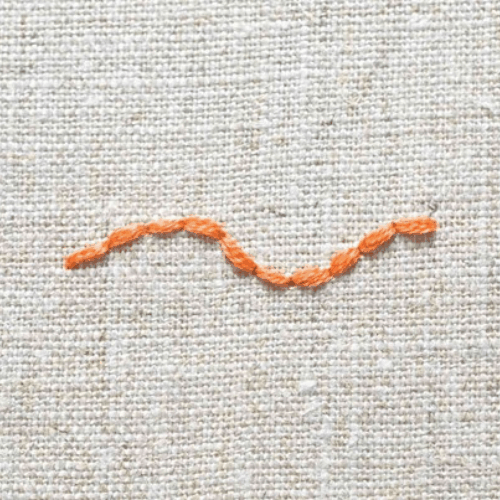
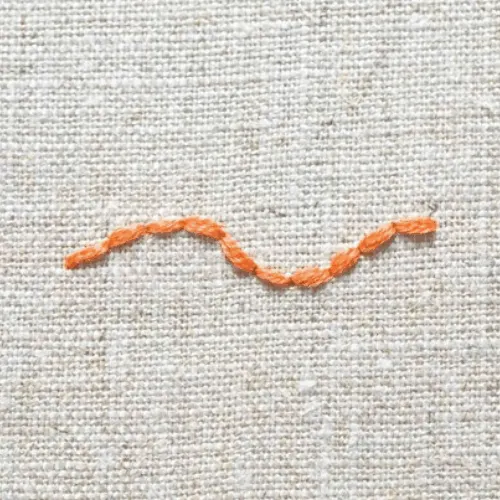
How to Do a Backstitch by Hand Step by Step
To make a backstitch, bring your needle up through the fabric, make one short stitch forward, and then bring the needle up again one stitch-length ahead. Insert the needle backward into the hole where the previous stitch ended. Continue moving forward and stitching backward until your line is complete.
That little forward-and-back motion is what gives the backstitch its name. It also explains why the stitch looks almost unbroken on the front of the fabric and slightly overlapped on the back.
Why You’ll Love the Backstitch
- It creates a clean, continuous outline with very few visible gaps.
- It is stronger and more secure than a basic running stitch.
- It works for both decorative embroidery and practical hand sewing.
- Short backstitches can follow curves, corners, lettering, and tiny details.
- It is simple enough for beginners but useful in advanced projects, too.
Readers Also Make
Building your hand-sewing skills one stitch at a time? Practice the running stitch by hand, learn how to do a stem stitch step by step, or explore these essential embroidery stitches for more beginner-friendly techniques.
What You Need for Backstitching by Hand
- Fabric: Cotton, linen, muslin, felt, or another fabric that is easy to pierce with a needle.
- Embroidery hoop: Helpful for embroidery because it keeps the fabric smooth and evenly tensioned.
- Needle: Choose an embroidery needle for decorative work or a sharp hand-sewing needle for seams and repairs.
- Thread or embroidery floss: Embroidery floss creates bold decorative lines, while all-purpose sewing thread is better for seams and mending.
- Scissors: Use small, sharp scissors for trimming the thread neatly.
- Fabric marker or pencil: Optional, but helpful for drawing a straight line, curve, word, or design before you begin.
How to Backstitch by Hand
- Prepare the fabric.Place embroidery fabric in a hoop so it is smooth and comfortably taut, not stretched like a drum. For hand sewing or mending, flatten the fabric and pin the layers together if needed.
- Thread the needle.Cut approximately 18 inches of thread or embroidery floss. A shorter length is less likely to knot or become fuzzy as you stitch. Thread the needle and secure the end with a small knot.
- Bring the needle up at Point A.From the back of the fabric, bring the needle up through the starting point of your line. Pull the thread through until the knot rests against the back of the fabric.
- Make the first stitch from Point A to Point B.Move the needle one stitch-length forward along the marked line. Insert the needle down through the fabric at Point B and pull the thread gently through.
- Bring the needle up ahead at Point C.From the back of the fabric, bring the needle up one stitch-length ahead of Point B. Point C should be approximately the same distance from Point B as Point A was from Point B.
- Stitch backward from Point C to Point B.Insert the needle back down into Point B, the same hole where the previous stitch ended. Pull the thread through. The first two stitches should now meet without leaving a noticeable gap.
- Continue forward and stitch backward.Bring the needle up one stitch-length ahead of the completed line, then insert it backward into the end of the previous stitch. Repeat this rhythm: come up ahead, then stitch back.
- Secure the thread.When the line is complete, turn the fabric over. Slide the needle beneath two or three stitches on the back, make a small knot, and trim the excess thread without cutting into your work.
Where Does the Needle Enter and Exit in a Backstitch?
The easiest way to remember the needle placement is: come up ahead and go back into the previous hole.
After the first stitch, the needle should exit the fabric one stitch-length in front of the completed line. It then enters the fabric at the exact point where the previous stitch ended. This keeps the stitches connected and gives the backstitch its smooth, unbroken appearance.
Try not to make a new hole beside the previous one. Entering the original hole helps prevent visible spaces and keeps the line tidy.
How Long Should Backstitches Be?
For most beginner embroidery projects, aim for stitches approximately 1/8 to 1/4 inch long. The exact length matters less than keeping the stitches consistent.
- Straight lines: Use evenly spaced stitches of about 1/4 inch.
- Gentle curves: Shorten the stitches slightly so the line bends smoothly.
- Tight curves and small letters: Use very short stitches, sometimes 1/8 inch or less.
- Hand-sewn seams: Use short, close stitches for greater strength.
Think of the stitch length as a steering wheel: shorter stitches give you more control around curves, corners, and small details.
How to Backstitch a Straight Line
Draw a light guideline before beginning and keep each needle entry directly on that line. Use the same stitch length from beginning to end, and check your work every few stitches rather than waiting until the entire row is finished.
A ruler and removable fabric marker can be helpful while practicing. Once your hands become familiar with the motion, keeping the line straight becomes much more natural.
How to Backstitch Around Curves
Backstitch works beautifully around circles, flower petals, leaves, and curved lettering when the stitches are kept short.
- Shorten each stitch as the curve becomes tighter.
- Turn the embroidery hoop or fabric as you work instead of twisting your wrist.
- Place the needle directly on the drawn line at every entry and exit point.
- Avoid pulling the thread too tightly, which can pucker the inside of the curve.
Several small stitches will make a smoother curve than two or three long stitches trying to bend around it.
How to Keep Backstitching Even
Uneven stitches are completely normal when you are learning. A few small habits make an enormous difference:
- Mark tiny dots along the design line before stitching.
- Use a consistent stitch length as your visual guide.
- Pull the thread until it lies flat, but stop before the fabric puckers.
- Keep the fabric evenly tensioned in the hoop.
- Pause every few stitches to look at the whole line.
- Practice first on scrap cotton or muslin.
Hand stitching does not need to look machine-made to be beautiful. The small variations are part of its charm. The goal is a line that looks intentional, smooth, and secure.
Common Backstitch Mistakes and How to Fix Them
There Are Gaps Between My Stitches
Insert the needle into the exact hole where the previous stitch ended. If the needle enters beside that hole, even slightly, a small gap may remain visible.
My Fabric Is Puckering
You may be pulling the thread too tightly or stretching the fabric too firmly in the hoop. Let the thread rest against the surface instead of cinching it down.
My Line Looks Jagged
Use shorter stitches, especially around curves and corners. It also helps to mark the entire line before you begin.
My Stitches Are Different Lengths
Mark evenly spaced dots along the line or use the width of your needle as a rough measuring guide until your spacing becomes more consistent.
My Thread Keeps Knotting
Use a shorter piece of thread, let the needle dangle occasionally to untwist it, and smooth the thread between your fingers before continuing.
The Back of My Work Looks Messy
A backstitch naturally overlaps more on the reverse side than it does on the front. Avoid carrying thread across large open areas, and secure each section before moving to a distant part of the design.
How to Secure Backstitch Thread
For a beginner-friendly start, tie a small knot at the end of the thread and keep it on the back of the fabric. To finish, pass the needle beneath several completed stitches on the reverse side, form a small loop, pass the needle through it, and tighten gently.
For embroidery that may be framed, displayed, or examined closely, you can begin without a bulky knot by leaving a short tail and stitching over it on the back as you work.
Perfect with a Quiet Afternoon of Crafting
Backstitching is a wonderfully portable skill for rainy afternoons, summer craft time, handmade gifts, holiday ornaments, visible mending, and slow evenings when you want to make something with your hands. Browse more ideas in Sewing and Crafts, or find creative projects for the whole family in Kids Crafts and Activities.
Backstitch vs. Running Stitch
A running stitch moves forward through the fabric with spaces between the stitches. It is fast, flexible, and ideal for gathering, basting, simple outlines, and decorative dashed lines.
A backstitch moves forward underneath the fabric and then stitches backward on the front. The stitches meet end to end, producing a stronger and more continuous line.
- Choose running stitch for speed, gathering, basting, or a dashed decorative effect.
- Choose backstitch for solid outlines, lettering, seams, mending, and areas that need more strength.
Learn the difference by practicing both with this running stitch tutorial for beginners.
Backstitch vs. Stem Stitch
Backstitch creates a firm, defined line with stitches that meet end to end. Stem stitch creates a slightly twisted, rope-like line that is especially pretty for flower stems, vines, flowing outlines, and decorative curves.
- Backstitch: Crisp, solid, strong, and excellent for lettering or detailed outlines.
- Stem stitch: Softly textured, decorative, and especially graceful on botanical designs.
Once you are comfortable with the backstitch, try this step-by-step stem stitch tutorial to add another classic embroidery stitch to your collection.
Ways to Use a Backstitch
- Outlining embroidered flowers, animals, and shapes
- Stitching names, quotes, monograms, and hand-lettered designs
- Adding facial features and small details to embroidered characters
- Creating borders around appliqué pieces
- Hand sewing seams when a sewing machine is unavailable
- Mending a split seam or small tear
- Decorating napkins, tea towels, pillowcases, and fabric gift bags
- Adding detail to felt ornaments and handmade toys
- Tracing children’s drawings onto fabric for keepsake embroidery
Backstitch Variations and Creative Ideas
Whipped Backstitch
Sew a regular row of backstitch, then weave a second thread under each stitch without piercing the fabric. This creates a smooth, corded effect and is especially pretty when two colors are used.
Double Backstitch
Work two parallel rows of backstitch to create a thicker border, decorative band, or bold embroidered lettering.
Variegated Thread
Use color-changing embroidery floss to make a simple outline look more detailed without changing threads.
Mixed-Stitch Embroidery
Combine backstitch outlines with running stitch details, French knots, lazy daisy petals, or stem stitch vines. Explore more possibilities in this guide to types of embroidery stitches every sewist should know.
Can Backstitch Be Used for Hand-Sewn Seams?
Yes. Backstitch is one of the strongest basic stitches for sewing a seam by hand because the stitches overlap on the reverse side and meet closely on the front.
For a sturdy seam, use all-purpose sewing thread and short stitches placed close together. Keep the seam allowance consistent and avoid pulling so tightly that the fabric gathers.
Can Children Learn the Backstitch?
Older children who can safely handle a needle can learn backstitching with close supervision. Start with felt, plastic canvas, burlap, or loosely woven fabric because the holes are easier to see and pierce.
Draw a short straight line with evenly spaced dots and let the child practice coming up ahead and going backward into the last hole. A blunt tapestry needle can be a comfortable place to begin when the fabric allows it.
Frequently Asked Questions About Backstitching
What is a backstitch?
A backstitch is a hand-sewing or embroidery stitch made by moving the needle forward underneath the fabric and then stitching backward into the end of the previous stitch. This creates a strong, continuous-looking line.
How do you do a backstitch by hand?
Bring the needle up through the fabric, make one short stitch forward, then bring the needle up one stitch-length ahead. Insert it backward into the hole where the previous stitch ended and repeat.
Is backstitching by hand strong?
Yes. Backstitch is stronger than a basic running stitch because the stitches overlap on the reverse side and form a closely connected line on the front.
How far apart should backstitches be?
Most decorative backstitches are about 1/8 to 1/4 inch long. Use shorter stitches for curves, small lettering, tight corners, and strong hand-sewn seams.
Why does my backstitch have gaps?
Gaps usually appear when the needle enters beside the previous hole instead of directly into it. Insert the needle into the exact endpoint of the last stitch.
Can I use backstitch for embroidery lettering?
Yes. Backstitch is one of the best beginner stitches for embroidery lettering because it creates a crisp, easy-to-control line. Shorten the stitches around curves and small letter shapes.
What is the difference between backstitch and running stitch?
Running stitch leaves spaces between forward-moving stitches. Backstitch returns into the previous stitch, creating a stronger line with little or no visible space.
What is the difference between backstitch and stem stitch?
Backstitch forms a crisp, solid line, while stem stitch forms a slightly twisted, rope-like line that works especially well for stems, vines, and flowing curves.
Is “backstich” the same as backstitch?
Yes. “Backstich” is a common misspelling of backstitch. The correct spelling has two letter t’s: backstitch.
Final Thoughts
Backstitching is one of those small skills that quickly becomes indispensable. It can outline a flower, write a name, mend a seam, strengthen a handmade project, or turn a child’s drawing into a fabric keepsake.
Start with a short straight line and concentrate on one simple rhythm: come up ahead, then stitch backward into the previous hole. Once that motion feels natural, curves, lettering, and detailed embroidery become much easier.