Pop Top Party Favor Craft: Pop the Top to Reveal the Fun!
There is something wonderfully sneaky about a party favor that looks like an ordinary pop-top can… until someone pulls the tab and discovers the surprise tucked inside. This Pop Top Party Favor Craft turns clean pop-top cans into clever DIY gift containers for Valentine’s Day, birthdays, classroom parties, Easter baskets, Halloween treats, baby showers, and handmade “just because” surprises.
It is budget-friendly, wildly customizable, and has that little “wait, how did you do that?” magic that makes handmade gifts feel extra special. Best of all, you can fill each can with candy, tiny toys, notes, gift cards, confetti, stickers, or themed treats, then reseal the bottom so the recipient still gets the fun of popping the top.
Pop quiz: What do you get when you mix an empty fruit can, scrapbook paper, ribbon, and a stash of tiny surprises? An un-can-ny party favor that is cute enough for Pinterest and simple enough for a craft night.
More Screen-Free Craft Fun for Kids
Looking for more easy projects for rainy days, classroom parties, birthday celebrations, holidays, and family craft time? Visit my Kids Crafts & Activities hub for paper crafts, printable activities, DIY party favors, sensory play, holiday crafts, and creative projects kids can make with simple supplies.


Why You’ll Love This Pop Top Party Favor Craft
- It makes a big impression with simple supplies. A small pop-top can becomes a surprise-filled favor guests actually want to open.
- It works for almost any celebration. Customize the paper, ribbon, tags, and fillers for Valentine’s Day, birthdays, Easter, Halloween, Christmas, baby showers, teacher gifts, or classroom exchanges.
- It is affordable. Save clean fruit cups or small cans, then dress them up with scrapbook paper and supplies you probably already have.
- It is interactive. Instead of just handing someone a treat bag, they get to pop the top and reveal the fun inside.
- It is easy to batch. Once you have the can-opening and paper-wrapping steps down, you can make several at once for party tables, favor baskets, or class gifts.
This project fits beautifully beside other handmade Valentine and party crafts like my Woven Heart Basket Template + Instructions and Hershey Kisses Roses. For printable classroom fun, you can also browse my Free Printables for Kids, Classrooms and Parties.


What Is a Pop Top Party Favor?
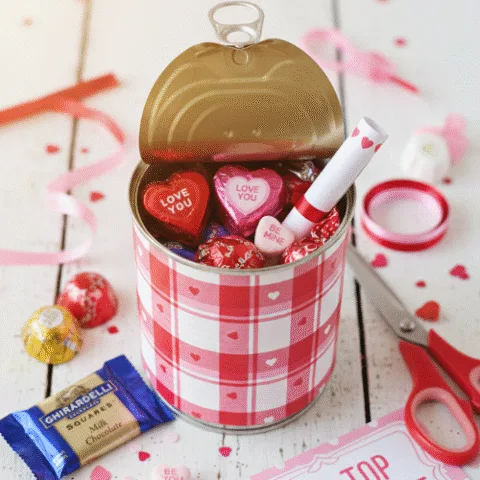
A pop top party favor is a decorated can that opens from the top like a regular pop-top container, but the surprise is added from the bottom. The trick is to open the bottom of the can with a smooth-edge safety can opener, empty and clean it, fill it with goodies, then glue the bottom lid back into place.
From the outside, it looks like a sealed can. When the recipient pulls the tab, the top pops open and reveals the surprise inside. It is part craft, part gift wrap, part party trick — and completely fun.
Best Occasions for Pop Top Party Favor Cans
These DIY pop-top cans are easy to customize, which makes them one of those crafts you can reuse all year with a few simple swaps.
Valentine’s Day Classroom Favors
Use red, pink, white, or heart-print paper. Fill the cans with chocolates, fruit snacks, stickers, erasers, mini notes, or printable Valentine cards. Add a tag that says, “I’m soda-lighted you’re my friend,” “You’re poppin’ awesome,” or “Pop the top, Valentine!”
Birthday Party Favors
Match the can wrap to the party theme. Add small toys, temporary tattoos, stickers, wrapped candy, slime charms, confetti, or a scavenger hunt clue. These also work well for a party prize table or place setting surprise. For more celebration inspiration, visit my Birthday Celebration Ideas hub.
Easter Basket Surprises
Use pastel paper, gingham ribbon, Easter grass, jelly beans, mini chocolate eggs, stickers, or tiny chick and bunny trinkets. These are adorable tucked into Easter baskets or used as place cards for brunch.
Halloween Treat Cans
Wrap cans in orange, black, purple, or spooky scrapbook paper. Fill them with candy corn, gummy worms, monster stickers, spider rings, or glow bracelets. Pair them with a Halloween activity like my Paper Roll Mummy Craft for a full party table idea.
Baby Shower or Bridal Shower Favors
Use soft florals, ribbon, lace, or pastel paper. Fill each can with mints, chocolates, tea bags, tiny candles, bath salts in sealed packets, or a handwritten thank-you note.
Supplies You’ll Need
- Small pop-top cans, such as individual fruit or vegetable cans
- Smooth-edge safety can opener
- Patterned scrapbook paper, wrapping paper, cardstock, or printable paper
- Ribbon, baker’s twine, yarn, or curling ribbon
- Craft glue, school glue, hot glue, or E6000 craft adhesive
- Scissors or paper trimmer
- Pencil for tracing the original label
- Shredded paper, tissue paper, or Easter grass
- Fillers such as candy, notes, small toys, stickers, gift cards, mini photos, or classroom treats
- A heavy book, jar, or can for pressing the lid while the glue dries


Important Safety Note Before You Start
This is a family-friendly craft, but an adult should handle the can opener, can edges, and any hot glue. A smooth-edge safety can opener is important because it removes the bottom lid cleanly and makes it easier to reseal. A standard can opener usually leaves sharper edges and can make the project messy.
After opening the can, check the bottom rim and lid before kids help decorate. If anything feels sharp or uneven, set that can aside and use another one.
How to Make a Pop Top Party Favor Can
Step 1: Open the Bottom of the Can
Use a smooth-edge safety can opener to remove the bottom of the can. Do not open the pop-top lid. The goal is to keep the tabbed top fully intact so the recipient can open it later.
Once the bottom is removed, empty the contents into a bowl, rinse the can, and save the bottom lid. You will glue that same lid back on after the can is filled.
Step 2: Wash and Dry the Can Completely
Remove the original label, wash the can thoroughly with warm soapy water, and dry it completely. Any moisture left inside can affect candy wrappers, paper fillers, and glue adhesion.
Let the can air-dry upside down if needed. Dry cans are easier to decorate and much better for treats.
Step 3: Use the Original Label as a Template
Carefully flatten the original can label and place it on the back side of your scrapbook paper. Trace around it with a pencil, then cut out the new label.


Step 4: Wrap the Can with Decorative Paper
Add a thin line of glue to the back of your cut paper and wrap it smoothly around the can. Press the seam firmly so it stays in place. If you are making several cans, wrap all of them before adding ribbons or embellishments.


Step 5: Add the Fillers Upside Down
Turn the can upside down so the open bottom faces up. Add the goodies in reverse order, keeping in mind that the recipient will open the can from the pop-top side.
For example, if you want a note to be the first thing they see, place it closer to the pop-top lid. Add shredded paper, tissue paper, or Easter grass to cushion the treats and keep everything from rattling around.


Step 6: Reseal the Bottom Lid
Apply a line of strong glue around the inside rim of the bottom lid or around the can’s bottom edge. Press the lid back into place carefully. Set a heavy object on top while the glue dries so the lid stays secure.
Let the glue dry completely before moving or gifting the can. Drying time depends on the adhesive you use, so check the glue instructions before handling.


Step 7: Decorate the Outside
Once the can is sealed, decorate it with ribbon, twine, stickers, tags, paper hearts, washi tape, die cuts, or glitter glue. You can tie ribbon through the pop-top tab or wrap it around the center of the can.


Step 8: Gift and Pop the Top
Hand out the finished cans and let the fun begin. The recipient pulls the tab, pops the top, and discovers the surprise inside.


Pop Top Party Favor Filler Ideas
The best fillers are small, lightweight, wrapped, and theme-friendly. Here are easy ideas for different occasions:
Valentine’s Day Fillers
- Wrapped chocolates
- Fruit snacks
- Conversation hearts
- Mini love notes
- Heart stickers
- Tiny erasers
- Printable Valentine cards
Birthday Party Fillers
- Temporary tattoos
- Mini bubbles
- Small toys
- Wrapped candy
- Confetti
- Party game clues
- Gift cards for older kids or adults
Classroom Prize Fillers
- Pencils
- Erasers
- Bookmarks
- Stickers
- Small fidgets
- Reward notes
- Mini activity sheets
Holiday Fillers
- Halloween spider rings
- Easter jelly beans
- Christmas peppermints
- New Year’s confetti
- St. Patrick’s Day chocolate coins
- Thanksgiving gratitude notes
Creative Variations for This Pop Top Craft
Pop-Top Valentine Cans
Use pink and red paper, heart ribbon, and punny tags. These are sweet for classroom exchanges, teacher gifts, Galentine’s Day, or family Valentine baskets.
Birthday Mystery Cans
Make one special “winner” can with a larger prize inside and fill the others with candy or small toys. This works beautifully for party games.
Movie Night Surprise Cans
Fill cans with popcorn seasoning packets, candy, trivia questions, or a movie ticket note. Pair them with printable activities from the Free Printables hub.
Teacher Appreciation Cans
Add mints, chocolate, a coffee gift card, and a small handwritten note. Wrap the can in notebook paper-style scrapbook paper or a pencil-themed print.
Scavenger Hunt Clue Cans
Place clues inside the cans and let kids pop each one open to reveal the next step. This is especially fun for birthday parties, Easter egg hunts, and family game nights.
Expert Tips for the Best Pop Top Party Favors
- Choose small cans. Individual fruit cans are a great size for favors and easier to reseal than larger cans.
- Use wrapped treats. Wrapped candy and sealed snacks are best since the can has been repurposed.
- Let the glue dry completely. A secure bottom keeps the surprise hidden until the pop-top is opened.
- Keep the top clean. Since the pop-top is the part people will pull, wipe it well before decorating.
- Batch your steps. Open all cans first, then wash all cans, trace all labels, wrap all cans, fill all cans, and seal all cans.
- Use a theme. Matching paper, ribbon, and filler colors makes the finished favors look intentional and party-ready.
- Label allergy-friendly treats. For classrooms, consider non-food fillers or clearly marked packaged treats.
What to Pair with Pop Top Party Favors
These party favor cans work well as part of a bigger craft, printable, or party activity setup. Try pairing them with:
- Woven Heart Basket Template + Instructions for a Valentine craft table
- DIY Tangrams for Kids for a screen-free puzzle activity
- Hershey Kisses Roses for a sweet handmade gift
- Paper Roll Mummy Craft for Halloween party favor inspiration
- Birthday Celebration Ideas for party planning, games, cakes, and treats
Pop Top Party Favor Craft FAQs
Can kids make this craft?
Kids can help decorate the cans, choose fillers, trace labels, and add stickers or ribbon. Adults should handle opening the cans, checking for sharp spots, and using hot glue or strong adhesive.
What kind of can works best?
Small pop-top fruit or vegetable cans work best because they are favor-sized and easy to fill. Look for cans with a pull-tab top and a bottom that can be removed cleanly with a smooth-edge safety can opener.
Do I open the top or the bottom of the can?
Open the bottom only. The pop-top lid needs to stay intact so the recipient can pull the tab and open the surprise later.
What glue should I use to reseal the can?
Hot glue, strong craft glue, or E6000 can work well. School glue may be fine for the paper wrap, but the bottom lid needs a stronger hold.
Can I put homemade food inside?
Wrapped or sealed treats are best, especially for classrooms or parties. If you use homemade treats, place them in a sealed treat bag before adding them to the can.
Can I make these ahead of time?
Yes. Make them a few days ahead and store them in a cool, dry place. Avoid adding anything that could melt, leak, or crush easily.
Can I use these for non-food favors?
Absolutely. Stickers, mini toys, erasers, notes, small craft supplies, friendship bracelets, and scavenger hunt clues all work well.
How do I make the cans look polished?
Use the original label as a template, cut clean edges, choose coordinated paper and ribbon, and keep the embellishments simple. A tag and a neat ribbon can make the whole project look party-ready.
Final Thoughts
This Pop Top Party Favor Craft is one of those simple DIY ideas that feels much more impressive than it is. You start with an ordinary can, add a little paper and ribbon, tuck a surprise inside, and suddenly you have a handmade favor that guests get to open with a smile.
Make them sweet for Valentine’s Day, colorful for birthdays, spooky for Halloween, pastel for Easter, or elegant for showers and handmade gifts. However you decorate them, the fun is in the reveal.
Pop the top, cue the smiles, and let the surprise do the talking.
Keep the Craft Table Going
For more easy paper crafts, printable activities, classroom projects, party favors, and screen-free ideas, visit the Kids Crafts & Activities hub. You will find simple projects for rainy days, holidays, birthdays, family fun nights, and creative classroom moments.

Pop Top Party Favor Craft: Pop the Top to Reveal the Fun!
Turn ordinary pop-top cans into charming, interactive party favors with this easy DIY tutorial! From Valentine’s Day treats to birthday surprises, this step-by-step guide shows you how to safely open a can, decorate it with patterned paper and ribbons, fill it with goodies, and reseal it for a magical gift. Budget-friendly, customizable, and perfect for all ages, these Pop Top Party Favors are a creative way to wow your guests and add a whimsical touch to any celebration.
Materials
- Small pop-top can (individual fruit or vegetable cans work best for easy resealing)
- Patterned scrapbook paper or decorative wrapping paper (for wrapping the can)
- Ribbon or twine (for embellishing the pop-top)
- Fillers: candy, shredded paper, mini toys, gift cards, rolled notes, etc.
Optional Decorative Extras:
- Printable tags or punny labels
- Stickers or glitter
- Colored twine or baker’s twine
- Mini clothespins or paper clips (for attaching tags)
Tools
- Safety can opener (removes the bottom without sharp edges — regular openers won’t work well)
- Scissors (for cutting paper and ribbon)
- Glue options: Elmer’s glue, craft glue, or a hot glue gun
- Heavy object (for pressing the lid down while glue dries)
Instructions
- Open the Can Safely – Use a safety can opener to remove the bottom, keeping the pop-top intact.
- Clean & Dry – Remove the label, wash thoroughly, and allow to dry completely.
- Prepare Decorative Wrap – Trace the original label onto patterned paper, cut, and glue neatly around the can.
- Add Fillers – Place candies, small toys, or notes upside down; add shredded paper or tissue for cushioning.
- Seal the Bottom – Apply glue around the removed lid and press it into place. Use a heavy object to secure while drying.
- Decorate & Personalize – Tie ribbon around the pop-top and add stickers, glitter, or themed embellishments.
- Gift & Enjoy – Hand out your Pop Top Party Favors and watch your guests delight in the surprise!
Notes
Notes:
- Always supervise kids when using a safety can opener or hot glue gun.
- Choose small fruit or veggie cans — they reseal easily and look adorable.
- Let glue fully dry before handling the can to ensure a secure seal.
- Use shredded paper, tissue, or Easter grass to cushion fillers and prevent shifting.
- Be creative with fillers: candy, mini toys, rolled notes, love messages, or themed trinkets make each favor special.
- Patterned paper, ribbons, stickers, and glitter can be customized to match any party theme.