Melted Crayon Canvas Art: A Colorful Craft That Melts Hearts
This easy melted crayon canvas craft proves creativity really drips from kids.
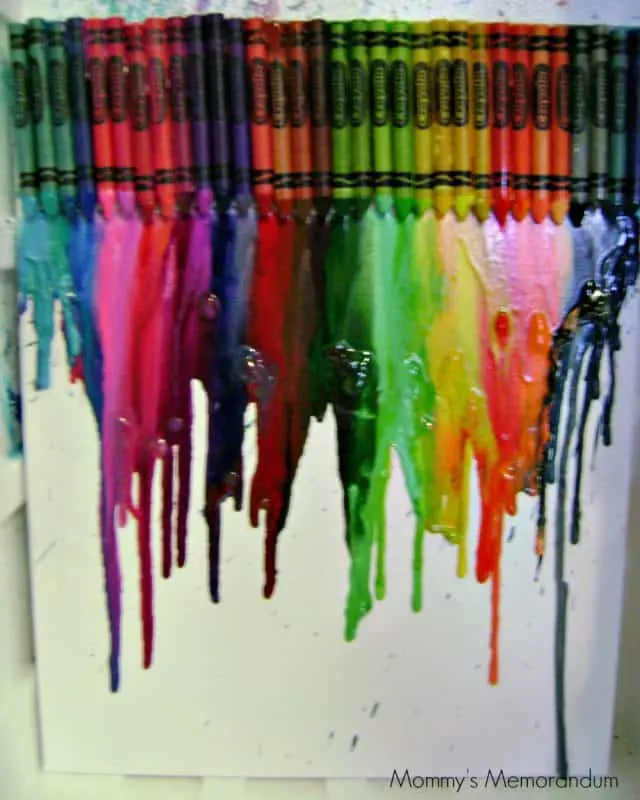
Sometimes the best art projects start with a simple idea… and a box of crayons. That’s exactly how this colorful melted crayon canvas art adventure began. My sister shared a photo of her own melted crayon masterpiece on Facebook, and before I could even hit “like,” my kids were already gathering supplies. Within minutes, we had crayons lined up, the blow dryer plugged in, and a plain white canvas ready for its rainbow makeover.
This melted crayon canvas craft is one of those magical projects that feels a little like science, a little like art, and a whole lot like fun. With just crayons, a canvas, and a blow dryer, kids can create vibrant rainbow drip art that looks impressive enough to hang in a gallery wall display. Even better? No two canvases ever turn out the same.
If you’re searching for an easy kids’ art project, a rainy‑day craft, or a colorful DIY wall décor idea, this melted crayon canvas tutorial is a must‑try. It’s bright, bold, budget‑friendly, and guaranteed to spark creativity.

Why You’ll Love This Melted Crayon Canvas Craft
This project has become a family favorite for so many reasons. Here’s why your kids (and you!) will love it too:
It’s incredibly easy
No fancy art skills required. Kids simply arrange crayons and melt them — the blow dryer does the magic.
It encourages creativity
Kids can choose their own color patterns, melting styles, and artistic effects. Every canvas becomes a one‑of‑a‑kind masterpiece.
The results look amazing
The vibrant wax drips create modern art that looks surprisingly gallery‑worthy.
It uses simple supplies
You probably already have most of the materials at home.
It’s perfect for multiple ages
Younger kids love watching the wax melt, while older kids experiment with angles, layers, and color flow.
Materials You’ll Need


- Box of crayons
- Art canvas (8×10 or 11×14 work great)
- Hot glue gun + glue sticks
- Blow dryer
Optional:
- Drop cloth or mat
- Old cardboard box or cooler for a melting station
- Painter’s tape for clean design edges
How to Make Melted Crayon Canvas Art


Step 1: Arrange the Crayons
Lay the crayons across the top edge of the canvas. Kids can experiment with color order — rainbow, ombré, or totally random.


Step 2: Secure the Crayons
Use a hot glue gun to attach each crayon to the canvas with the tips pointing downward.


Step 3: Prepare a Melting Station
Stand the canvas upright against a protected surface. Melted wax can splatter, so a drop cloth is your friend.
Step 4: Melt the Crayons
Turn the blow dryer to medium or high heat. Move it slowly across the crayons until they begin to melt and drip down the canvas.


Step 5: Experiment With Effects
Tilt the canvas for splatters, slow drips, or layered colors. Every angle creates a new effect.
Step 6: Let the Artwork Cool
Allow the wax to cool completely — usually 10–15 minutes — before moving the canvas.
Two Different Artistic Styles


Li’l Man’s technique:
- Melted crayons quickly
- Tilted the canvas for splatter effects
- Created bold, dramatic drips
The Divine Miss M’s technique:
- Melted crayons slowly
- Let colors drip in controlled layers
- Built soft, blended patterns
Both turned out beautifully — just in totally different styles.
Expert Tips for the Best Melted Crayon Art
- Remove crayon wrappers for smoother melting.
- Start with low to medium heat to reduce splatter.
- Work in a ventilated area.
- Protect surfaces with cardboard or a drop cloth.
- Melt in stages for more control over color flow.
Variations & Creative Ideas
Want to personalize your melted crayon canvas? Try these fun twists:
- Silhouette art: Tape a heart, tree, or initials onto the canvas before melting.
- Galaxy crayon art: Use navy, purple, black, and silver.
- Seasonal palettes:
- Pastels for spring
- Red, white, and blue for summer
- Orange and yellow for fall
- Reverse drip design: Flip the canvas upside down after melting for a cool effect.
Serving Suggestions (Display Ideas)
Once your artwork cools, it’s ready to shine.
Try displaying it as:
- Kids’ bedroom wall art
- Classroom or homeschool displays
- DIY gifts for grandparents
- A colorful hallway gallery wall
- A creative project for birthday parties
FAQs About Melted Crayon Canvas Art
Is melted crayon art safe for kids? Yes — with adult supervision for the glue gun and blow dryer.
Do crayons need to be new? Nope! Broken crayons work perfectly.
Can I use a heat gun instead of a blow dryer? Yes, but heat guns melt wax faster, so use caution.
What size canvas works best? 8×10 and 11×14 are the most popular sizes.
More Creative Fun
If your kids love hands‑on, colorful projects like this melted crayon canvas art, you’ll have a blast exploring even more easy DIY activities together. Try one of these reader‑favorite crafts next:
- Whip up a batch of DIY bath fizzies — they’re fizzy, fragrant, and make adorable handmade gifts.
- Get squishy with our vibrant homemade playdough, a perfect rainy‑day boredom buster.
- Turn two simple ingredients into sensory magic with this easy tutorial: How to Make Moon Sand with 2 Ingredients!
- Bring a touch of garden‑chic charm to your home with our Chalkboard Flower Pots tutorial — a fun craft for kids and adults alike.
Final Thoughts
This melted crayon canvas art project reminded me that the best memories often come from spontaneous creativity. What started as a quick idea turned into an afternoon filled with laughter, experimentation, and two completely different masterpieces.
That’s the magic of crafting with kids — there’s no wrong way to create.
If you try this melted crayon canvas craft, I’d love to hear how it turned out. Did your kids go for dramatic splatters or slow rainbow drips? Share your creations in the comments!
This Melted Crayon Canvas Art Tutorial was originally published June 7, 2012, and updated April 4, 2026, with improved instructions, updates, and new photos.