Homemade Chocolate Pudding Recipe | Rich, Creamy & Easy!
Homemade Chocolate Pudding Recipe
This homemade chocolate pudding is the ultimate throwback dessert—rich, velvety, and packed with real chocolate flavor. Whether you're making it for a weekday treat or a nostalgic ending to a family dinner, this stovetop pudding comes together with pantry staples and no box mix required.
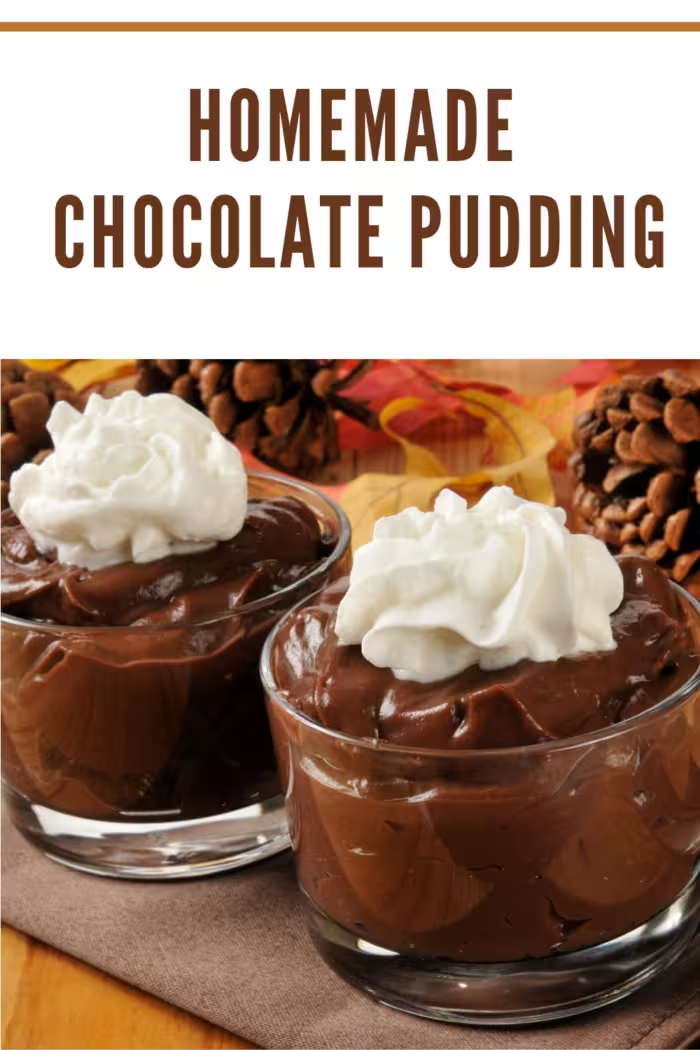
Unlike store-bought mixes, this pudding is made entirely from scratch—just like grandma used to make. If you’ve ever had our popular Southern Chocolate Gravy, you’ll love this similarly decadent yet thicker version that sets up perfectly in the fridge.
Ingredients
- 4 tablespoons Corn Starch (60g)
- 1 ½ cups Sugar (300g)
- 4 tablespoons Unsweetened Cocoa Powder
- 4 cups Milk (946ml) – whole milk is best, or use half evaporated and half water for creaminess
- 3 Egg Yolks
- 1 teaspoon Vanilla Extract (5ml)
- 3 teaspoons Butter (15g)
Why You'll Love This Chocolate Pudding
- Old-fashioned goodness: No boxed mix—just real ingredients for a true homemade taste.
- Quick & easy: You’ll go from stovetop to spoon in less than 30 minutes.
- Versatile: Serve it in ramekins, mason jars, pie shells, or layer it into trifles.
- Kid-friendly: This pudding is a hit with even the pickiest eaters. Add sprinkles or gummy worms to turn it into a dirt cup pudding!
Step-by-Step Instructions
- In a medium saucepan, whisk together corn starch, sugar, and cocoa powder.
- Gradually pour in milk while whisking to dissolve the dry ingredients completely.
- Cook over medium heat, stirring constantly with a wooden spoon or whisk, until the mixture begins to thicken—this can take 8–10 minutes.
- Lower the heat and stir in the egg yolks one at a time, mixing thoroughly to prevent scrambling.
- Once the pudding is thick and glossy, remove from heat and stir in vanilla and butter until fully incorporated.
- Pour into serving bowls, ramekins, or jars. Let cool to room temperature, then refrigerate for 2–3 hours before serving.

Expert Tips
- Use high-quality cocoa powder for the richest chocolate flavor—Dutch-processed gives a deeper taste.
- Whisk constantly to keep the mixture from sticking to the pan or forming lumps.
- Press plastic wrap directly on the surface of the pudding before chilling to prevent a skin from forming.
- Don’t skip the butter: it gives the pudding a silky finish.
Serving Ideas
- Top with homemade whipped cream and chocolate shavings for a classic finish.
- Serve warm over brownies or pound cake for a rich chocolate sauce.
- Layer with crushed cookies and whipped topping in mason jars for a no-bake parfait.
- Use as a filling in cakes, doughnuts, or cream puffs.
FAQs
- Can I use almond or oat milk?
Yes, but the texture may be slightly thinner. Full-fat plant-based milks work best. - Can I skip the eggs?
Yes! The pudding will still set using just cornstarch. It won’t be quite as rich, but still delicious. - How long does it keep?
Stored in an airtight container in the refrigerator, it lasts for 4–5 days.
More Must-Try Chocolate Recipes
Homemade Vanilla Pudding

This homemade vanilla pudding is sweet, creamy, and made on the stovetop with simple ingredients. Enjoy it chilled with whipped cream or try the chocolate and banana variations in the notes.
Ingredients
- 4 tablespoons cornstarch
- 1 ½ cups granulated sugar
- 4 cups milk, or 2 cups evaporated milk mixed with 2 cups water
- 3 egg yolks
- 1 teaspoon vanilla extract
- 1 tablespoon butter
Instructions
1. In a medium saucepan, whisk together the cornstarch and sugar. Gradually whisk in the cold milk until smooth. Add the egg yolks and whisk until combined.
2. Place the pan over medium heat. Cook, whisking constantly, until the pudding thickens and begins to bubble, about 10–15 minutes.
3. Once bubbling, continue whisking gently for about 1 minute. The pudding should coat the back of a spoon and reach 160°F on a food thermometer.
4. Remove from the heat. Stir in the vanilla and butter until smooth. If needed, strain through a fine-mesh strainer.
5. Divide among six dessert dishes or pour into a shallow serving bowl. Press plastic wrap directly onto the surface to prevent a skin, if desired.
6. Refrigerate until chilled and set, about 1–2 hours. Serve with whipped cream or your favorite toppings.
Notes
- Medium saucepan
- Whisk
- Food thermometer
- Fine-mesh strainer, optional
- Six dessert dishes or a shallow serving bowl
- Gradually whisk the cold milk into the sugar and cornstarch to help prevent lumps.
- Whisk constantly as the pudding cooks, including around the bottom and edges of the pan.
- The pudding will continue to thicken as it chills.
- If it looks lumpy, strain it while warm.
- Chocolate: Whisk 4 tablespoons unsweetened cocoa powder into the sugar and cornstarch before adding the milk.
- Banana: Stir 1 teaspoon banana extract into the cooked pudding with the vanilla and butter. Chill, then layer with sliced bananas, graham crackers or vanilla wafers, and whipped cream. You may also omit the banana extract and use the vanilla pudding for the layers.
- Evaporated milk: Replace the 4 cups milk with 2 cups evaporated milk mixed with 2 cups water.
Equipment
Tips
Make-Ahead and Storage
Divide into shallow dishes, cover, and refrigerate promptly, within 2 hours of preparation. Store covered in the refrigerator for 3–4 days. Add fresh fruit and whipped cream when ready to serve.
Variations
Serving
Serve chilled with homemade whipped cream, fresh berries, chocolate shavings, or a drizzle of homemade caramel sauce.
FAQs
Can I serve it warm? Yes. It will be softer when warm and will thicken more as it chills.
How do I prevent pudding skin? Press plastic wrap directly onto the surface before refrigerating.
Try This Next: Instant Pot Rice Pudding
If a bowl of creamy pudding sounds like your kind of comfort food, try my Instant Pot Rice Pudding. It’s made without eggs and finished with sweetened condensed milk.
Nutrition Disclaimer
Nutrition information is an estimate and will vary based on ingredients, brands, serving size, and optional toppings.
Nutrition Information:
Yield:
6Serving Size:
1Amount Per Serving: Calories: 310Total Fat: 5gSaturated Fat: 2gUnsaturated Fat: 3gCholesterol: 99mgSodium: 60mgCarbohydrates: 65gFiber: 0gSugar: 63gProtein: 3g
The Nutritional Information may not be accurate. This website provides approximate nutrition information for convenience and as a courtesy only. Nutrition data is gathered primarily from the USDA Food Composition Database, whenever available, or otherwise other online calculators.