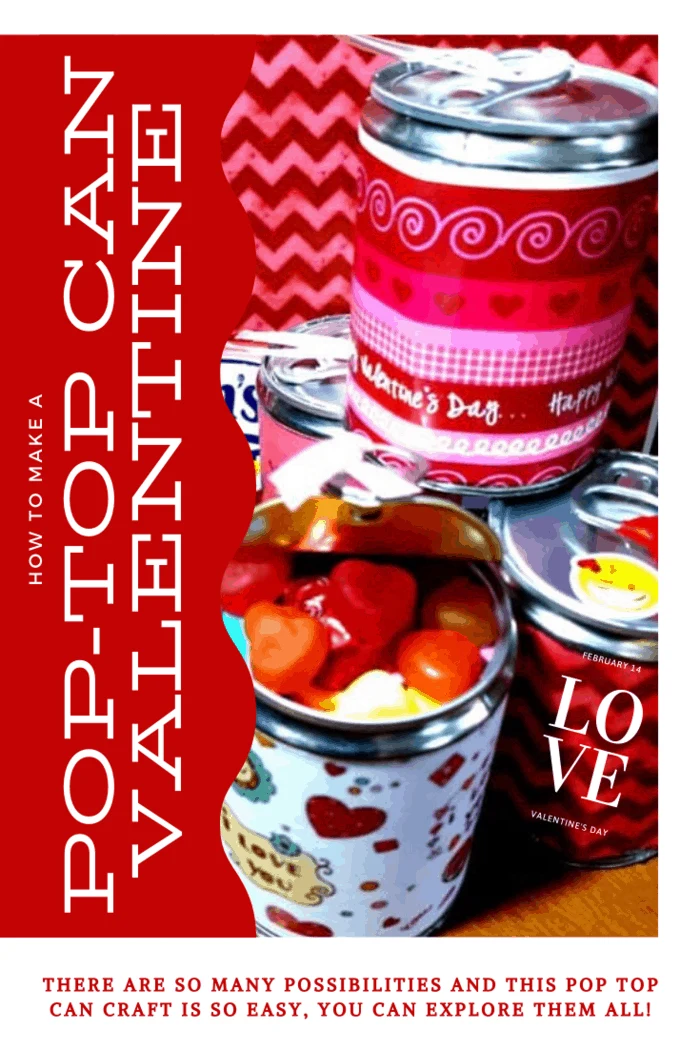
Pop Top Party Favor Craft: A Fun and Unique DIY Gift Idea
Looking for a creative way to surprise your guests or make gift-giving extra special? Pop Top Party Favor Crafts are the perfect solution! This easy, budget-friendly DIY project turns ordinary pop-top cans into exciting party favors, unique gift containers, and eye-catching decorations. Whether you’re planning a birthday, baby shower, or holiday celebration, these customized cans will leave your recipients in awe!
What is a Pop Top Party Favor?
A Pop Top Party Favor Craft is a repurposed tin can with a pop-top lid, transformed into a fun and mysterious gift container. You fill the can with goodies, small gifts, or personalized notes, then reseal it and decorate the exterior to match your theme.
As the giver, you’ll have fun crafting something unique. As the recipient, it’s an intriguing surprise—how did everything get inside? The answer remains a delightful mystery!


Creative Ways to Use Pop Top Party Favors
This craft is so versatile that you can use it in multiple ways! Here are some fun ideas:
Party Favors
- Make a Pop Top Can favor for each guest and place it at their seat.
- Have everyone open their can at the same time during the party.
- Create a prize game—one can has a special gift card, while the others have candy!
Party Decorations
- Customize the cans to match your party theme (baby showers, birthdays, bridal showers).
- Use them as balloon anchors by tying a helium balloon to the pop-top.
- Design them as centerpieces that double as guest takeaways.
Unique Gift Containers
- Fill cans with lotions, candles, gift cards, photos, jewelry, or homemade treats.
- Surprise your kids with DIY Valentine’s gifts for their classmates.
- Make fun stocking stuffers with small personalized gifts.
- Propose in a creative way with a Pop-Prosal! Hide an engagement ring inside for a one-of-a-kind moment.
The possibilities are endless, and the best part? It’s incredibly easy to make!


It will have the recipient wondering how you got it all in there, as the pop the top and see the contents.
How to Make a Pop Top Party Favor
Supplies You’ll Need
- Small pop-top can (Del Monte individual fruit cans work great!)
- Patterned paper for decoration
- Ribbon to tie around the top
- Elmer’s glue & craft glue (or a glue gun)
- Scissors
- Can opener (safety opener, not one that crimps!*)
- Fillers (shredded paper, candy, small toys, gift card, etc.)
- A heavy object (to help seal the lid back on)
Note: A regular can opener won’t work for this craft—it’s frustrating and messy. Instead, use a safety can opener (available at Walmart, Target, or Amazon) that removes the lid without sharp edges.

Step-by-Step Instructions
Open the Can
- Using a safety can opener, carefully remove the bottom (not the pop-top) of the can.
Clean & Dry
- Remove the label and wash out the can thoroughly. Let it dry completely before filling.
Prepare the Decorative Wrap
- Trace the original label onto the back of your patterned paper.


- Cut out the traced piece and glue it onto the can for a clean look.


Glue the paper to the can


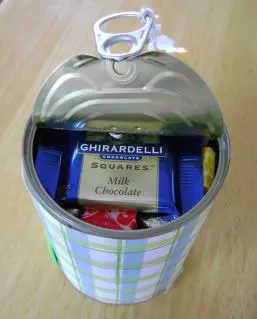
Fill the Can
- Add your goodies upside down so they’re right-side-up when opened.
- Use tissue paper or shredded paper for an extra festive touch!


Fill the can the rest of the way with shredded paper or Easter Grass.


Seal the Bottom
- Apply glue around the rim of the removed lid and press it back onto the can.
- Place a heavy object on top to ensure a secure seal while drying.


Decorate & Personalize
- Tie a ribbon to the pop-top.
- Add stickers, labels, or glitter for a custom look.


Gift & Enjoy!
- When the recipient pulls the pop-top, they’ll be amazed at the surprise inside!


The result is a fun, creatively concealed treat!


Expert Tips for the Perfect Pop Top Party Favor
✔ Choose the Right Can Size – Fruit cans or vegetable cans work best. Avoid large cans, as they’re harder to reseal.
✔ Use a Strong Glue – A hot glue gun works well, but craft glue is a great alternative if working with kids.
✔ Think Outside the Box – Get creative with fillers like mini photos, love notes, or themed gifts.
✔ Perfect for Holidays – These make great Christmas stocking stuffers, Easter surprises, and Halloween treats!
FAQs: Your Pop Top Craft Questions Answered
Q: Can I reuse cans from home?
A: Absolutely! Just make sure to use a safety can opener so the lid reseals properly.
Q: What’s the best glue for sealing the bottom?
A: E6000 craft glue or a hot glue gun works best for durability.
Q: Can kids make this craft?
A: Yes! It’s a fun project for kids, but adult supervision is recommended when using a glue gun.
Want More Creative DIY Ideas?
Love this Pop Top Party Favor Craft? Get even more fun DIY and craft ideas by visiting my Pinterest board!
And if you want easy, fun recipes to pair with your party favors, check out my cookbook, The How-To Cookbook for Teens: 100 Easy Recipes to Learn the Basics. It’s packed with quick, beginner-friendly recipes perfect for any occasion. Grab your copy today and start making magic in the kitchen!
This craft is brought to you by Welch’s Fruit Snacks, America’s Favorite Fruit Snack Brand!

Pop Top Party Favor Craft: Pop the Top to Reveal the Fun!
This pop top can craft is a clever way to fit. It looks complicated, but it is so easy and fun to make and give. Fill with candy and more!
Materials
- Small pop-top can (I like the Del Monte individual Fruit sized best)
- Patterned paper
- Ribbon
- Elmer's glue
- Craft glue or glue gun
- Scissors
- Can opener (One that doesn't Crimp--safety opener*)
- Fillers (shred, candy, small toys, gift card, etc.)
- Something with some weight to it...like a book.
Instructions
- Using your can opener, open the bottom of the can-the non-pop-top end.
- Use a safety can opener (this type of can opener removes the lid without cutting the metal–instead, it breaks the lid's seal and removes the lid with the lip around it still intact).
- Remove Label. Clean the can out thoroughly and then let the can dry.
- Trace the label onto the backside of the patterned paper
- Cut out the patterned paper piece and apply glue to the backside of the print.
- Glue the paper to the can and place candies or filler items inside can.
- Remember to put the items in the can upside down so that when the recipient opens the can right side up, the gifts will be as they are supposed to be.
- Depending on how you want the gifts to come out of the can, you may want to tuck a little piece of tissue paper in the bottom and/or the top.
- Fill the can the rest of the way with shredded paper or Easter Grass
- Place a glue line around the edge of the bottom you removed with the safety opener.
- Place lid on top of can and press--you may want to put a heavy object on top to secure until completely dry.
- Once the lid is secure, decorate the outside of the can.
- We tied a ribbon to the top of the pop-top.
- To open, simply pull up the ribbon or the pop-top as you would normally open the can.
- The result is a fun, creatively concealed treat!
Notes
*Note: It is not recommended you use a regular can opener for this craft, as it is frustrating. You can buy a safety can opener at Walmart, Target or Amazon.