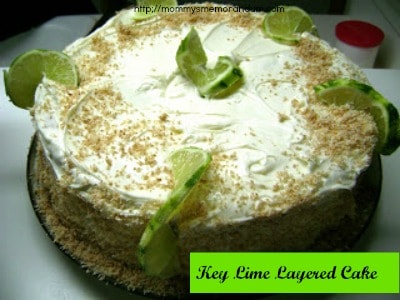
Key Lime Layered Cake Recipe
This Key Lime Layered Cake recipe bakes bright tropical flavor into a moist, citrusy layer cake with tangy key lime frosting and toasted coconut. It is the kind of dessert that tastes like sunshine, birthday candles, and a little slice of Miami all stacked into one show-stopping cake.
If you love the sweet-tart flavor of Key Lime Pie, this cake gives you that same tropical sparkle in a soft, tender, celebration-worthy dessert. Fresh key lime juice, key lime zest, creamy frosting, and toasted coconut come together in a cake that feels right at home on a birthday dessert table, summer cookout spread, spring brunch, Easter table, Mother’s Day celebration, or “I need something citrusy and fabulous” weekend.
This recipe was inspired by those sun-kissed Miami memories where palm trees swayed, ocean air lingered, and a neon green Key Lime pie shop could turn an ordinary day into dessert magic. This cake captures that same bright, nostalgic flavor in a layered dessert made for sharing.

Why You’ll Love This Key Lime Layered Cake
This cake has all the tropical charm of Key Lime pie, but with the drama and height of a layer cake. It is sweet, tart, creamy, bright, and just indulgent enough to feel like a special occasion.
- Bright citrus flavor: Key lime juice and zest bring that unmistakable sweet-tart tropical flavor.
- Moist cake layers: Greek yogurt or sour cream helps keep the cake tender and rich.
- Creamy frosting: Cream cheese, butter, key lime juice, zest, vanilla, and powdered sugar create a tangy frosting that tastes like sunshine.
- Birthday-worthy presentation: Four layers make the cake feel impressive and festive.
- Toasted coconut finish: Coconut adds texture, sweetness, and tropical flair.
- Perfect for warm-weather parties: Serve it for birthdays, brunches, spring celebrations, summer parties, or citrus-loving dessert tables.
If you enjoy layered cakes, this is a beautiful partner recipe to your birthday dessert table alongside Easy Black Forest Cake Recipe, Perfect Sugar Cookies, and Microwave Confetti Fudge.
Key Lime Layered Cake Ingredients
For the Cake
- 2½ cups all-purpose flour
- 2 cups granulated sugar
- 1 teaspoon baking powder
- 1½ teaspoons baking soda
- ½ teaspoon salt
- 3 large eggs
- ¾ cup vegetable oil
- 1 cup freshly squeezed key lime juice, or bottled key lime juice such as Rose’s
- ¾ cup Greek yogurt or sour cream
- 1 tablespoon key lime zest
- 14 ounces sweetened flaked coconut, toasted, approximately ½ bag
For the Key Lime Frosting
- 2 packages cream cheese, 16 ounces each, softened
- ¾ cup unsalted butter, softened
- 1 tablespoon key lime zest
- ¼ cup key lime juice
- 1 tablespoon vanilla extract
- 2½ pounds powdered sugar
For the Toasted Coconut, Optional
- 7 ounces sweetened coconut flakes
Optional Garnishes
- Fresh lime slices
- Extra key lime zest
- Toasted coconut
- White chocolate curls
- Fresh berries
- Birthday candles or a cake topper
For a classic frosting option you can use across cakes and cupcakes, save this Cream Cheese Frosting Recipe. It is a helpful base for many birthday cakes and celebration desserts.


How to Make Key Lime Layered Cake
Step 1: Prepare the Pans
Preheat the oven to 350°F. Grease two 9-inch round cake pans with cooking spray, then lightly flour them. This helps the cake layers release cleanly after baking.
Step 2: Mix the Dry Ingredients
In a large mixing bowl, sift together the flour, sugar, baking powder, baking soda, and salt. Sifting helps break up lumps and gives the cake a smoother texture.
Step 3: Add the Eggs
Add the eggs one at a time, mixing well after each addition. This helps the batter come together evenly.
Step 4: Add the Oil
Pour in the vegetable oil and mix until fully combined. Oil helps keep the cake moist and tender.
Step 5: Add the Key Lime Juice
Slowly pour in the key lime juice while mixing on medium speed. Scrape the sides of the bowl as needed so the batter becomes smooth and creamy.
Step 6: Add Yogurt and Zest
Fold in the Greek yogurt or sour cream and key lime zest. Stir just until evenly distributed. The yogurt or sour cream adds moisture, while the zest boosts the citrus flavor.
Step 7: Divide and Bake
Divide the batter evenly between the prepared cake pans. Bake for 30 to 35 minutes, or until a toothpick inserted into the center of each cake comes out clean.
Step 8: Cool the Cake Layers
Remove the cakes from the oven and let them cool in the pans on a wire rack for 5 to 7 minutes. Run a knife around the edge of each cake, then carefully turn the cakes out onto the wire rack to cool completely, about 1 hour.
Step 9: Slice the Layers
Once the cakes are completely cool, slice each cake horizontally into two even layers. You will have four cake layers total.
If you are new to slicing and stacking cakes, this Fill Cake Tutorial is a helpful step-by-step guide for layered cakes.
How to Make Key Lime Frosting
The frosting is what gives this cake its creamy, tangy finish. It is rich from cream cheese and butter, bright from key lime juice and zest, and sweet enough to balance the citrus.


Frosting Directions
- In a large mixing bowl, cream together the softened cream cheese and butter until smooth.
- Add the key lime zest, key lime juice, and vanilla extract. Mix until combined.
- Gradually add the powdered sugar, beating until the frosting is creamy, smooth, and spreadable.
- Taste and adjust with a little more zest if you want a stronger lime flavor.
If the frosting is too soft, chill it briefly before assembling the cake. If it is too thick, add a tiny splash of key lime juice and mix again.
How to Toast Coconut
Toasted coconut adds a golden, nutty finish that makes this cake feel even more tropical. It also gives the outside of the cake a little texture and visual drama.


Toasted Coconut Directions
- Preheat the oven to 200°F.
- Spread the sweetened coconut flakes evenly on a baking sheet.
- Place the baking sheet in the oven.
- Watch carefully and turn the coconut with a spatula every few minutes.
- Remove from the oven once the coconut is evenly golden brown.
- Let the coconut cool completely before adding it to the cake.
Tip: Coconut can go from golden to too dark quickly, so do not walk away while it is toasting.
How to Assemble the Key Lime Layered Cake
- Place one cake layer on a serving platter or cake stand.
- Spread an even layer of key lime frosting over the top, reaching almost to the outer edge.
- Add the second cake layer and repeat with frosting.
- Continue layering until all four cake layers are stacked.
- Apply a thin crumb coat around the outside of the cake.
- Chill the cake until the crumb coat is set.
- Finish with a final layer of key lime frosting.
- Press toasted coconut around the outer edge of the cake, if using.
- Garnish the top with fresh lime slices, extra zest, or birthday decorations.
A crumb coat makes a big difference on layered cakes. Use this Crumb Coat Cake Tutorial if you want a cleaner, more polished finish.
Expert Tips for the Best Key Lime Layered Cake
- Use fresh zest. Key lime zest adds big citrus flavor without making the cake too wet.
- Cool completely before frosting. Warm cake will melt the frosting and make the layers slide.
- Chill before slicing. A chilled cake cuts cleaner and holds its layers better.
- Do not overmix after adding yogurt. Mix just until combined for a tender crumb.
- Toast coconut slowly. Lower heat helps the coconut toast evenly without burning.
- Use a serrated knife to split layers. A long serrated knife helps cut even layers.
- Make it ahead. The citrus flavor settles beautifully after chilling.
Variations and Creative Ideas
Key Lime Birthday Cake
Add birthday candles, a citrus-colored cake topper, lime-green sprinkles, or a white chocolate drip for a birthday-ready finish.
Key Lime Coconut Cake
Press toasted coconut around the sides and top of the cake for a stronger tropical flavor.
Key Lime Cupcakes
Bake the batter as cupcakes, top with key lime frosting, and sprinkle with toasted coconut. This is a great option for birthday parties and dessert tables.
Key Lime Sheet Cake
Bake the batter in a sheet pan for an easier potluck-style version. Frost with key lime frosting and garnish with coconut and zest.
Key Lime Cake with Graham Cracker Crumbs
Add a sprinkle of graham cracker crumbs between layers or around the top to echo the flavor of Key Lime pie.
Key Lime Berry Cake
Add fresh strawberries, raspberries, or blueberries between layers for a colorful spring or summer cake.
Extra Tangy Key Lime Cake
Add extra zest to the frosting if you love a stronger citrus punch.
Serving Suggestions
This cake is bright and rich, so it works beautifully after simple party food, brunch dishes, grilled meals, or birthday snacks.
- Serve chilled for clean slices.
- Top slices with extra toasted coconut.
- Add fresh berries on the side.
- Pair with coffee, iced tea, or lemonade.
- Serve with Sparkling Orange Beverage Recipe for a cheerful birthday table.
- Pair with Raspberry Lemonade Recipe for spring and summer celebrations.
Make This Cake for Birthdays and Celebrations
Key Lime Layered Cake is a beautiful choice for birthdays because it feels fresh, bright, and unexpected. It is especially lovely for spring birthdays, summer celebrations, tropical party themes, beach-themed birthdays, Easter, Mother’s Day, bridal showers, baby showers, and garden parties.
If you are building a full party menu, pair this cake with simple party favorites like 6 Layer Dip Recipe, Filipino Lumpia Recipe, or Vanilla Caramel Corn Crunch.
For party treats and dessert table extras, add Perfect Sugar Cookies, Microwave Confetti Fudge, or Cupcake Apples Tutorial if you want something playful for kids.
Storage and Make-Ahead Tips
- Refrigerator: Store the cake covered in the refrigerator for up to 3 days.
- Serving: Let the cake sit at room temperature for 10 to 15 minutes before slicing if you want a softer frosting texture.
- Make ahead: Bake the cake layers one day ahead, wrap them well, and frost the next day.
- Freezing: Freeze unfrosted cake layers tightly wrapped for up to 2 months. Thaw completely before frosting.
- Toasted coconut: Toast coconut ahead and store it in an airtight container once fully cooled.
More Birthday Celebration Ideas
Planning a birthday cake, tropical dessert table, summer party, brunch celebration, or citrus-inspired birthday menu? Keep the party magic going with more birthday celebration ideas, including cakes, frosting tutorials, party treats, games, drinks, activities, and easy planning tips.
- Birthday Celebration Ideas — Start here for birthday cakes, games, party food, drinks, activities, gifts, and easy planning tips.
- Organizing a Kids Birthday Party — A practical party-planning guide for smoother, less stressful kids’ birthday celebrations.
- 9 Bargain Basics for a Kids Birthday Blowout — Budget-friendly birthday party tips for planning a fun celebration without overspending.
- Golden Birthday — A once-in-a-lifetime birthday milestone idea centered around celebrating the year someone turns the age of their birth date.
- Easy Black Forest Cake Recipe — A dramatic chocolate cherry layer cake that works beautifully as a birthday cake or themed celebration dessert.
- Fill Cake Tutorial — A step-by-step cake filling guide for layered birthday cakes and celebration desserts.
- Crumb Coat Cake Tutorial — A must-have cake decorating tutorial for smooth birthday cakes and polished frosting finishes.
- Cream Cheese Frosting Recipe — A classic frosting for birthday cakes, cupcakes, carrot cake, red velvet cake, and layered desserts.
- Perfect Sugar Cookies — Classic cookies for decorating, dessert trays, party favors, and birthday treat bags.
- Microwave Confetti Fudge — A colorful, easy birthday treat for party trays, gift boxes, and kid-friendly celebrations.
- Sparkling Orange Beverage Recipe — A bubbly drink option for birthdays, brunch parties, and celebration tables.
- Raspberry Lemonade Recipe — A bright party drink for spring and summer birthdays.
Need the full party-planning shortcut? Browse the complete Birthday Celebration Ideas category for party planning tips, cakes, cupcakes, cookies, drinks, games, kids’ activities, decorating tutorials, gift ideas, and dog birthday treats.
Key Lime Layered Cake FAQs
Can I use regular lime juice instead of key lime juice?
Yes, but the flavor will be slightly different. Key limes are usually more floral and tart, while regular Persian limes are a little sharper. Either will work in this cake.
Can I use bottled key lime juice?
Yes. Fresh key lime juice is wonderful, but bottled key lime juice such as Rose’s can be used when fresh key limes are not available.
Can I make this cake ahead of time?
Yes. You can bake the cake layers one day ahead and frost the cake the next day. The finished cake also stores well in the refrigerator, making it a good make-ahead dessert for parties.
Does Key Lime Layered Cake need to be refrigerated?
Yes. Because the frosting contains cream cheese and butter, store the cake covered in the refrigerator.
How long does Key Lime Layered Cake last?
The cake is best enjoyed within 3 days when stored covered in the refrigerator.
Can I make this recipe as cupcakes?
Yes. Bake the batter as cupcakes, then top with key lime frosting and toasted coconut. Watch the baking time closely because cupcakes bake faster than cake layers.
Can I make this without coconut?
Yes. The toasted coconut is optional. You can leave it off or replace it with graham cracker crumbs, white chocolate curls, lime zest, or sprinkles.
What frosting goes best with key lime cake?
Cream cheese frosting works beautifully because it balances the tart citrus flavor. Key lime frosting made with cream cheese, butter, lime juice, zest, vanilla, and powdered sugar is especially delicious.
How do I keep the cake layers from sliding?
Cool the cake completely, use an even layer of frosting between each layer, apply a crumb coat, and chill the cake before adding the final frosting layer.
Is this cake good for birthdays?
Yes. This cake is bright, pretty, and celebration-worthy. It is especially good for spring birthdays, summer birthdays, tropical parties, brunch celebrations, and citrus dessert tables.
Final Thoughts
This Key Lime Layered Cake is a tropical celebration dessert with moist citrus cake, creamy key lime frosting, toasted coconut, and just enough nostalgic sunshine to make every slice feel special. It has the bright flavor of Key Lime pie, the drama of a layer cake, and the kind of party-table presence that makes guests ask for the recipe.
Serve it chilled, decorate it with lime slices and toasted coconut, and save it for birthdays, brunches, summer parties, spring celebrations, or any day that needs a little tropical dessert magic.
Save this Key Lime Layered Cake recipe for birthday cakes, citrus desserts, tropical parties, summer celebrations, brunch menus, and dessert tables that deserve a little sunshine.
This recipe was originally published September 21, 2010, and updated May 17, 2026, with improved instructions, updates, and new photos.