Layered PEEPS Rice Krispie Treats
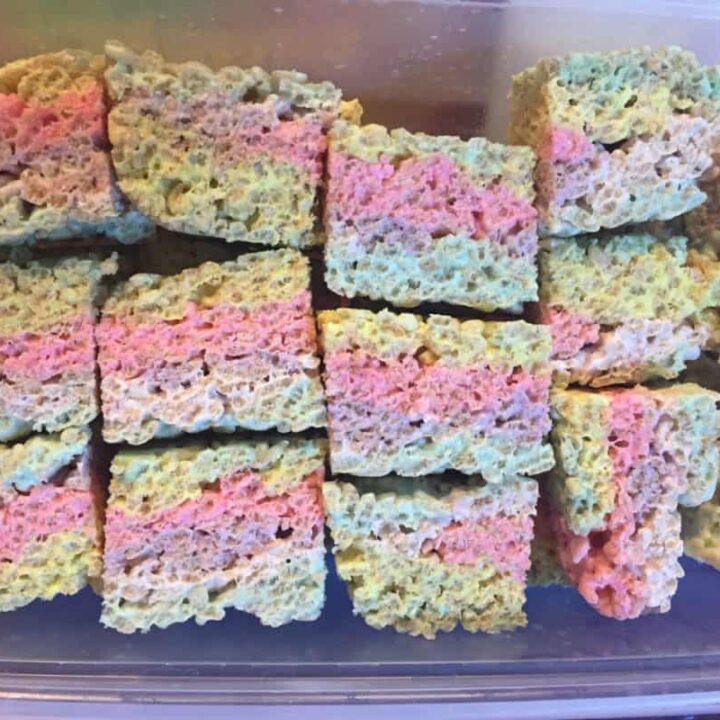
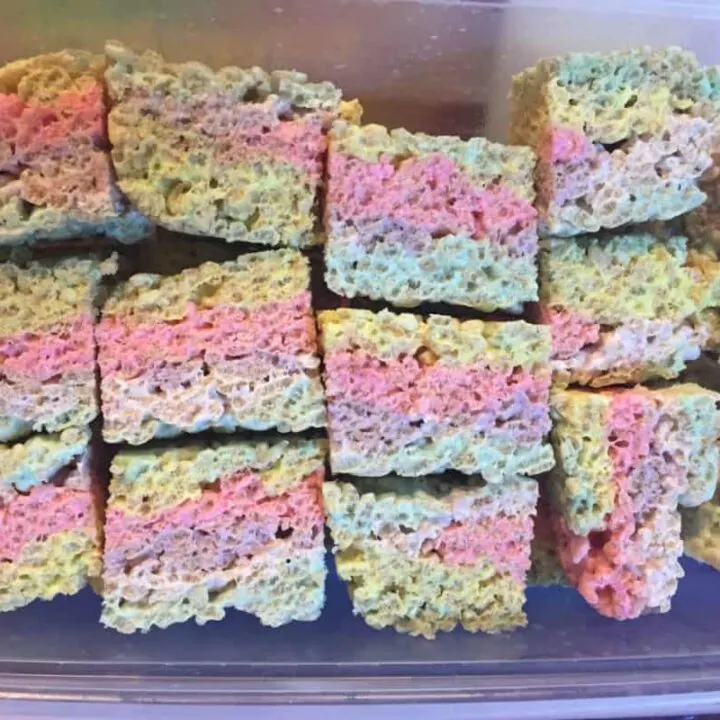
These layered PEEPS Rice Krispie treats combine colorful marshmallow PEEPS, butter, and crispy rice cereal in four soft, gooey pastel layers that are easy to make in an 8×8-inch pan.
They take about 15 minutes to prepare and make a playful no-bake Easter dessert for parties, classroom celebrations, spring gatherings, or an afternoon of cooking with the kids.


Layered PEEPS Rice Krispie Treats Recipe
These are the classic marshmallow cereal squares you remember, only each layer is made with a different color of PEEPS. One 3-ounce package of PEEPS, 1 tablespoon of butter, and 1½ cups of crispy rice cereal make each layer.
For the four-layer version shown here, you will need four 3-ounce packages of PEEPS, 4 tablespoons of butter, and 6 cups of cereal. Working with one color at a time keeps the pastel stripes distinct and gives each layer the same soft, chewy texture.
The microwave method is quickest, but you can melt the PEEPS on the stovetop over low heat if you prefer more control. The most important trick is to stop heating as soon as the marshmallows melt and press each layer gently into the pan. Overheating or firmly packing the cereal can turn otherwise gooey treats into hard little bricks.
Why You’ll Love This Recipe
- Clear quantities: Each color uses one 3-ounce package of PEEPS, 1 tablespoon of butter, and 1½ cups of cereal.
- Soft and gooey: Gentle heat and light pressing help prevent dry or hard treats.
- Quick and no-bake: The layers take about 15 minutes to prepare.
- Easy to customize: Choose three, four, or five PEEPS colors depending on the look you want.
- Made for spring celebrations: The pastel layers are perfect for Easter baskets, dessert trays, and classroom parties.
Ingredients for Layered PEEPS Rice Krispie Treats
This amount makes four layers in one 8×8-inch pan.
- 4 packages PEEPS marshmallow chicks or bunnies, 3 ounces each, in four different colors
- 4 tablespoons unsalted butter, divided
- 6 cups crispy rice cereal, divided
- 2 teaspoons vanilla extract, divided and optional
- Nonstick cooking spray or softened butter for the pan
For each individual layer: Use one 3-ounce package of PEEPS, 1 tablespoon butter, 1½ cups crispy rice cereal, and ½ teaspoon vanilla if desired.
What Size Pan Should I Use?
An 8×8-inch pan creates thick, clearly defined layers and approximately nine generous squares or 16 smaller party-size pieces. A 9×9-inch pan also works, but the layers will be slightly thinner.
A 9×13-inch pan is too large for this four-package batch unless you prefer very thin treats. For thicker treats in a 9×13-inch pan, double the recipe.
How to Make Layered PEEPS Rice Krispie Treats
- Prepare the pan. Line an 8×8-inch pan with parchment paper or foil, leaving an overhang on two sides. Lightly coat it with nonstick spray or butter.
- Choose the color order. Arrange the unopened PEEPS packages in the order you want the layers to appear. For the strongest contrast, place the darkest color on the bottom and the lightest color on top.
- Melt the first color. Place one 3-ounce package of PEEPS and 1 tablespoon butter in a large microwave-safe bowl with high sides. Microwave for 30 seconds, stir, and then heat for another 10 to 15 seconds if needed.
- Stir until smooth. Stir the melted PEEPS until no large marshmallow pieces remain. Add ½ teaspoon vanilla if using.
- Add the cereal. Fold in 1½ cups of crispy rice cereal until evenly coated.
- Make the first layer. Transfer the mixture to the prepared pan. Use a buttered spatula, a piece of parchment, or lightly greased fingertips to spread it to the edges. Press only firmly enough to create an even layer.
- Let the layer settle. Allow it to rest for 3 to 5 minutes while you prepare the next color. This brief pause helps keep the colors separated.
- Repeat with each color. Wash and thoroughly dry the bowl between colors, or use a clean bowl for each batch. Continue layering until all four colors are in the pan.
- Cool before cutting. Let the treats stand at room temperature for 30 to 45 minutes, or until firm enough to lift from the pan and slice cleanly.
How to Make PEEPS Rice Krispie Treats in the Microwave
For the microwave method, heat one color of PEEPS with 1 tablespoon of butter for 30 seconds. Stir before adding more time. Most batches need only another 10 to 15 seconds.
Avoid microwaving the mixture for a full minute without stirring. PEEPS can puff dramatically as they heat, and overheating the sugar can make the finished treats hard.
Use a large bowl even though the ingredient amount looks small. The marshmallows expand before collapsing into a smooth mixture.
How to Make Them on the Stovetop
Melt 1 tablespoon of butter in a medium saucepan over low heat. Add one 3-ounce package of PEEPS and stir gently until the marshmallows are almost completely melted.
Remove the pan from the heat before adding 1½ cups of cereal. Residual heat will finish melting any small marshmallow pieces without overcooking the mixture.
The stovetop method takes a little longer, but it gives you better control and can be helpful if your microwave heats unevenly.
Best Layering Order for Pastel PEEPS
There is no required PEEPS color order, but a little planning makes the finished squares more striking. Arrange noticeably different colors next to each other rather than stacking two similar shades together.
A pretty four-layer order is:
- Purple on the bottom
- Blue or green
- Pink
- Yellow on top
You can reverse the order or use whichever colors are available. The flavor does not change much between traditional PEEPS colors, so the order is mostly about creating clean, visible stripes.
How to Prevent Hard or Dry Rice Krispie Treats
The secret to soft PEEPS Rice Krispie treats is less about adding extra butter and more about handling the marshmallow mixture gently.
- Use low heat. High heat can cook the sugar and create hard treats.
- Stop heating as soon as the PEEPS melt. They do not need to boil or bubble.
- Measure the cereal accurately. Too much cereal makes the layers dry and crumbly.
- Press lightly. Compacting the cereal removes the airy texture that keeps the treats tender.
- Work quickly. Spread each mixture while it is still warm and flexible.
- Use fresh PEEPS. Older marshmallows do not melt as smoothly and may produce firmer treats.
Can You Use Stale PEEPS?
Fresh PEEPS make the softest, smoothest treats. Their marshmallow centers melt easily and coat the cereal evenly.
Slightly stale PEEPS can still be used, especially if they are only a little firm. Add an extra teaspoon of butter to that layer and melt them slowly on the stovetop.
Very hard, dried-out PEEPS are not ideal. They may remain lumpy after heating and can make the cereal treats tough or uneven.
How to Keep the PEEPS Colors Separate
- Use a clean bowl or saucepan for every color.
- Wash and completely dry utensils between batches.
- Let each layer rest for 3 to 5 minutes before adding the next.
- Add the next layer while it is warm, not piping hot.
- Spread from the center toward the edges instead of dragging the mixture back and forth.
- Avoid adding food coloring unless you need to intensify a very pale layer.
How to Cut Clean Layered Squares
Let the layered treats cool completely at room temperature before cutting. Lift the entire slab from the pan using the parchment or foil overhang and place it on a cutting board.
For the cleanest squares:
- Lightly grease a large sharp knife.
- Make one firm downward cut instead of sawing back and forth.
- Wipe and regrease the blade between cuts.
- Cut the slab into three rows, then turn and cut three more rows for nine large squares.
- For a party tray, cut four rows in each direction for 16 smaller pieces.
If you want especially crisp layers for photographs or a party display, trim a very thin strip from each outer edge before cutting the remaining slab into squares.


Easter Party Presentation Ideas
- Place each square in a pastel cupcake liner for easy serving.
- Stack three squares and tie them loosely with a spring-colored ribbon for a party favor.
- Cut the treats into small rectangles and tuck them into Easter baskets.
- Add a light drizzle of white chocolate and a few pastel sprinkles.
- Use small cookie cutters to make egg, flower, or bunny shapes.
- Arrange the squares by color to create a rainbow-style dessert tray.
For a taller centerpiece, stack the squares on a cake stand and place a few unopened PEEPS around the base so guests can immediately see what makes the layers colorful.
Variations and Substitutions
Three-Layer PEEPS Treats
Use three 3-ounce packages of PEEPS, 3 tablespoons of butter, and 4½ cups of cereal. The layers will be slightly thicker in an 8×8-inch pan.
Five-Layer PEEPS Treats
Use five 3-ounce packages of PEEPS, 5 tablespoons of butter, and 7½ cups of cereal. Press each layer evenly so the finished slab does not become too tall to cut comfortably.
Regular Marshmallow Version
You can substitute regular mini marshmallows, but you will lose the natural pastel colors. Divide the melted marshmallow mixture into separate bowls and tint each portion with a very small amount of gel food coloring.
Chocolate-Dipped Squares
Dip one corner of each cooled square in melted white or milk chocolate. Let the chocolate set on parchment paper before storing.
Extra-Marshmallow Treats
Fold a small handful of mini marshmallows into each cereal mixture after it has cooled for about one minute. They will soften without melting completely, creating little pockets of marshmallow.
Storage and Make-Ahead Instructions
Store layered PEEPS Rice Krispie treats in an airtight container at room temperature for up to three days. Place parchment or wax paper between stacked layers to prevent sticking.
Do not refrigerate them for routine storage. Cold air can dry the cereal and firm the marshmallow layers. Refrigeration can also create condensation when the treats return to room temperature.
For the best texture, make them one day before your party. Keep the slab whole and cut it shortly before serving so fewer edges are exposed to air.
Can You Freeze PEEPS Rice Krispie Treats?
Yes, although freshly made treats have the best texture. Wrap individual squares tightly in plastic wrap, place them in a freezer-safe container, and freeze for up to six weeks.
Thaw the wrapped treats at room temperature. Keeping them wrapped while they thaw helps prevent condensation from settling directly on the cereal.
Troubleshooting Layered PEEPS Treats
Why Are My Rice Krispie Treats Hard?
The PEEPS were probably overheated or the cereal mixture was pressed too firmly into the pan. Use short heating intervals and spread each layer with gentle pressure.
Why Are the Layers Falling Apart?
The first layer may have cooled too long before the next one was added. Let each layer rest only 3 to 5 minutes so it is set but still slightly tacky.
Why Did the Colors Blend Together?
The lower layer may still have been very warm, or the same unwashed bowl may have been used for multiple colors. Let each layer settle briefly and use a clean, dry bowl for every color.
Why Is the Mixture Difficult to Spread?
The marshmallow mixture cools quickly. Have the cereal measured and the pan prepared before melting the PEEPS, then transfer the mixture to the pan immediately.
Why Are My Treats Dry?
Too much cereal or stale PEEPS can create dry treats. Use exactly 1½ cups of cereal for each 3-ounce package of PEEPS.
Frequently Asked Questions
How many PEEPS do I need for layered Rice Krispie treats?
For four layers in an 8×8-inch pan, use four 3-ounce packages of PEEPS. Each package makes one layer when combined with 1 tablespoon of butter and 1½ cups of crispy rice cereal.
Can I make PEEPS Rice Krispie treats in the microwave?
Yes. Microwave one package of PEEPS with 1 tablespoon of butter for 30 seconds, stir, and then heat for another 10 to 15 seconds only if needed.
What size pan is best for layered PEEPS Rice Krispie treats?
An 8×8-inch pan produces thick, visible layers. A 9×9-inch pan works for slightly thinner squares, while a 9×13-inch pan requires a doubled recipe for substantial layers.
Do different PEEPS colors taste different?
Traditional pastel PEEPS colors have very similar marshmallow flavor. Specialty and seasonal varieties may have added flavors, so check the package before combining them.
How long do layered PEEPS Rice Krispie treats last?
They stay soft for about three days when stored in an airtight container at room temperature.
Can I use PEEPS bunnies instead of chicks?
Yes. Use the package weight rather than the number of pieces. One 3-ounce package makes one layer regardless of whether the PEEPS are shaped like chicks or bunnies.
Can I prepare these for an Easter party ahead of time?
Yes. Prepare the layered slab one day ahead, store it tightly covered at room temperature, and cut it into squares shortly before serving.
Final Thoughts
These layered PEEPS Rice Krispie treats are the sort of recipe that begins with a few bright packages of marshmallow chicks and turns into a full kitchen memory. There is melting, stirring, color planning, and almost certainly a little taste-testing along the way.
The finished treats are soft, chewy, and unmistakably festive, with pastel stripes that make a simple cereal square feel worthy of the Easter dessert table. Keep the heat low, press the layers lightly, and do not worry if every stripe is not perfectly straight. Homemade is allowed to look homemade.
Now the only important decision is whether purple, pink, blue, or yellow gets the top spot.
Layered PEEPS Rice Krispie Treats
These layered PEEPS Rice Krispie treats combine colorful marshmallow PEEPS, butter, and crispy rice cereal in four soft, gooey pastel layers. Made in an 8x8-inch pan, this easy no-bake Easter dessert includes both microwave and stovetop directions, plus tips for keeping the colors separate and cutting clean squares.
Ingredients
- 4 packages PEEPS marshmallow chicks or bunnies, 3 ounces each, in four different colors
- 4 tablespoons unsalted butter, divided
- 6 cups crispy rice cereal, divided
- 2 teaspoons vanilla extract, divided, optional
- Nonstick cooking spray or softened butter for greasing the pan
Instructions
Prepare the pan. Line an 8x8-inch pan with parchment paper or foil, leaving enough overhang to lift the treats from the pan. Lightly grease the lining with nonstick cooking spray or softened butter.
Plan the layers. Arrange the four packages of PEEPS in the order you want the colors to appear. For strong color contrast, place the darkest color on the bottom and the lightest color on top.
Melt the first color. Place one 3-ounce package of PEEPS and 1 tablespoon butter in a large microwave-safe bowl. Microwave for 30 seconds, then stir. Heat for another 10 to 15 seconds only if needed.
Finish the marshmallow mixture. Stir until the PEEPS are smooth. Add ½ teaspoon vanilla extract if using.
Add the cereal. Fold 1½ cups crispy rice cereal into the melted PEEPS until the cereal is evenly coated.
Form the first layer. Transfer the mixture to the prepared pan. Use a buttered spatula, lightly greased fingertips, or a piece of parchment paper to spread it evenly. Press only firmly enough to create a level layer.
Let the layer settle. Allow the first layer to rest for 3 to 5 minutes while preparing the next color. Do not refrigerate it or allow it to become completely cold.
Repeat the process. Wash and thoroughly dry the bowl or use a clean bowl for each color. Repeat the melting, mixing, and layering process with the remaining PEEPS, butter, cereal, and optional vanilla.
Cool the treats. Let the completed layered treats stand at room temperature for approximately 30 minutes, or until firm enough to lift and cut.
Cut into squares. Lift the slab from the pan using the parchment or foil overhang. Place it on a cutting board and cut it into 9 large squares or 16 smaller party-size squares with a lightly greased sharp knife.
Notes
Notes:
Each individual layer uses one 3-ounce package of PEEPS, 1 tablespoon unsalted butter, 1½ cups crispy rice cereal, and ½ teaspoon vanilla extract if desired.
Fresh PEEPS produce the softest treats. Slightly stale PEEPS may be used, but very hard or dried-out marshmallows may not melt smoothly.
Stovetop Instructions:
To make each layer on the stovetop, melt 1 tablespoon butter in a medium saucepan over low heat. Add one 3-ounce package of PEEPS and stir gently until the marshmallows are almost completely melted. Remove the pan from the heat and stir until smooth before folding in 1½ cups crispy rice cereal.
Repeat with the remaining colors, washing and drying the saucepan between batches so the pastel layers remain distinct.
Helpful Notes:
Use an 8x8-inch pan. This pan size creates thick, clearly visible pastel layers. A 9x9-inch pan may be used for slightly thinner treats.
Do not overheat the PEEPS. Excessive heat cooks the sugar and can make the finished treats hard.
Press gently. Firmly packing the cereal mixture removes the airy texture and creates dense treats.
Keep colors separate. Use clean, dry bowls and utensils for each PEEPS color.
Let each layer rest briefly. A 3- to 5-minute rest helps prevent the colors from blending while allowing the layers to stick together.
Cut clean squares. Allow the treats to cool completely. Lightly grease a sharp knife and wipe the blade between cuts.
Storage. Store the treats in an airtight container at room temperature for up to 3 days. Place parchment paper between stacked squares.
Avoid refrigeration. Refrigerating Rice Krispie treats can dry the cereal and harden the marshmallow layers.
Substitutions:
Regular mini marshmallows may be substituted for PEEPS, but the treats will not have naturally colored layers. Divide the melted marshmallow mixture into separate portions and tint each one with a small amount of gel food coloring.
PEEPS chicks and PEEPS bunnies both work. Use the 3-ounce package weight rather than counting individual marshmallows.
Make Ahead Instructions:
These layered PEEPS Rice Krispie treats may be prepared one day before serving. For the softest results, store the cooled slab whole in an airtight container at room temperature and cut it into squares shortly before serving.
Storage Instructions:
Store the treats in an airtight container at room temperature for up to 3 days. Place parchment or wax paper between layers to prevent sticking.
To freeze, wrap individual squares tightly and place them in a freezer-safe container for up to 6 weeks. Thaw the treats while they are still wrapped at room temperature.
Serving Suggestions:
Serve these pastel treats on an Easter dessert tray with chocolate eggs, fresh strawberries, or colorful candy. Place individual squares in pastel cupcake liners for classroom parties, spring gatherings, or Easter baskets.
For more playful desserts, serve them with classic Oreo Dirt Cups. You can also add peanut butter chocolate brittle to a spring dessert platter.
Related Recipes:
Keep the marshmallow fun going with the easiest marshmallow frosting. It is a fluffy topping for cupcakes, cakes, and spring desserts.
Add Homemade Whipped Cream to pies, pudding, and other party desserts, or browse more easy dessert recipes.
Use an 8x8-inch pan for thick, clearly visible pastel layers. A 9x9-inch pan may be used for slightly thinner treats.
Do not overheat the PEEPS. Excessive heat cooks the sugar and can make the finished treats hard.
Press each layer gently. Firmly packing the cereal mixture removes the airy texture and creates dense treats.
Use clean, dry bowls and utensils for each PEEPS color so the pastel layers remain distinct.
Store the treats in an airtight container at room temperature for up to 3 days. Place parchment paper between stacked squares.
For another playful no-bake dessert, try these classic Oreo Dirt Cups. For a fluffy cake or cupcake topping, make the easiest marshmallow frosting.
These layered PEEPS Rice Krispie treats combine colorful marshmallow PEEPS, butter, and crispy rice cereal in four soft, gooey pastel layers. Made in an 8x8-inch pan, this easy no-bake Easter dessert includes microwave and stovetop directions, plus tips for keeping the colors separate and cutting clean squares. Serve them alongside classic Oreo Dirt Cups for a playful spring dessert table.
Nutrition Information:
Yield: 12 Serving Size: 1 squareAmount Per Serving: Calories: 523Total Fat: 6gSaturated Fat: 3gUnsaturated Fat: 3gCholesterol: 10mgSodium: 656mgCarbohydrates: 108gFiber: 1gSugar: 13gProtein: 9g
The Nutritional Information may not be accurate. This website provides approximate nutrition information for convenience and as a courtesy only. Nutrition data is gathered primarily from the USDA Food Composition Database, whenever available, or otherwise other online calculators.
This recipe was originally published March 19, 2015, and updated with clearer PEEPS quantities, layering instructions, troubleshooting tips, storage guidance, and Easter party ideas.