Learn how to make Hershey Kisses Roses with our simple, step-by-step tutorial. Perfect for Valentine’s Day, bridal showers, or any special occasion, these delightful chocolate roses are both easy and economical to create. Impress your loved ones with this unique, homemade gift that’s sure to sweeten their day!
How to Make Hershey Kisses Roses: A Sweet DIY Gift
Learn how to create a Hershey Kiss Rose with these easy-to-follow, step-by-step instructions. These cellophane Hershey Kiss flowers make a unique gift for Valentine’s Day, bridal showers, birthdays, or just because. Let’s get started!
Gift alone, or add a fun Ghiradelli Advent to the gift for the ultimate chocolate gift. Check out our tutorial on how to make a Surprise Crystal Rose Bouquet with a Gem Garden Box to identify the crystals.


Hershey Kisses Roses: An Economical Delight
Hershey Kisses Roses are both economical and charming. Combining the sweetness of chocolate with the beauty of roses, these delightful creations cost about 50 cents each and take very little time to make. Compare that to the average price for a dozen florist-arranged, long-stemmed roses in the United States, which was over $73 on Valentine’s Day in 2011 according to the Society of American Florists. Even during other times of the year, the price is just over $59. Our tutorial will show you how to create these lovely treats for a fraction of the cost!


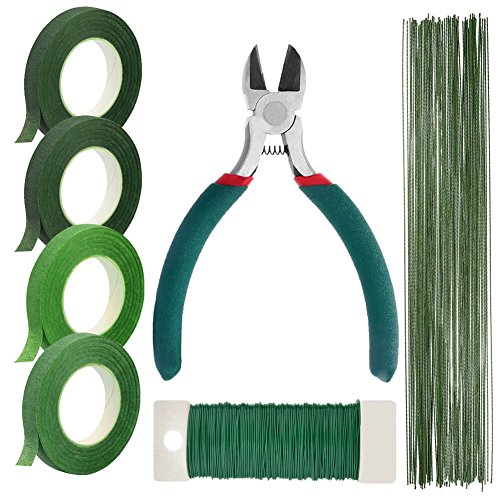
Supplies You’ll Need
Each Hershey Kiss Rose takes about 10 minutes to make, with a prep time of around 5 minutes.
To make your Hershey Kiss Roses, gather the following items:
- HERSHEY’S KISSES Brand Chocolates or HUGS Chocolates (red foils work best)
- Florist tape
- Artificial leaves (optional—we used green ribbon)
- Florist wire (20 gauge works best)
- Clear cellophane, plastic wrap, or red glitter tulle


How to Make a Hershey Kiss Rose Step-by-Step Video:
Step-by-Step Instructions
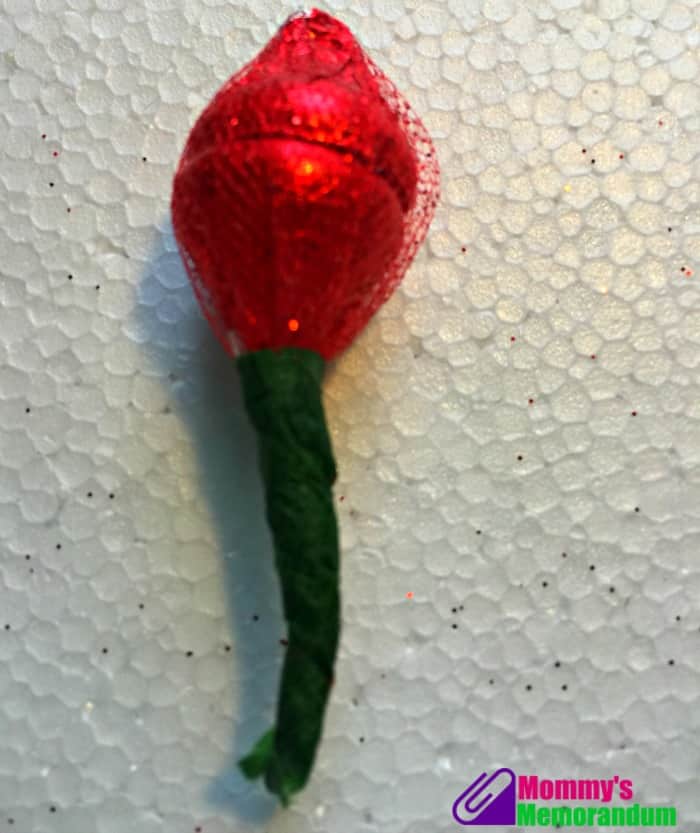
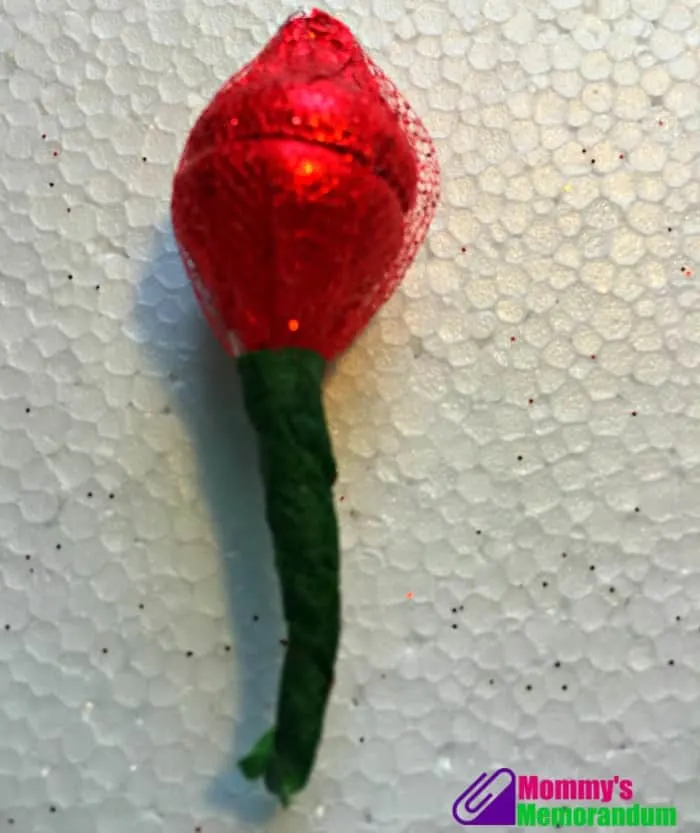
1. Create the Rosebud
Pair two Hershey Kisses flat sides together. Use glue dots if desired.


Wrap the two Hershey Kisses in tulle or cellophane. You’ll need about a 4″ square.


Secure the tulle over the Hershey Kisses using the florist tape to form a rosebud.
Place the florist wire against the florist tape that secures the tulle.


2. Assemble the Stem
Place the florist wire against the florist tape securing the tulle.
Wrap the florist tape around the base of the rosebud, continuing down the entire length of the wire.


Add artificial leaves or ribbon if desired. Secure them to the wire with florist tape as you continue wrapping.


3. Finish the Rose
Continue wrapping the floral tape down the wire until the stem reaches the desired length.


Trim the wire using wire cutters.
You now have a beautiful Hershey Kisses Rose! Repeat these steps to create a bouquet, and arrange your Hershey Kisses Roses in a box or vase.


A Winter Wonderland Anecdote
I once made 200 of these Hershey Kisses Roses for my niece’s Quinceanera. Her theme was Winter Wonderland, so I used silver Hershey Kisses with blue cellophane, white silk leaves, and white floral tape. The result was stunning and added a magical touch to her special day.


Gift Ideas and Personal Touches
These Hershey Kisses Roses can be gifted alone or paired with a fun addition like a Ghiradelli Advent calendar for the ultimate chocolate gift. Check out our tutorial on how to make a Surprise Crystal Rose Bouquet with a Gem Garden Box to add an extra special touch.


Get Started Today!
Ready to become your own Hershey Florist? Gather your supplies and start crafting these delightful Hershey Kisses Roses today. Not only are they a thoughtful and sweet gift, but they also show the love and effort you put into creating something special.
Want More Crafting Ideas?
If you enjoyed this tutorial, be sure to check out our other DIY projects. Don’t forget to share your creations with us—we’d love to see your Hershey Kisses Roses and hear about the joy they bring to your loved ones.


How to Make A Hershey Kisses Rose
Learn how to make a Hershey Kiss Rose with this easy tutorial. Cellophane roses are impressive or a bouquet of Hershey Kiss Roses.
Materials
- To make your Hershey Kiss Roses, gather the following items:
- HERSHEY'S KISSES Brand Chocolates or HUGS Chocolates (red foils work best)
- Florist tape
- Artificial leaves (optional—we used green ribbon)
- Florist wire (20 gauge works best)
- Clear cellophane, plastic wrap, or red glitter tulle
Tools
- wire cutters are optional
Instructions
Step-by-Step Instructions
1. Create the Rosebud
- Pair two Hershey Kisses flat sides together. Use glue dots if desired.
- Wrap the two Hershey Kisses in tulle or cellophane. You'll need about a 4" square.
- Secure the tulle over the Hershey Kisses using the florist tape to form a rosebud.
2. Assemble the Stem
- Place the florist wire against the florist tape securing the tulle.
- Wrap the florist tape around the base of the rosebud, continuing down the entire length of the wire.
- Add artificial leaves or ribbon if desired. Secure them to the wire with florist tape as you continue wrapping.
3. Finish the Rose
- Continue wrapping the floral tape down the wire until the stem reaches the desired length.
- Trim the wire using wire cutters.
Recommended Products
-
 CDOKY 50 Pcs 13'' Rose Stems with Leaves, Fake Flower Stems, Faux Green Leaves Stems, Floral Arrangement Supplies, DIY Artificial Flowers Tools for Bouquet Wedding Party
 -
 AnapoliZ Cellophane Wrap Roll Red | 100’ Ft. Long X 16” in. Wide | 2.3 Mil Thick Transparent Red | Gifts, Baskets, Treats, Cellophane Wrapping Paper | Colorful Cello Christmas, Holiday Color
 -
 Paxcoo Floral Tape and Floral Wire Arrangement Tools Kit with Wire Cutter 26 Gauge Stem Wire and 22 Gauge Paddle Wire for Bouquet Stem Wrap Florist
 -
 HERSHEY'S KISSES Milk Valentines Day Chocolate Individually Wrapped In Valentine colored Foils - 2 Pound