How to Make Paper Wolverine Claws: Easy Origami Tutorial
Want to know how to make paper Wolverine claws that actually slip over your fingers? This easy origami Wolverine claws tutorial turns one simple sheet of paper into a homemade superhero claw that kids, teens, and comic book fans can fold for costumes, parties, rainy-day crafts, and pretend play.
If you have paper and a few minutes, you can make your own DIY Wolverine claws with no glue, no tape, and no complicated supplies. Make one claw to learn the fold, then repeat the steps to create a full set of paper Wolverine claws for one hand.
This is one of those crafts that feels like pure kid magic. One minute you have a flat sheet of paper. A few folds later, you have a sharp-looking origami claw that slides onto your finger and makes you feel like you just joined the X-Men. SNIKT! Well, paper-snikt, but still.


Why You’ll Love This Paper Wolverine Claws Craft
These origami Wolverine claws are easy, budget-friendly, and wildly fun for kids who love superheroes, paper crafts, costumes, and hands-on activities. They are also a great screen-free project because the entire craft starts with one simple sheet of paper.
- Uses basic supplies: You only need paper and optional help from a ruler or pen for crisp folds.
- No glue or tape required: The claw holds together with folds and a tucked flap.
- Great for pretend play: Kids can make one claw or fold a full set for superhero dress-up.
- Fun for parties: Use this as a superhero birthday party activity or comic book craft station.
- Easy to customize: Try white paper, yellow paper, silver paper, or recycled paper for different looks.
- Works as a costume accessory: Paper claws can be a quick homemade costume piece for Halloween or dress-up day.
Supplies You’ll Need to Make Paper Wolverine Claws
You do not need fancy origami paper for this project. A regular sheet of printer paper works beautifully.
- One sheet of paper, 8.5 x 11 inches — Printer paper is perfect for practicing.
- Ruler or pen, optional — Use this to press folds and make sharper creases.
- Colored paper, optional — Yellow, silver, or gray paper gives the claws a more dramatic superhero look.
Parent tip: Regular printer paper is easiest for beginners. Cardstock may look sturdier, but it can be harder for kids to fold and tuck neatly.
How Many Paper Claws Do You Need?
For the classic Wolverine look, make three paper claws for one hand. If your child wants the full superhero effect, make six claws total: three for each hand.
If this is your first time making origami Wolverine claws, start with just one. Once you understand the folds, the next claws go much faster.
Watch the How to Make Wolverine Claws Video
Before you start folding, watch the video tutorial to see how the paper claw comes together. The photos below also walk you through each step.
How to Make Paper Wolverine Claws Step by Step
Follow these step-by-step directions to make one origami Wolverine claw. Repeat the process to make a full set.
Step 1: Start With One Sheet of Paper
Lay one sheet of paper flat on your table. Smooth out any wrinkles so your folds line up neatly.
Step 2: Fold the Bottom Corner Up
Take the bottom corner of the paper and fold it up at an angle to begin creating a square shape. Line up the edges carefully and press the fold flat.
This first crease gives your paper claw its starting shape, so take your time and make the fold as neat as possible.

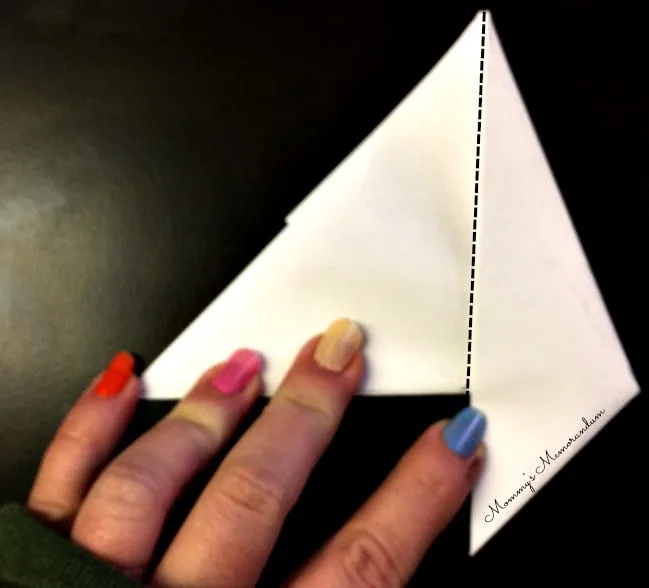
Step 3: Fold the Top Corner Across
Fold the top far-right corner over so it meets the top far-left corner. Your paper should start forming a clean angled shape.
Press the crease firmly with your fingers. If you want extra crisp folds, gently run a ruler or pen along the fold.
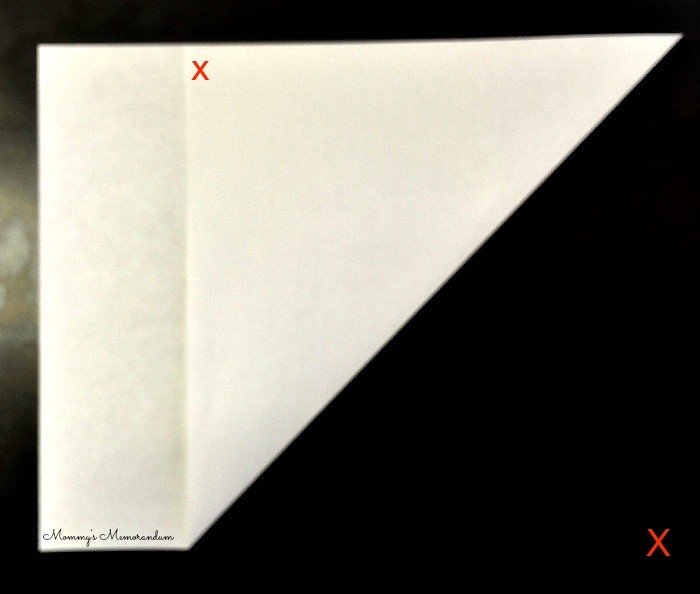
Step 4: Fold the Bottom Edge to Form a Triangle
Fold the bottom section up at an angle so your paper begins to form a triangle. Keep the edges lined up as closely as you can.
Do not worry if your first claw is not perfect. Origami gets easier with practice, and paper claws are very forgiving.
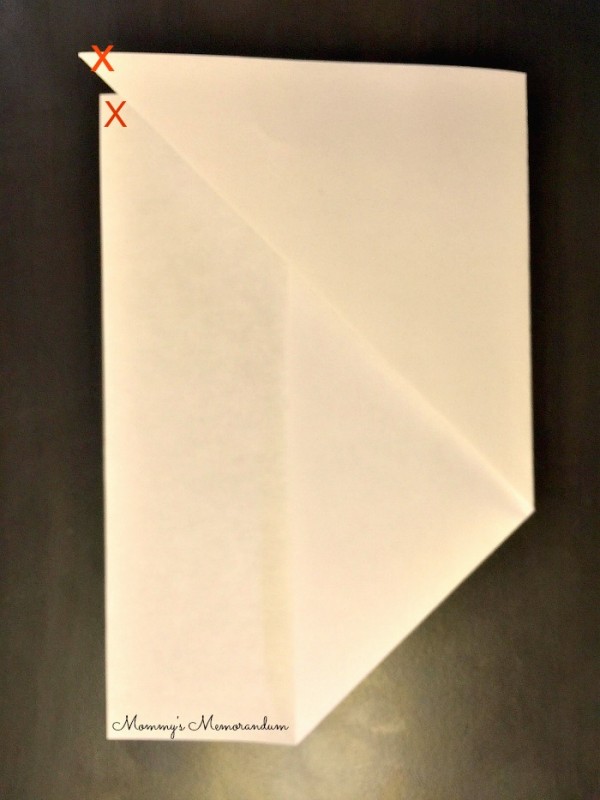
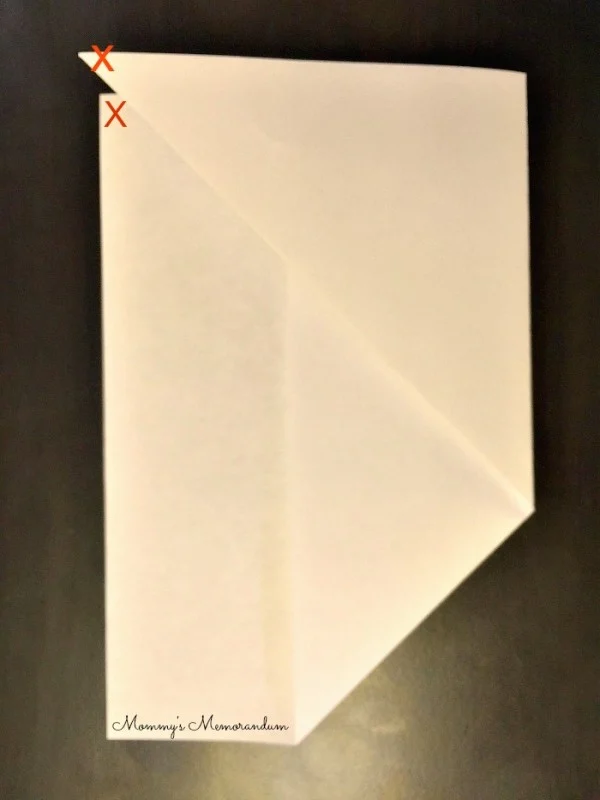
Step 5: Fold the Bottom Left Corner to the Top Right Corner
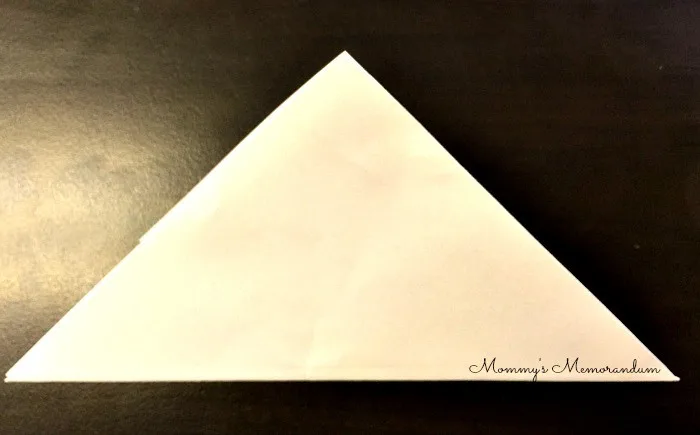
Bring the bottom left corner up to meet the top right corner. This creates a smaller triangle and helps build the long, pointed shape of the claw.
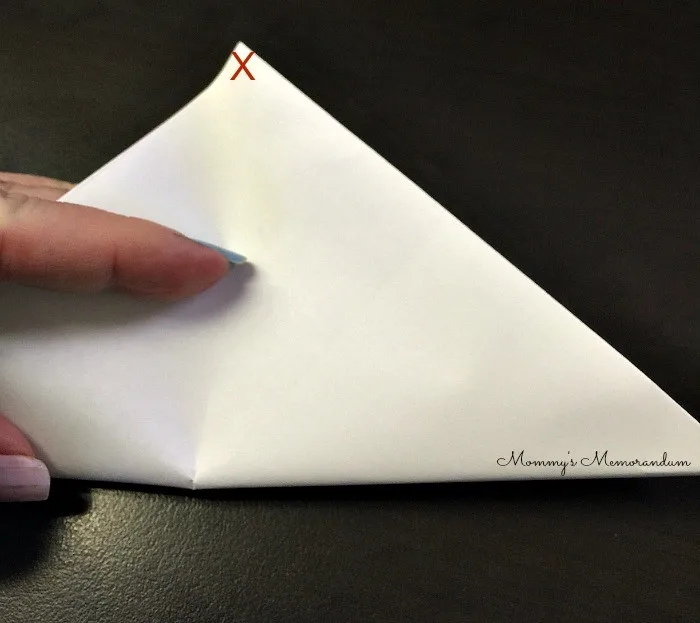
After this fold, your paper should look like a neat triangle.

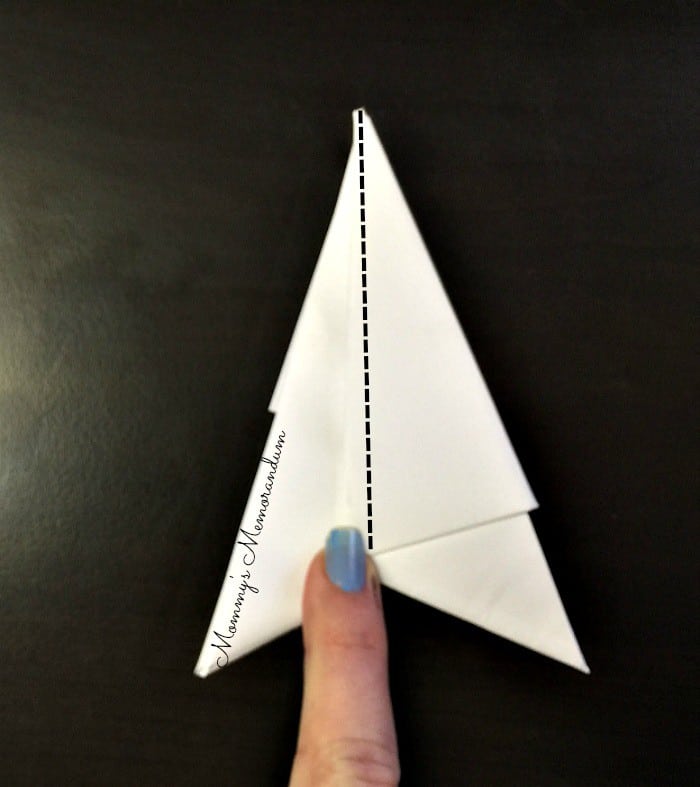
Step 6: Fold One Side Over About One-Third of the Way
Take the right diagonal edge and fold it over about one-third of the way. This is where your origami Wolverine claw really starts to take shape.
Use a ruler, pen, or your fingernail to press the crease sharply. Crisp folds help the finished claw hold its shape better.
The fold should create a long, narrow shape.

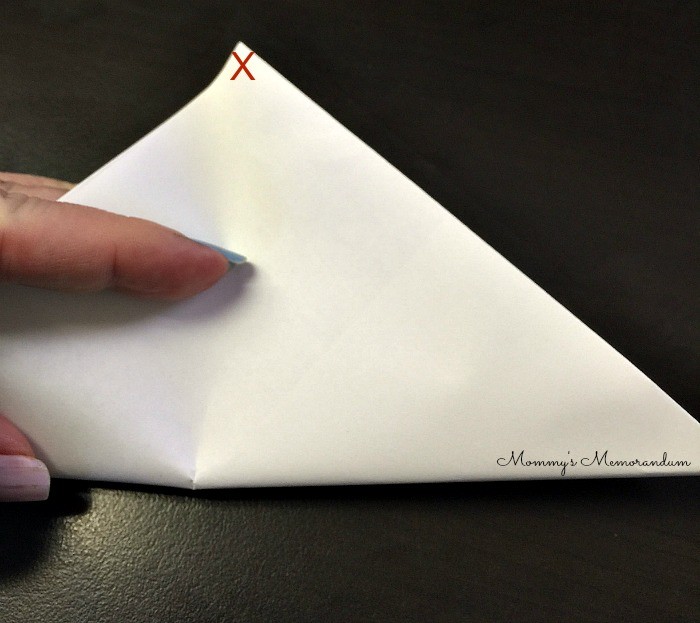
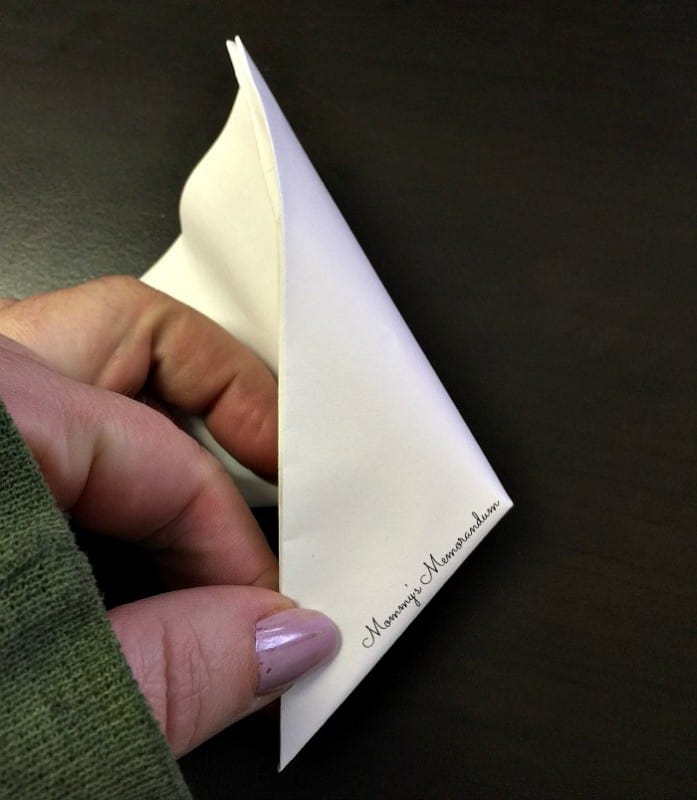
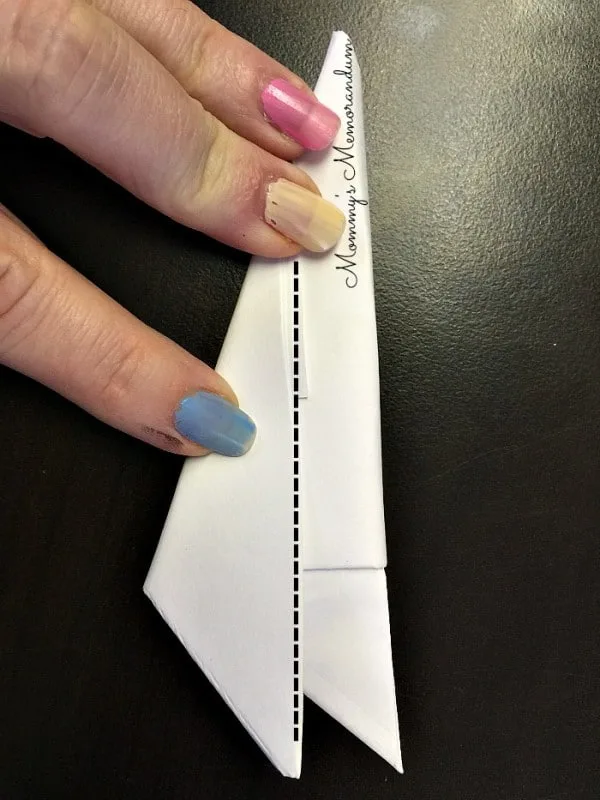
Step 7: Fold the Far Right Edge Over Again
Fold the far right edge over again, keeping the edges aligned. This makes the paper claw longer, narrower, and easier to wear.


When folded, your paper should look similar to the photo below.

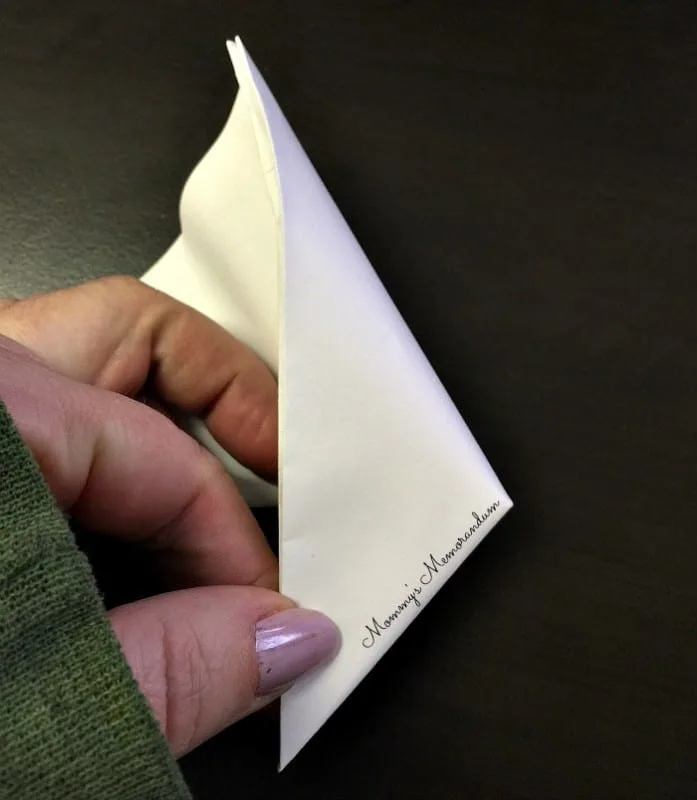
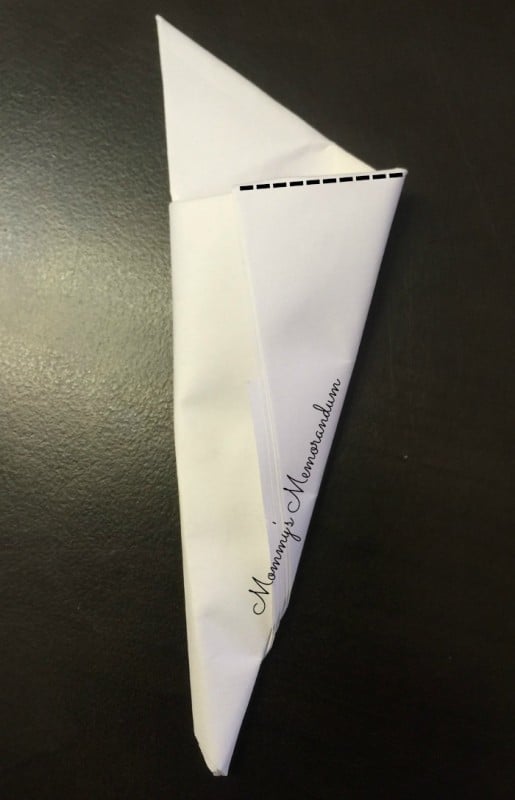
Step 8: Fold One More Time
Fold the paper over one more time to refine the shape. You should now see the claw form clearly.

Your folded paper should look similar to this:

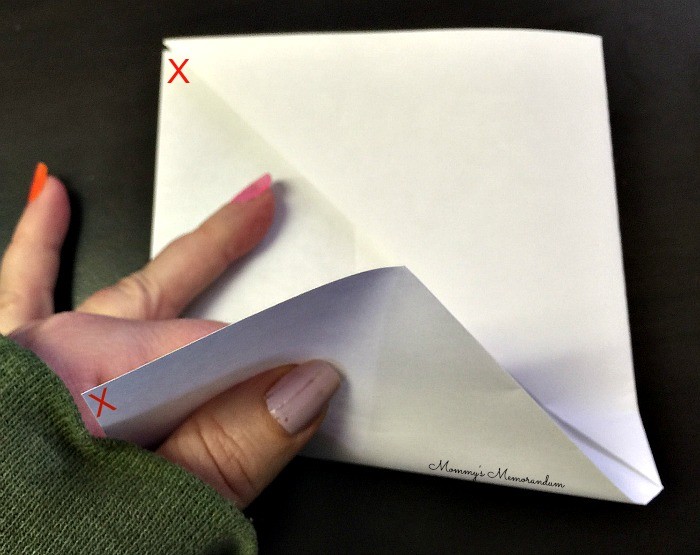
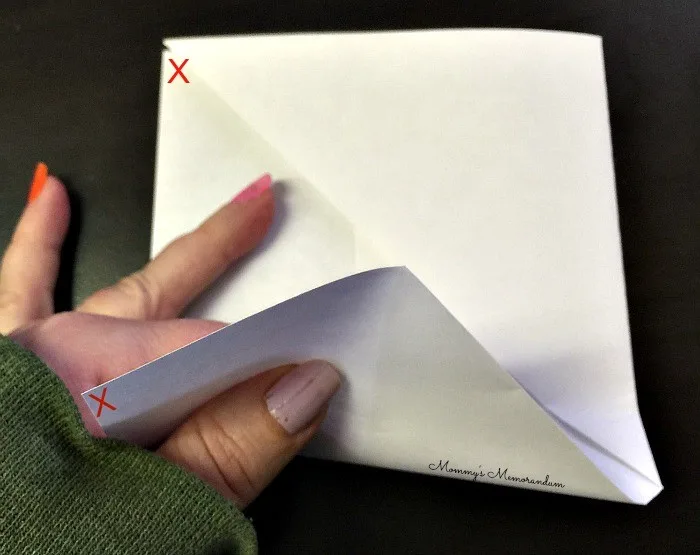
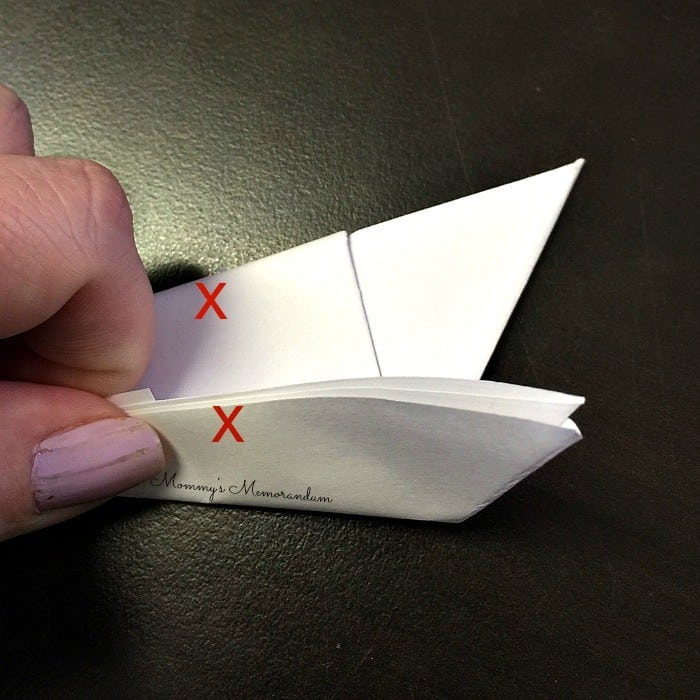
Step 9: Tuck the Tab Into the Fold
Take the small tab sticking up from the last fold and tuck it into the fold running across the claw. This helps lock the origami claw in place without glue or tape.

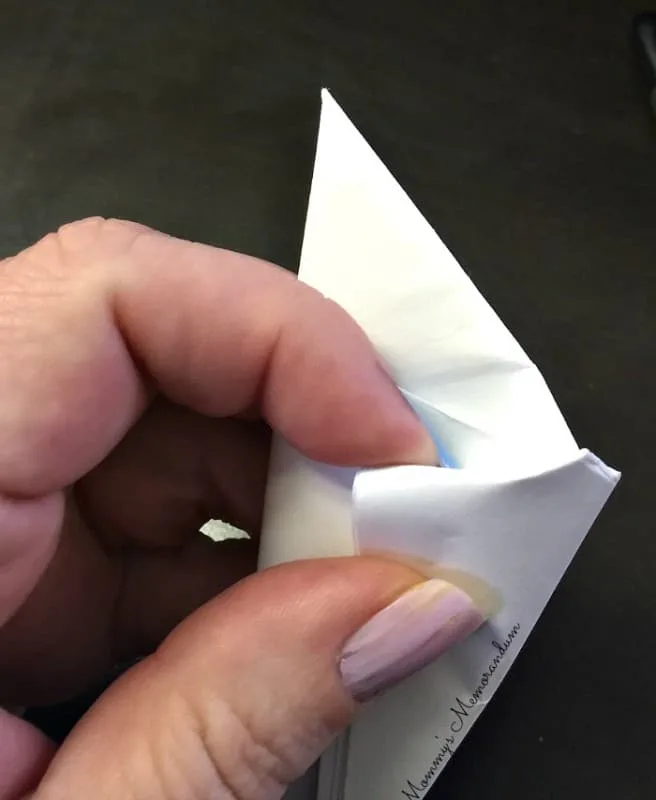
Once tucked, the claw should hold its shape.

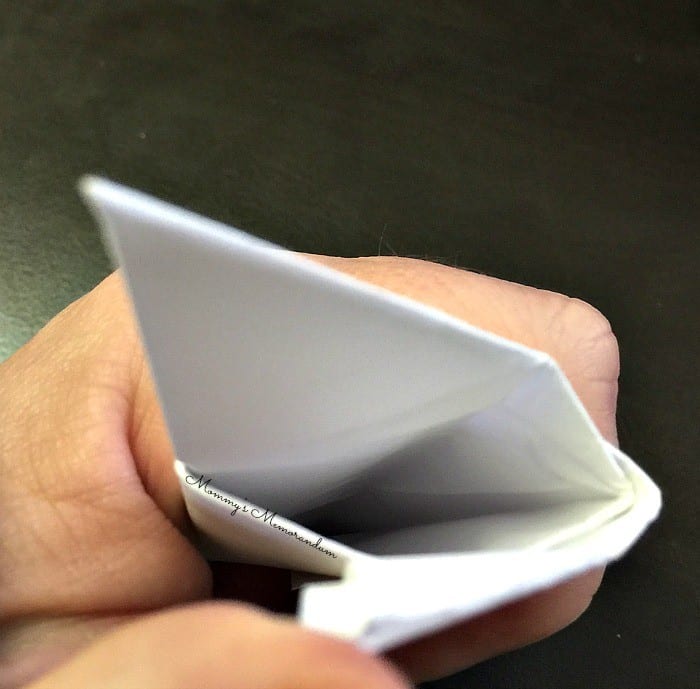
Step 10: Shape the Finger Pocket
Gently squeeze the tube shape to open the small pocket at the end of the claw. This is where your finger will slide in.
Be gentle so you do not crush the claw. You want it open enough to wear, but still narrow enough to keep that Wolverine-inspired shape.

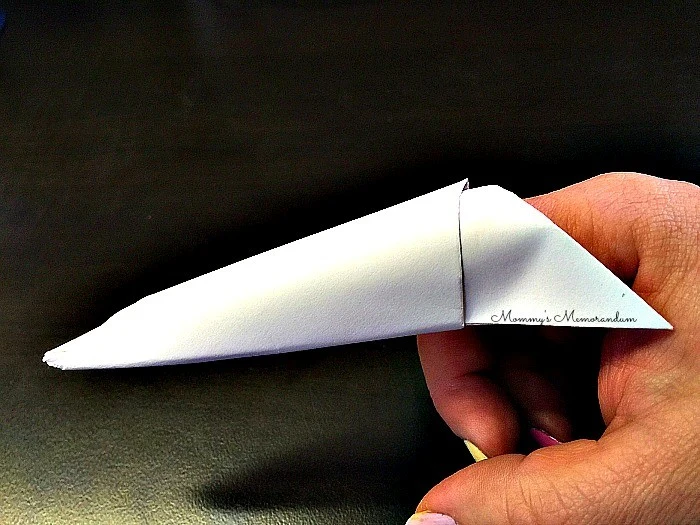
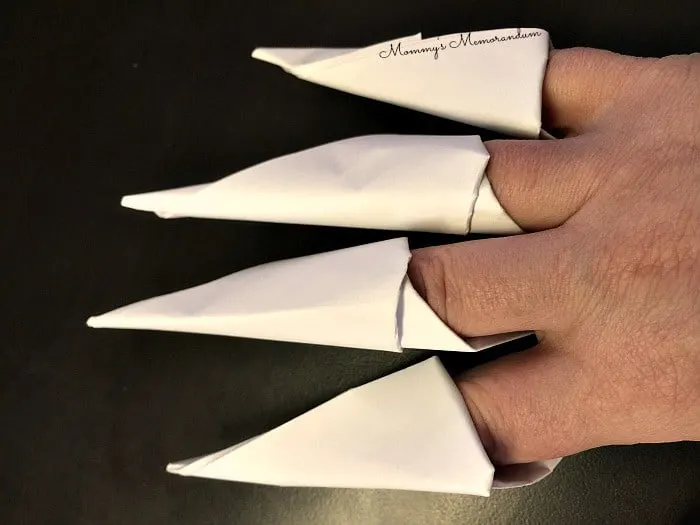
How to Wear Your Paper Wolverine Claws
Slide your finger gently into the pocket at the base of the paper claw. The claw should sit over your finger like a paper sleeve.
For a full Wolverine-inspired set, make three claws for one hand. You can also make six if you want claws for both hands.


Wolverine Claws, originally uploaded by jonbonjovious.
Tips for Making Better Origami Wolverine Claws
If your first paper claw looks a little wonky, welcome to the club. Origami is very much a “try it once, then immediately get better” kind of craft. These tips help make the claws cleaner and easier to wear.
- Use thinner paper first. Printer paper is easier to fold than cardstock.
- Press every crease firmly. Sharp creases make the claw hold its shape.
- Make one practice claw. The first one teaches your fingers what to do.
- Keep the folds aligned. Crooked folds can make the claw twist.
- Do not force the finger pocket. Open it gently so the paper does not tear.
- Use colored paper for costume claws. Yellow, silver, or gray paper makes the finished claws stand out.
Fun Ways to Use Paper Wolverine Claws
These homemade Wolverine claws are more than a one-and-done paper craft. Once kids learn the fold, they can make them for all kinds of superhero-inspired fun.
- Superhero birthday party craft station
- Rainy-day paper craft
- Comic book movie night activity
- Halloween costume accessory
- Dress-up bin addition
- DIY superhero photo booth prop
- Classroom paper-folding activity
- Screen-free afternoon craft
Safety Notes for Paper Wolverine Claws
These paper claws are meant for pretend play, costumes, crafts, and photos. They should not be used for rough play, poking, running, or swinging near faces.
- Use soft paper instead of stiff cardstock for younger kids.
- Round the tip slightly if making these for small children.
- Supervise kids during pretend play.
- Remind children not to poke people, pets, furniture, or screens.
- Remove paper claws before running, climbing, or eating.
Mom note: They are paper. They are fun. They are also still pointy enough to make siblings dramatic. Set the rules before the superhero battle begins.
Best Paper to Use for Homemade Wolverine Claws
The best paper depends on who is making the claws and how they plan to use them.
- Printer paper: Best for beginners, kids, and practice claws.
- Colored copy paper: Best for brighter superhero claws.
- Construction paper: Works, but the claws may feel softer and less crisp.
- Origami paper: Pretty and easy to fold, but usually smaller than printer paper.
- Cardstock: Sturdier, but harder to fold and tuck.
If you are making these with a group of kids, regular copy paper is the easiest and most affordable option.
Troubleshooting: Why Won’t My Paper Claw Stay Together?
If your origami Wolverine claw keeps opening, the tuck may not be secure or one of the folds may be too loose.
The claw keeps unfolding
Press each crease again and make sure the final tab is tucked firmly into the fold.
The claw is too loose on my finger
Gently squeeze the pocket to make it smaller. You can also try using a slightly smaller sheet of paper for smaller hands.
The claw is too tight
Open the finger pocket slowly with your finger or the end of a marker. Do not pull too hard or the paper may tear.
The claw looks crooked
Check that your first few folds are lined up neatly. The early folds affect the final shape.
The paper ripped
Use a fresh sheet of paper and avoid overworking the same crease. Printer paper is usually easier than thick paper for this project.
Make It a Superhero Craft Day
Once kids figure out how to make paper Wolverine claws, they will probably want to make a whole set. You can turn this into a bigger superhero craft afternoon with coloring pages, homemade masks, comic book reading time, or a movie night snack board.
If you love easy printable and paper activities, visit my Free Printables for Kids collection for more coloring pages, activity sheets, masks, and screen-free ideas.
How to Make Wolverine Claws FAQs
How do you make Wolverine claws with paper?
You can make paper Wolverine claws by folding one sheet of paper into a narrow triangle shape, wrapping the folds around, tucking the final flap, and opening a small pocket for your finger. This origami-style tutorial shows each step with photos.
Can kids make these paper Wolverine claws?
Yes, older kids can usually make these paper claws with practice. Younger children may need help with the folds and the final tuck. Adult supervision is recommended, especially during pretend play.
Do I need origami paper?
No. A regular 8.5 x 11-inch sheet of printer paper works well. Origami paper can be used, but it may create smaller claws.
How many paper claws should I make?
Make three paper claws for one hand if you want a Wolverine-inspired look. Make six claws if you want claws for both hands.
Can I use cardstock to make Wolverine claws?
You can use cardstock, but it is harder to fold and tuck. Printer paper is better for beginners because it bends more easily and creates cleaner folds.
Are paper Wolverine claws safe?
Paper Wolverine claws are best for crafts, costumes, photos, and gentle pretend play. Kids should not run, poke, swing, or roughhouse while wearing them.
Can I make these claws without tape or glue?
Yes. This origami Wolverine claw design uses folds and a tucked flap, so you do not need tape or glue.
What can I use paper Wolverine claws for?
Use them for superhero parties, Halloween costumes, comic book crafts, rainy-day activities, pretend play, or a fun paper-folding challenge.
Final Thoughts: One Sheet of Paper, Instant Superhero Energy
Learning how to make paper Wolverine claws is one of those wonderfully simple crafts that delivers big kid excitement with almost no supplies. A single sheet of paper becomes a wearable claw, and suddenly everyone at the table is folding, laughing, comparing claws, and planning their superhero poses.
Whether you are making these for a rainy afternoon, a superhero birthday party, a DIY costume, or just because someone asked, “How do you make Wolverine claws?” this easy origami tutorial is a fun one to keep handy.
Save this tutorial for the next time you need an easy paper craft, superhero activity, or homemade Wolverine claws made with nothing more than paper and a little folding magic.
More Kids Crafts & Activities to Keep Little Hands Busy
Looking for more easy ways to keep kids creating, learning, and playing without another screen? Explore more Kids Crafts & Activities for rainy days, classrooms, parties, holidays, movie nights, and screen-free family fun.
- How to Make Paper Wolverine Claws — An easy origami superhero craft that turns one sheet of paper into wearable claws for pretend play, costumes, parties, and rainy-day fun.
- DIY Tangrams for Kids — A printable puzzle craft that builds geometry skills, spatial reasoning, problem-solving, and screen-free learning.
- How to Make Moon Sand with 2 Ingredients — A simple sensory play activity kids can squish, mold, shape, and explore with basic household ingredients.
- How to Make DIY Bouncy Balls That Really Bounce — A hands-on STEM activity that lets kids mix, test, and bounce their own homemade bouncy balls.
- Woven Heart Basket Template + Instructions — A classic paper weaving craft for Valentine’s Day, classroom activities, handmade gifts, and treat baskets.
- Easy Toilet Paper Roll Mummy Craft for Kids — A budget-friendly Halloween craft using cardboard tubes, gauze or crepe paper, googly eyes, and spooky-season fun.
- DIY Rescue Knights Shield and Armor Craft — A pretend-play craft for kids who love knights, rescue missions, shields, armor, and character-inspired adventures.
- Free Printables for Kids — Find printable activity sheets, coloring pages, masks, Valentine cards, movie night printables, and classroom-friendly screen-free fun.
Save this collection: These easy kids crafts and activities are perfect for rainy days, birthday parties, classroom centers, holiday fun, family movie nights, homeschool lessons, and those “I’m bored” afternoons that arrive with absolutely no warning.

How to Make Wolverine Claws-Easy Origami
Learn how to make paper Wolverine claws with this easy origami tutorial. This fun superhero paper craft uses one sheet of paper, simple folds, and no glue or tape.
Materials
- 1 sheet of 8.5 x 11-inch paper
Tools
- Ruler or pen, optional for pressing folds
Instructions
- Lay one sheet of paper flat on your table.
- Fold the bottom corner up at an angle to begin creating a square shape.
- Fold the top far-right corner over to meet the top far-left corner.
- Fold the bottom section up at an angle to form a triangle.
- Fold the bottom left corner up to meet the top right corner.
- Fold the right diagonal edge over about one-third of the way.
- Fold the far right edge over again, keeping the edges aligned.
- Fold the paper over one more time to refine the claw shape.
- Tuck the small tab into the fold running across the claw.
- Gently open the pocket at the base of the claw and slide it onto your finger.
- Repeat the steps to make three claws for one hand or six claws for both hands.
Notes
Notes:
Printer paper is easiest for beginners. Cardstock can be used, but it is harder to fold and tuck. These paper Wolverine claws are meant for crafts, costumes, photos, and gentle pretend play only. Do not use them for rough play, poking, running, or swinging near faces.
This recipe was originally published February 9, 2016, and updated May 18, 2026, with improved instructions, updates, and new photos.