Handmade Gift/Snack Containers: The DIY “Love Box” That Steals Hearts (and Snacks)
If Cupid had a craft room, this little project would be sitting front and center on his worktable. Valentine’s Day is around the corner, and nothing says “I care” quite like a handmade treat container filled with goodies. These DIY Gift/Snack Containers are charming, sturdy, and delightfully customizable—perfect for classmates, coworkers, friends, or anyone who deserves a little extra sweetness. Once you make one, you’ll be folding and gluing your way through a whole batch faster than Cupid can reload his quiver.
This tutorial walks you through every step with clear, schema-ready instructions, natural keyword sprinkling, and a warm, conversational tone your readers expect. It fits beautifully alongside your other Valentine’s Day crafts, treat ideas, and handmade gift projects—especially if they’ve already fallen in love with your Easy Ghirardelli Advent, Candy Filled Snakes, or Heart-Shaped Washcloths.


Why You’ll Love This DIY Gift Container
These handmade paper containers check every box for a fun, functional, and budget-friendly craft.
- Affordable: You only need basic cardstock, glue, and a few embellishments.
- Versatile: Ideal for snacks, small gifts, party favors, baby showers, bridal showers, and classroom treats.
- Customizable: Mix and match scrapbook papers, add ribbon, stickers, or tags—make each one unique.
- Kid-Friendly: A great craft for children, teens, or a cozy afternoon of solo creativity.
Whether you’re crafting for Valentine’s Day or stocking up on DIY gift box ideas for year-round celebrations, these containers deliver charm and practicality in one tidy package.
Materials Needed
- 8.5″ x 11″ colored cardstock
- 2–3 coordinating scrapbook papers
- Glue
- Scissors
- Velcro dots or ribbon (for closure)
- Embellishments (stickers, ribbon, tags, buttons, doo-dads—anything goes)


Directions for making a Handmade Gift or Snack Container:
1.) Take your colored cardstock and measure in 2″ on each side vertically. 
 2.) Within the 2″ columns, measure 2.5″ from the bottom and the top, in all four corners.
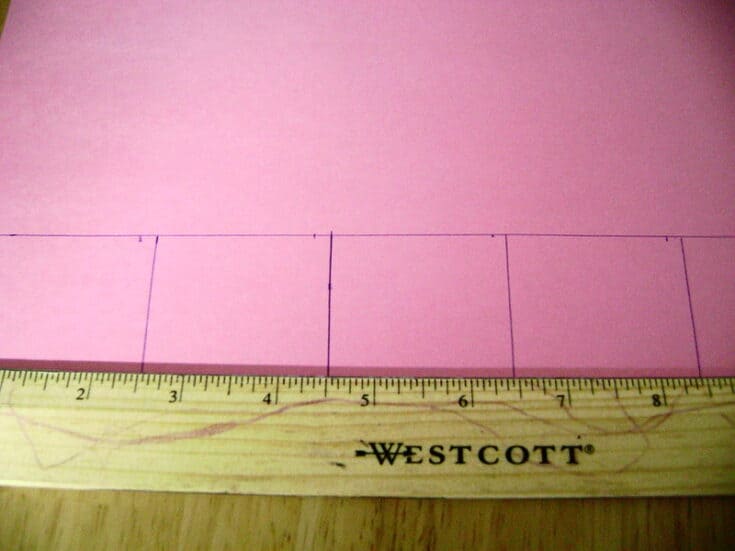
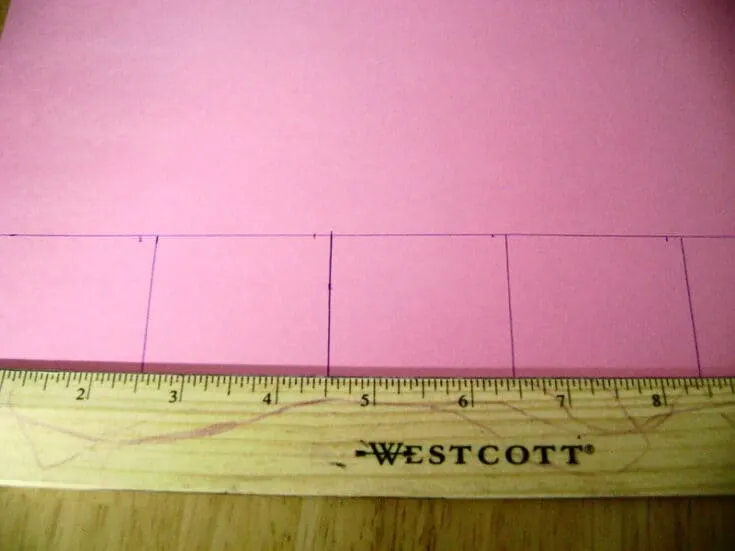 3.) From your 2.5″ line, measure up 2″ on all four sides
 4.) In the 2″ squares draw a diagonal line, connecting the bottom outside corner to the top “inside” corner.
 5.) Score along the lines you have just drawn. You will want to score all the way across the page from the top of your diagonal lines (4.5″ from the edge of the paper) This will be your containers “base.” Tip: You don’t need a “fancy” tool to score. Just place your ruler against the line, and open your scissors. Drag your open scissors along the edge of the ruler, applying enough pressure to “score” it, but not cut all the way through.) 6.) Fold, back and forth, along the scored lines. This will make the folding easier. 7.) Fold along the 2″ column and glue the 2.5″ boxes to the paper.
 8.) Fold the diagonal fold, up to the 2.5″ square and glue. 9.) Repeat until you have a “bottom” on your container.
 You have just completed the most difficult part of the project! The next part is customizing your container! 10.) On the backside of your coordinating paper, measure two boxes 4.5″x4.25″ and cut out. These are your front and back panels for your container.
 11.) Glue one panel to the front of your container and one panel to the back of your container.
 12.) Using the same colored cardstock as your “container” measure one 4″x4.5″. Cut Out. This is your “lid.”
 13.) Along the 4.5″ edge of your “lid,” measure down 1″ and score. 14.) Fold “scored” line back and forth. 15.) Using either the same paper as the panels or another coordinating print, measure 1″x4.5″ and glue just beneath the scored edge of your “lid,” on the “longer” section. 16.) Place glue along 1″, edge and secure to your “container.” 17.) To fasten your container closed you can cut slits in the front of the container, matching to slits in the lid and tie with ribbon OR you can use velcro circles to close the container.
 18.) Add embellishments to your container to make it YOURS!

Fill and Gift
Add snacks, chocolates, stationery, small toys, or tiny surprises. These containers are perfect for gifting, party favors, or classroom treats.
Expert Tips for Professional Results
- Use contrasting cardstock and patterned paper for a bold, eye-catching design.
- Scoring is essential for crisp folds—don’t skip it.
- Velcro closures make the container reusable.
- Add a handwritten note or mini Valentine for an extra-personal touch.
Creative Variations
- Mini Birthday Favor Boxes: Fill with candies or tiny toys.
- Holiday-Themed Containers: Swap in Christmas, Halloween, or Valentine’s Day scrapbook paper.
- Stationery Gift Box: Add pencils, stickers, or mini notepads for a sweet teacher gift.
Serving Suggestions & Uses
These DIY containers are perfect for:
- Party favors
- Classroom snacks
- Baby shower giveaways
- Small handmade gifts
- Valentine’s Day treats
- Office surprises


DIY Valentine’s Day Gift Boxes – Handmade Snack Containers That Steal Hearts
FAQs
What cardstock works best? Standard 8.5″ x 11″ cardstock works well, but heavier cardstock adds durability.
Can I make these without scissors? A craft knife works, but scissors are easiest for beginners.
How long do these containers last? With sturdy cardstock and careful folding, they can last for months—great for keepsakes or reusable gift boxes.
Want More DIY Inspiration
- Easy Ghirardelli Advent – A simple felt craft treat project
- Candy Filled Snakes – A fun snack idea
- Heart-Shaped Washcloths – A handmade gift
- How to Make Hershey Kisses Roses: A Sweet DIY Gift
- Crystal Roses with a Gem Garden Box
Final Thoughts
These Handmade Gift/Snack Containers are the kind of DIY project that feels both nostalgic and fresh—simple materials, thoughtful details, and endless possibilities. Whether you’re crafting for Valentine’s Day, a birthday, or just because, these little “love boxes” turn ordinary cardstock into something memorable. They’re charming, customizable, and guaranteed to bring a smile to anyone lucky enough to receive one.
This diy craft was originally published Jan. 16, 2010, and updated January 12, 2026, with improved instructions, updates, and new photos.