Get ready to say ‘Aloha’ to the most clever Lilo and Stitch-themed Hoco proposal! “Ohana got to Hoco?”
Ohana Homecoming Proposal: Stitch Surfboard Theme
For a memorable homecoming proposal, we embraced the love for Stitch from Lilo and Stitch, bringing a touch of Hawaii to the occasion with a creative Stitch surfboard theme. Ohana, which means family, sets the tone for this heartwarming surprise.
You might also like our Tennis-Themed Promposal.

History of the Theme:
The idea of incorporating Stitch into a homecoming proposal stems from the enduring popularity of Disney’s Lilo and Stitch, a heartwarming tale of ‘ohana.’ The character Stitch symbolizes the importance of family and friendship, making it a meaningful choice for your proposal.
Preparation Time:
- Planning and gathering supplies: 1-2 days in advance
- Creating the Stitch surfboard: 3-4 days
- Finalizing proposal details: 1 day

Crafting the Stitch Surfboard – Materials and Steps
Materials Needed:
- 1 sheet of balsa wood
- Scroll saw or jig saw
- Spray Paint in the chosen surfboard color
- Sandpaper
- Acrylic paints
- Paintbrushes
- Painter’s Tape
- Black permanent Marker
- Transfer Paper
- Pencil
- Tape Measure
- For circle cutting:
- Standard drill bit (for small circles)
- Hole saw or annular cutter (for larger circles)

Creating the Template:
1. Shape Template:
- Design a template for the surfboard shape on paper.
2. Transfer Template:
- Trace the surfboard template onto the balsa wood.
3. Cut the Surfboard:
- Using a scroll saw or jig saw, carefully cut out the surfboard shape along the traced lines.
4. Sanding:
- Smooth the edges and surface of the surfboard with sandpaper, ensuring it’s even and free of splinters.
Creating the Bite Mark:
5. Bite Mark Template:
- Design a template for the bite mark that Stitch left when he bit the surfboard. This can be a series of connecting circles.
6. Cutting the Bite Mark:
- Using a hole saw or annular cutter, cut out the bite mark shape from the surfboard.
7. Sanding the Edges:
- Carefully sand the edges of the bite mark to make them smooth and well-defined.

Sealing the Wood:
8. Sealer Coat (Optional):
- Apply a sealer coat to the balsa wood, which can save time in the painting process. Let it dry thoroughly.
Painting:
9. Surfboard Color:
- Spray paint the surfboard in your chosen surfboard color. Let it dry completely.
Creating the Lettering and Design:
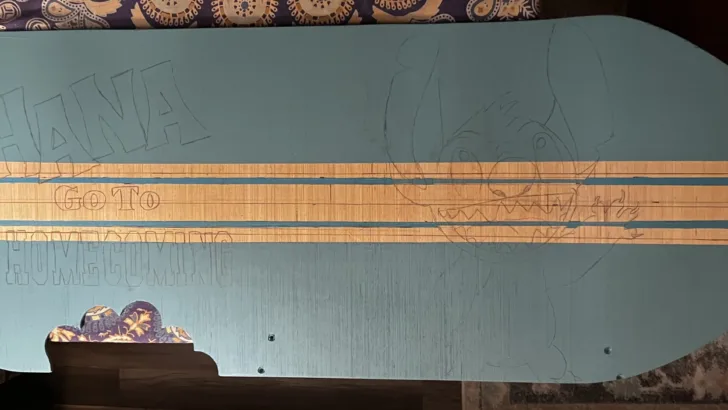
10. Lettering and Design:
- Create your desired lettering and design elements for the surfboard on copy paper. You can either trace, use a projector and trace, or hand-draw the designs.

11. Applying the Designs:
-
- Once the surfboard’s paint coat is dry, position the transfer paper on the surfboard where you want the lettering and Stitch placed.
- Use a pencil to trace the designs from your copy paper onto the surfboard.
12. Detail Work:
- Use acrylic paints and brushes to carefully paint the lettering, Stitch, and any other design elements on the surfboard. Take your time to ensure a neat and vibrant finish.

- I used a sparkle acrylic for the whites of Stitch’s eyes to give him some “life.”

13. Painter’s Tape:
- Use painter’s tape to create clean lines and edges for your designs, such as pin-stripes, especially for color transitions.
14. Final Touches:
- Once the paint is dry, use a black permanent marker to outline and enhance the details.

By following these steps, you’ll create a stunning Stitch-themed surfboard that will serve as the centerpiece for your memorable homecoming proposal.
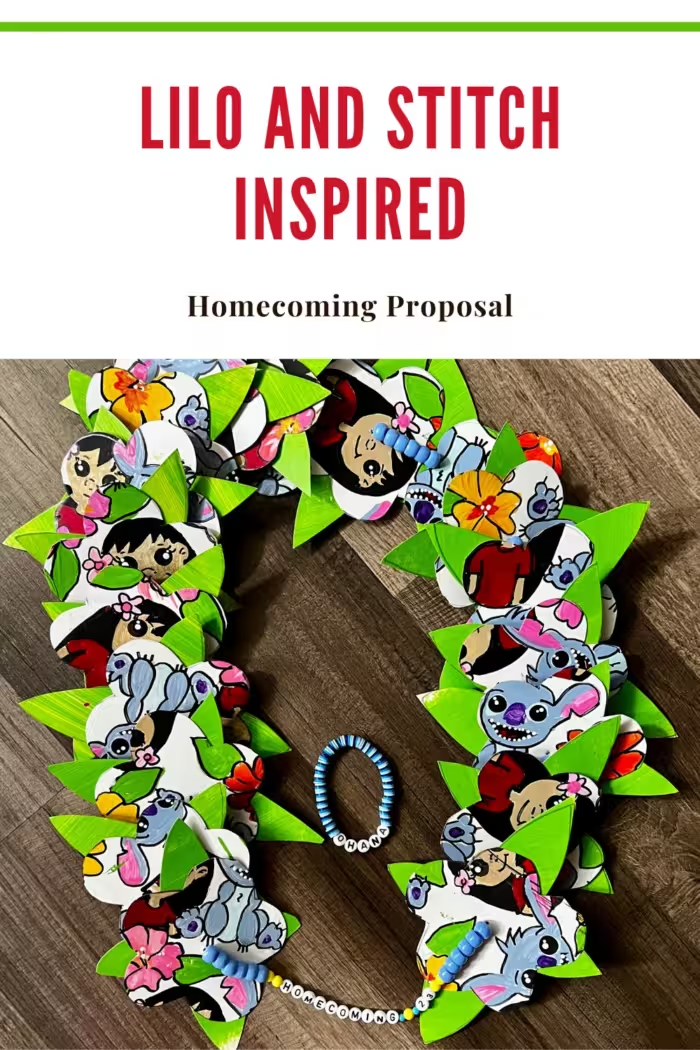
Bring it all together with a Disney’s Lilo and Stitch Themed Lei.

Creating a Disney’s Lilo and Stitch Themed Lei
Prep Time: 20 minutes
Makes one lei or more
Materials:
- Poster board
- Transfer paper
- Markers or acrylic paint
- Pony beads (or straws cut into 1″ lengths)
- Yard (or elastic string)
- Lei flower and leaf templates
- Scissors
- Green posterboard or construction paper
Instructions:
1. Transfer Lilo and Stitch Characters:
- Begin by printing or drawing Lilo and Stitch characters on the poster board using transfer paper. Ensure the characters are the desired size for your lei.
2. Add Color:
- Color the characters with markers or acrylic paint. Let them dry completely.
3. Create Flower and Leaf Templates:
- Trace the characters with the flower template and cut out the flower shapes.
- Trace the leaf template onto the green poster board or construction paper and cut out the leaf shapes.
4. Prepare Beads:
- Make a hole in the center of each flower and leaf cutout using a hole punch or a sharp object.
5. String the Lei:
- Cut a piece of yarn or elastic string to your desired lei length.
- Start by stringing 6 pony beads onto the string, followed by one leaf, and then one flower.
- Repeat this pattern (6 beads, 1 leaf, 1 flower) until the lei is the desired length.
6. Tie Off:
- Once you’ve reached your desired length, tie off the ends of the string securely, ensuring the lei is closed.
Expert Tips:
- To make the lei sturdier, you can laminate the character cutouts before attaching them to the string.
- Experiment with different character combinations for a unique and personalized lei.

Storage:
- Store your Lilo and Stitch themed lei in a cool, dry place to prevent damage.
FAQs:
Q1: Can I use other Disney characters for this lei? A1: Absolutely! You can customize your lei with any Disney characters you like.
Q2: Can I use different colors for the flowers and leaves? A2: Of course! Get creative and use your favorite colors to make the lei unique.
Alternate Names:
- Disney Character Lei
- Ohana Lei
- Lilo and Stitch Flower Garland
Ohana Go To HOCO Proposal
Materials
Materials Needed:
- 1 sheet of balsa wood
- Scroll saw or jig saw
- Spray Paint in the chosen surfboard color
- Sandpaper
- Acrylic paints
- Paintbrushes
- Painter's Tape
- Black permanent Marker
- Transfer Paper
- Pencil
- Tape Measure
- For circle cutting:
- Standard drill bit (for small circles)
- Hole saw or annular cutter (for larger circles)
Tools
- Tape Measure
- Standard drill bit (for small circles)
- Hole Saw or Annular cutter (for larger circles)
- Scroll Saw or Jig Saw
Instructions
- Creating the Template:
1. Shape Template:
Design a template for the surfboard shape on paper.
2. Transfer Template:
Trace the surfboard template onto the balsa wood.
3. Cut the Surfboard:
Using a scroll saw or jig saw, carefully cut out the surfboard shape along the traced lines.
4. Sanding:
Smooth the edges and surface of the surfboard with sandpaper, ensuring it's even and free of splinters.
Creating the Bite Mark:
5. Bite Mark Template:
Design a template for the bite mark that Stitch left when he bit the surfboard. This can be a series of connecting circles.
6. Cutting the Bite Mark:
Using a hole saw or annular cutter, cut out the bite mark shape from the surfboard.
7. Sanding the Edges:
Carefully sand the edges of the bite mark to make them smooth and well-defined.
Sealing the Wood:
8. Sealer Coat (Optional):
Apply a sealer coat to the balsa wood, which can save time in the painting process. Let it dry thoroughly.
Painting:
9. Surfboard Color:
Spray paint the surfboard in your chosen surfboard color. Let it dry completely.
Creating the Lettering and Design:
10. Lettering and Design:
Create your desired lettering and design elements for the surfboard on copy paper. You can either trace, use a projector and trace, or hand-draw the designs.
11. Applying the Designs:
Once the surfboard's paint coat is dry, position the transfer paper on the surfboard where you want the lettering and Stitch placed.
Use a pencil to trace the designs from your copy paper onto the surfboard.
12. Detail Work:
Use acrylic paints and brushes to carefully paint the lettering, Stitch, and any other design elements on the surfboard. Take your time to ensure a neat and vibrant finish.
I used a sparkle acrylic for the whites of Stitch's eyes to give him some "life."
13. Painter's Tape:
Use painter's tape to create clean lines and edges for your designs, such as pin-stripes, especially for color transitions.
14. Final Touches:
Once the paint is dry, use a black permanent marker to outline and enhance the details.
By following these steps, you'll create a stunning Stitch-themed surfboard that will serve as the centerpiece for your memorable homecoming proposal.
Bring it all together with a Disney's Lilo and Stitch Themed Lei.