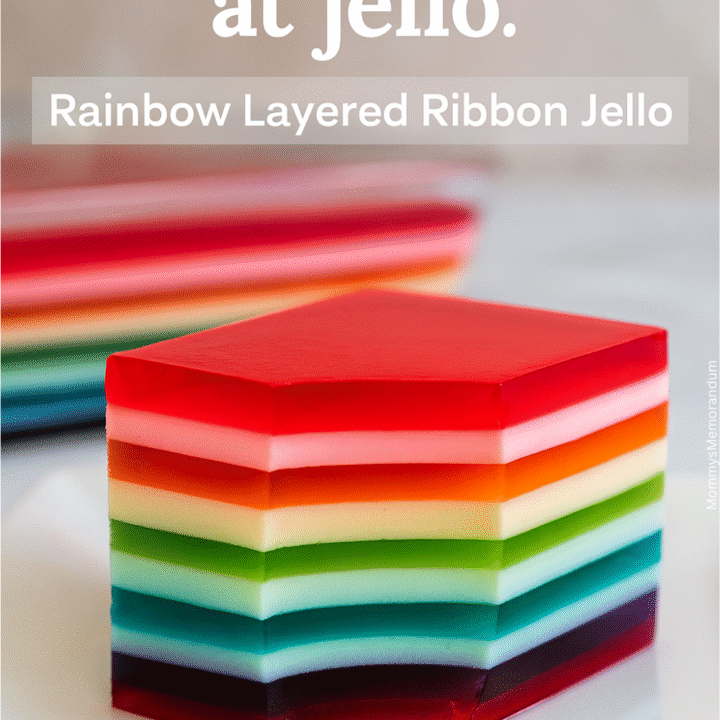
Rainbow Layered Ribbon Jello with Sour Cream
This Rainbow Layered Ribbon Jello recipe is a colorful retro dessert made by alternating fruity gelatin with creamy sour cream layers that set into beautiful, sliceable ribbons.
It takes time to chill, but the method is easy, the ingredients are simple, and the finished dessert can be made a day ahead for holidays, birthdays, potlucks, and summer gatherings.


Rainbow Layered Ribbon Jello Recipe
Ribbon Jello is an old-fashioned layered gelatin dessert made by pouring one thin layer at a time and allowing it to set before adding the next. In this version, part of each dissolved gelatin flavor remains clear while the rest is mixed with sour cream to create a soft, pastel ribbon.
The sour cream does more than create pretty layers. Its gentle tang balances the sweetness of the gelatin and gives the dessert the creamy flavor people remember from vintage ribbon Jello recipes.
This is not a difficult recipe, but it is a patient one. Each layer needs enough refrigerator time to become firm without setting so hard that the next layer cannot cling to it. Once you find that slightly tacky sweet spot, the process becomes an easy rhythm of pour, chill, whisk, and repeat.
The result is a cool, colorful dessert that can be cut into squares or served in clear glasses. It is especially helpful when you need a make-ahead dessert that looks impressive without frosting, piping, or turning on the oven.
Why You’ll Love This Ribbon Jello Recipe
- It uses simple ingredients. Flavored gelatin, boiling water, and sour cream create all those beautiful layers.
- It can be made ahead. Prepare it the day before and keep it refrigerated until serving time.
- The colors are customizable. Make a full rainbow or choose colors for a holiday, school, shower, or birthday.
- It is naturally eye-catching. A clear glass dish lets the colorful ribbons become the decoration.
- It has nostalgic flavor. Sweet fruit gelatin and lightly tangy sour cream taste like the church suppers and family holidays many of us remember.
Readers Also Make
A spoonful of homemade whipped cream makes these colorful ribbon Jello squares feel even more special. For another cheerful party pairing, serve them with a pitcher of raspberry lemonade.
Ribbon Jello Ingredients
The complete measurements are in the recipe card below, but these ingredient notes explain how each part of the recipe works.
Flavored Gelatin
Use several 3-ounce packages of flavored gelatin in contrasting colors. Strawberry, orange, lemon, lime, blue raspberry, grape, and cherry create a bright rainbow, but you do not need to use every color.
Choose flavors you enjoy rather than selecting by color alone. Each layer contributes flavor as well as appearance.
Boiling Water
The water must be fully boiling so the gelatin crystals dissolve completely. Stir until the liquid is clear and no grainy crystals remain around the bottom or sides of the bowl.
Sour Cream
Full-fat sour cream creates the smoothest, most traditional ribbon Jello layers. It softens the color of the gelatin and adds a mild tang without making the dessert taste sharply sour.
Let the sour cream sit at room temperature briefly while you prepare the first layer. Sour cream that is not ice-cold blends more smoothly into the warm gelatin.
How to Make Rainbow Layered Ribbon Jello
The full step-by-step quantities are in the recipe card. This overview shows how the layered method works and what to watch for as you build the dessert.
1. Dissolve the First Gelatin Flavor
Stir one package of gelatin into boiling water until it is completely dissolved. Take your time with this step because undissolved crystals can leave a grainy layer.
2. Make the Clear Gelatin Layer
Measure part of the dissolved gelatin into a clear 8-inch square glass dish. Refrigerate it until the surface is set but still slightly tacky when touched gently.
3. Make the Sour Cream Ribbon
Whisk sour cream into the gelatin remaining in the bowl until the mixture is smooth and evenly colored. Carefully spoon or pour it over the first chilled layer.
4. Chill and Repeat
Chill the creamy layer until set. Repeat the same clear-layer and sour-cream-layer process with the remaining gelatin flavors.
Pour each new mixture slowly, preferably over the back of a spoon, to prevent the stream from breaking through the layer underneath.
5. Chill Before Cutting
After the final layer has been added, refrigerate the entire dish until completely firm. For the cleanest slices and strongest layers, an additional overnight chill is even better.

Grandma Janna’s Magical Ribbon Jello
Grandma Janna loved to make the table beautiful. Sometimes all it required was bringing out her best wine glasses and filling them with layered ribbon Jello.
She topped each glass with a dollop of homemade whipped cream and a strawberry or cherry from the garden. When she wanted to be especially fancy, she tilted the glasses in the refrigerator while the gelatin set so the layers appeared almost vertical.
I thought it was the most magical dessert on the planet.
Looking back, the ingredients were wonderfully simple. The magic was in the care she took with every layer and in the way she could turn an ordinary dessert into something that made us stop and admire the table.
You can make this recipe in a square glass dish for easy slicing or borrow Grandma Janna’s idea and layer it in individual glasses. Use sturdy glasses with enough refrigerator space around them, and make certain they are securely propped before adding a tilted layer.
What Is Ribbon Jello?
Ribbon Jello is a layered gelatin dessert in which clear fruit-flavored layers alternate with opaque, creamy layers. Vintage recipes may use sour cream, yogurt, evaporated milk, whipped topping, or sweetened condensed milk to create the ribbons.
This recipe uses sour cream because it provides the classic sweet-and-tangy flavor while allowing the gelatin colors to remain visible. The finished dessert is sometimes called rainbow Jello, layered Jello, sour cream ribbon Jello, or seven-layer Jello.
Why Sour Cream Works in Layered Jello
Sour cream disperses through the dissolved gelatin and turns it from transparent to creamy and opaque. That visual contrast is what makes each pair of layers look like a ribbon.
Its tang also balances gelatin’s sweetness. You do not need to sweeten the sour cream separately because it is mixed directly with the flavored gelatin.
For a smooth layer, whisk the sour cream into warm gelatin rather than boiling-hot gelatin. Add it gradually and continue whisking until no white streaks or small lumps remain.
Expert Tips for Neat Jello Layers
- Clear a level refrigerator shelf first. Moving the dish while a layer is setting can create waves or uneven ribbons.
- Use a clear glass dish. Glass allows you to check the thickness and firmness of every layer.
- Set a timer. Layered Jello is easy to forget when you are working on something else.
- Look for a tacky surface. A layer should feel firm enough to support the next mixture but not dry or rubbery.
- Keep waiting gelatin at room temperature. Do not refrigerate the portion waiting to become the sour cream layer.
- Pour over a spoon. This softens the flow and protects the layer below.
- Work gently. Vigorous pouring can dig a hole through a partially set ribbon.
- Chill the completed dessert thoroughly. The final set makes it easier to cut clean squares.
How Long Does Layered Jello Take to Make?
The hands-on work is brief, but every layer needs approximately 15 to 25 minutes of chilling, depending on your refrigerator, the temperature of the mixture, and the thickness of the layer.
With multiple clear and creamy layers, plan on several hours from beginning to end. The easiest approach is to make ribbon Jello when you will be home and can return to the refrigerator at regular intervals.
After adding the final layer, give the dessert at least another two hours to become completely firm. Making it the day before serving removes any need to rush.
Troubleshooting Layered Ribbon Jello
Why did my Jello colors bleed together?
The previous layer was probably too soft, or the new gelatin was poured while it was still too hot. Let the new mixture cool slightly and make sure the chilled layer can support it before pouring.
Why are the layers sliding apart?
The lower layer may have set too firmly before the next layer was added. Layers bond best when the surface is set but remains slightly tacky.
Why is the sour cream layer lumpy?
The sour cream may have been too cold or added all at once. Bring it closer to room temperature, whisk it in gradually, and smooth the mixture before pouring.
Why did one layer develop a hole?
A concentrated stream of warm gelatin can pierce a soft layer. Pour slowly over the back of a spoon to distribute the liquid more gently.
Why are my layers uneven?
The refrigerator shelf or baking dish may not be level. Check both before you begin. Slightly crooked ribbons will still taste wonderful and can add homemade charm.
Why did the gelatin form a rubbery skin in the bowl?
The reserved gelatin began setting before you were ready to use it. Keep it at room temperature and stir it occasionally. If it thickens slightly, place the bowl over warm water briefly and stir until fluid again. Do not boil it.
Ribbon Jello Variations and Creative Ideas
Red, White, and Blue Ribbon Jello
Use red and blue gelatin flavors with pale sour cream ribbons for Memorial Day, the Fourth of July, or a summer cookout. Because the creamy layers retain some of the gelatin color, the “white” ribbons will be softly tinted rather than pure white.
Christmas Ribbon Jello
Alternate red and green gelatin for a nostalgic Christmas dessert. Smaller individual glasses make a beautiful addition to a holiday table.
Pastel Easter Jello
Choose lemon, lime, strawberry, and berry flavors for soft spring colors. Serve the squares with whipped cream and fresh berries.
School or Team Colors
Use two or three gelatin colors that coordinate with a school, sports team, graduation party, or family celebration.
Individual Layered Jello Glasses
Divide each mixture among small clear dessert cups, parfait glasses, or Grandma’s best glasses. Individual servings take more refrigerator space but make an especially pretty presentation.
Tilted Ribbon Jello
Securely tilt each glass inside a muffin pan or against a folded kitchen towel while a layer sets. Change the angle between selected layers to create diagonal ribbons. Make sure every glass is stable before adding liquid.
Ribbon Jello with Yogurt
Plain or vanilla yogurt can replace the sour cream, although the flavor will be sweeter and less traditionally tangy. Avoid thin yogurt that could make the creamy layer watery.
Perfect with a Summer Celebration
This chilled, no-bake dessert is right at home beside picnic food, grilled favorites, fresh berries, and cold lemonade. Find more warm-weather inspiration in my summer recipes and party ideas.
A red-and-blue version also fits beautifully into a Memorial Day menu or a table filled with Fourth of July recipes and ideas.
How to Serve Rainbow Ribbon Jello
Serve ribbon Jello well chilled. Cut it into squares, narrow rectangles, or small cubes using a sharp knife dipped in warm water. Wipe the blade between cuts so the pale layers remain clean and colorful.
For Grandma Janna’s presentation, add a small dollop of homemade whipped cream and top it with a fresh strawberry or cherry. Wait until shortly before serving to add the topping so the whipped cream remains fluffy.
Other simple serving ideas include:
- Arrange small squares on a chilled white platter so the colors stand out.
- Serve individual pieces in clear dessert dishes.
- Add fresh strawberries, raspberries, blueberries, or cherries.
- Cut the Jello into small cubes for a children’s party buffet.
- Layer the recipe directly in glasses for a more formal presentation.
How to Store Ribbon Jello
Cover the dish tightly or transfer the pieces to an airtight container and refrigerate them. For the best appearance and texture, serve the Jello within three days.
Keep it refrigerated until shortly before serving. Extended time at room temperature can soften the layers, especially at an outdoor summer gathering.
Can You Make Ribbon Jello Ahead?
Yes. Ribbon Jello is an excellent make-ahead dessert. Prepare it one day before serving and leave it uncut in the refrigerator. Keeping the dessert in the original dish protects the edges and prevents the individual pieces from drying out.
Add whipped cream, fresh fruit, or other garnishes after cutting and shortly before the dessert reaches the table.
Can You Freeze Layered Jello?
Freezing is not recommended. Gelatin can release water and develop an unpleasant rubbery texture after it thaws. Refrigeration preserves the smooth texture and distinct layers much better.

Rainbow Layered Ribbon Jello FAQs
What is ribbon Jello made of?
Ribbon Jello is made with flavored gelatin, boiling water, and a creamy ingredient. This recipe uses sour cream to create opaque ribbons between the clear gelatin layers.
How do you make ribbon Jello with sour cream?
Dissolve one gelatin flavor in boiling water and use part of it for a clear layer. Whisk sour cream into the remaining gelatin to make the creamy ribbon. Chill each layer before adding the next.
Is this an easier ribbon Jello recipe?
The ingredients and mixing method are easy, but the dessert requires patience because every layer must chill separately. Setting a timer and working with one flavor at a time keeps the process manageable.
How long should each Jello layer chill?
Most thin layers need approximately 15 to 25 minutes. Refrigerator temperature and layer thickness can affect the time, so check for a firm but slightly tacky surface rather than relying only on the clock.
How many layers are in rainbow ribbon Jello?
The number depends on how many gelatin flavors you use. When each flavor creates one clear and one creamy layer, seven flavors can produce fourteen individual ribbons.
Can I use sugar-free gelatin?
Yes. Sugar-free gelatin can be prepared with the same layering method. Package size and yield may differ, so compare the prepared volume with the gelatin used in the recipe card.
Can I replace the sour cream?
Plain or vanilla yogurt can work, although it creates a sweeter and less tangy ribbon. Choose a thick yogurt and whisk it smoothly into the gelatin.
What pan is best for layered ribbon Jello?
An 8-inch square clear glass dish makes thick, visible layers that are easy to cut. A larger dish will produce thinner layers and may shorten the chilling time.
How do I keep the layers from separating?
Add each new layer while the one underneath is set but still slightly tacky. If the lower layer becomes completely firm and dry, the next layer may not adhere as securely.
How do I cut layered Jello cleanly?
Chill it thoroughly, dip a sharp knife in warm water, wipe away the moisture, and cut straight down. Clean and warm the blade again between cuts.
Can I serve ribbon Jello in individual glasses?
Yes. Divide every layer evenly among clear glasses and chill them on a level shelf. You can also carefully tilt the glasses while selected layers set to create diagonal ribbons.
One Beautiful Layer at a Time
Rainbow Layered Ribbon Jello is proof that simple ingredients can still make a little kitchen magic. The recipe asks for patience, but each colorful layer builds anticipation until the final dessert is ready to slice.
For me, it will always bring back Grandma Janna’s best glasses, garden fruit, and the almost-vertical ribbons that made an ordinary gelatin dessert seem impossibly fancy.
Charlotte the Great always believed good food filled a table, but good stories filled a family. Every recipe has a story worth passing down.
Rainbow Layered Ribbon Jello
This Rainbow Layered Ribbon Jello is a retro-inspired dessert with bright, translucent stripes separated by creamy ribbons for a playful stained-glass effect. It’s an eye-catching, make-ahead treat perfect for holidays, birthdays, and potlucks. The colorful layers create a nostalgic charm while the creamy middle adds a smooth, velvety texture. It’s also a fun kitchen project, similar to hands-on recipes like my Meatloaf Mugs, and pairs beautifully with drinks such as a Pumpkin Pie Martini or Raspberry Lemonade.
Ingredients
- 7 packages (3 oz each) flavored gelatin (Strawberry, Orange, Lemon, Lime, Blue Raspberry, Grape, Cherry)
- 7 1/4 cups boiling water
- 1 cup sour cream (or flavored yogurt)
Instructions
Dissolve First Gelatin Add one gelatin packet to a heat-safe bowl. Pour in 1 1/4 cups boiling water and stir until completely dissolved.
Notes
NOTES
- Avoid letting layers fully harden before adding the next; slightly tacky surfaces help layers bond.
- Flavored yogurt can be used for more colorful, fruit-forward creamy ribbons.
- Prepare it one day ahead for the best flavor and cleanest slices.
- Using a glass dish makes the layers more visually striking—similar to how presentation enhances recipes like Mashed Potatoes That Rise to the Occasion.
VARIATIONS
- Use holiday color themes such as red/green for Christmas or pastels for Easter.
- Create a tropical vibe with coconut or pineapple yogurt.
- Add whipped cream before serving for a dessert-cake feel.
- Pair complementary colors like Strawberry + Cherry or Lemon + Lime for visual balance.
SERVING SUGGESTIONS
- Slice the Jello into even squares, diamonds, or bars for serving.
- Add fresh berries or citrus for a refreshing contrast.
- Top with whipped cream for extra creaminess.
- Serve alongside beverages like the Pumpkin Pie Martini or bright Raspberry Lemonade.
FAQ
Can I use sugar-free gelatin? Yes, sugar-free flavored gelatin works the same way — follow the same steps.
Does pan size matter? Yes. Larger pans produce thinner layers, while smaller pans make thicker stacks.
How far in advance can I make it? Make up to 2 days ahead. Keep refrigerated and covered.
Can I use Greek yogurt? You can, but it sets faster and thicker. Regular yogurt blends more smoothly for creamy ribbons. This recipe was originally published February 7, 2011, and updated November 18, 2025, with improved instructions, updates, and new photos.
Nutrition Information:
Yield: 12 Serving Size: 1Amount Per Serving: Calories: 42Total Fat: 4gSaturated Fat: 2gUnsaturated Fat: 2gCholesterol: 12mgSodium: 14mgCarbohydrates: 1gSugar: 1gProtein: 1g
The Nutritional Information may not be accurate. This website provides approximate nutrition information for convenience and as a courtesy only. Nutrition data is gathered primarily from the USDA Food Composition Database, whenever available, or otherwise other online calculators.
Close the recipe box gently…there’s another family favorite waiting inside.