Looking to make dessert less guilty? These protein packed red velvet cake pops and protein packed raspberry cheesecake recipes are sure to be the indulgence your sweet tooth craves, but with no guilt.
I received Quest Protein Powder in exchange for this post. All opinions are my own.
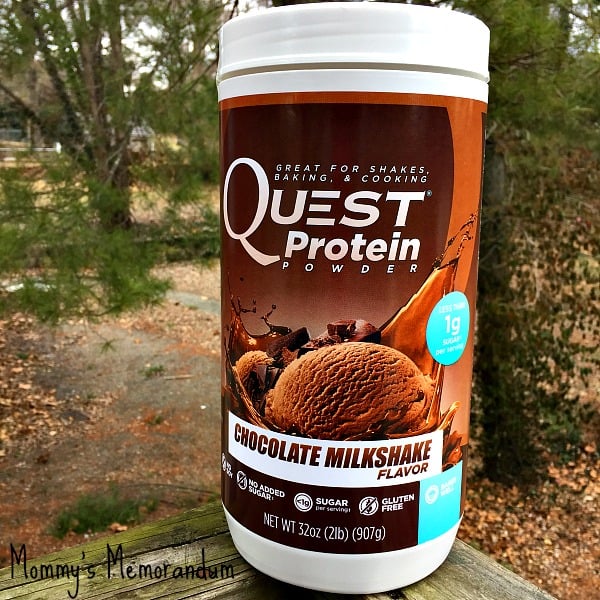
On my busy mornings, when I am in a rush to get out the door, I can look forward to a delicious creamy Quest milkshake. It makes my morning complete.
Quest Protein Powder is tasty. It’s chocolate flavoring, decadent. I like it best mixed in skim milk, but it tastes great simply mixed with water. One scoop has a whopping 22 grams of protein!
It isn’t just for dumping into milk and calling it a meal. Oh, no, Quest Protein Powder is a great cooking companion. Mix it in your favorite recipes and eliminate the junk. Go from carb-heavy to protein-rich treat!

Treat yourself with Clean & Delicious recipes
Valentine’s Day is Cupid’s time to sabotage your diet goals with sweets. Quest Nutrition has the perfect challenge for Cupid’s arrow with delicious protein packed recipes for Red Velvet Cake Pops & Raspberry Cheesecake. These decadent desserts are sure to win the hearts (and taste buds) of your loved ones.
RED VELVET CAKE POPS
Quest’s Red Velvet Cake Pops recipe is the reason you’ll tell that box of chocolates you’re seeing other desserts. This Quest creation allows you to fall in love all over again with red velvet cake. These rich, chocolaty cake bites are as beautiful as a bouquet of flowers and more delicious than your standard V-day treats.
Yields: 18 servings
Serving size: 1 cake pop
Prep time: 20 min
Cook time: 24 min


Ingredients:
Cake
1⁄ 2 cup Quest Vanilla Milkshake Protein Powder
1 Double Chocolate Chunk Quest Bar
1⁄ 2 cup almond meal
1 1⁄ 2 tablespoons unsweetened cocoa powder
3 tablespoons zero-calorie sweetener
1⁄ 2 teaspoon baking soda
1⁄ 4 teaspoon salt
1 cup unsweetened vanilla almond milk
2 teaspoons vanilla extract
1⁄ 2 tablespoon red food coloring
Coconut cooking spray
Frosting
1 scoop Quest Vanilla Milkshake Protein Powder
3 1⁄ 2 ounces reduced-fat cream cheese
1⁄ 4 cup zero-calorie sweetener
2 tablespoons reduced-fat sour cream
1⁄ 2 teaspoon vanilla extract
Chocolate Coating
6 ounces sugar-free milk or dark chocolate
How to Make Protein-packed Red Velvet Cake Pops:
Cake
- Preheat oven to 350°F.
- In a medium-sized microwave-safe bowl, heat unwrapped Double Chocolate Chunk Quest Bar for 10 seconds.
- Using a rolling pin, roll the bar out to 1⁄4-inch thickness.
- Bake for 4 minutes, or until the bar is lightly crisped. Remove to cool.
- Break the crisped bar into pieces, place it in a mini blender, and process it into powder.
- In a medium-size mixing bowl, add Quest Vanilla Milkshake Protein Powder, the powdered Double Chocolate Chunk Quest Bar, almond meal, cocoa powder, zero-calorie sweetener, baking soda, and salt, and mix well.
- Add almond milk, vanilla extract, and red food coloring. Mix cake base until fully incorporated and the batter is dark red.
- Coat a 9-by-13-inch glass baking dish with nonstick cooking spray. Pour in batter.
- Bake 18 to 20 minutes, or until an inserted toothpick comes out clean and the cake is completely cooked and springy.
- Remove and let cool.
- Break the cake into small pieces, and place in a large mixing bowl.
Frosting
- In a medium-size bowl, add Quest Vanilla Milkshake Protein Powder, cream cheese, zero-calorie sweetener, sour cream, and vanilla extract.
- Mix until smooth.
Assembly
- Add frosting to the crumbled cake, and mix together until all frosting is incorporated.
- Cover bowl with plastic wrap and place in freezer for 20 minutes.
- Remove cake from the freezer. Take a small amount of cake batter and form eighteen walnut-sized balls.
- Break the chocolate into even-sized small pieces. Melt slowly over a double boiler or in a dry bowl that fits snuggly over a pot. (Water should not touch pot or bowl above it. Before placing the pot on top, simmer water in a pot on low heat, then turn off the heat and place the dry bowl or pot with chocolate in it on top, and stir when the chocolate starts to melt until chocolate is shiny and smooth)
- Once the chocolate is ready, remove cake balls from the fridge and carefully submerge each into melted chocolate. Gently tap the edge to remove excess. If chocolate begins to seize, simply return to double boiler. Place each pop on wax paper and insert lollipop sticks.
- Chill for 10 minutes in the freezer, or until chocolate hardens and creates a shell.
Nutrition Info:
Calories: 110
Protein: 7
Fat: 7
Net Carbs: 3
Fiber: 4

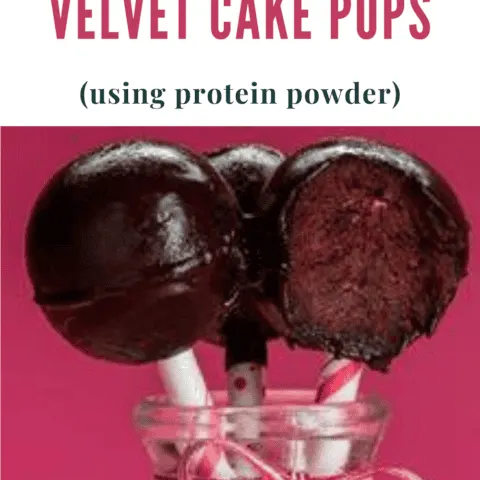
Protein Powder Red Velvet Cake Pops
Protein-packed Red Velvet Cake Pops Recipe. This recipe is the reason you’ll tell that box of chocolates you’re seeing other desserts.
Ingredients
Cake
- 1⁄ 2 cup Quest Vanilla Milkshake Protein Powder
- 1 Double Chocolate Chunk Quest Bar
- 1⁄ 2 cup almond meal
- 1 1⁄ 2 tablespoons unsweetened cocoa powder
- 3 tablespoons zero-calorie sweetener
- 1⁄ 2 teaspoon baking soda
- 1⁄ 4 teaspoon salt
- 1 cup unsweetened vanilla almond milk
- 2 teaspoons vanilla extract
- 1⁄ 2 tablespoon red food coloring
- Coconut cooking spray
Frosting
- 1 scoop Quest Vanilla Milkshake Protein Powder
- 3 1⁄ 2 ounces reduced-fat cream cheese
- 1⁄ 4 cup zero-calorie sweetener
- 2 tablespoons reduced-fat sour cream
- 1⁄ 2 teaspoon vanilla extract
- Chocolate Coating
- 6 ounces sugar-free milk or dark chocolate
Instructions
Cake
- Preheat oven to 350°F.
- In a medium-sized microwave-safe bowl, heat unwrapped Double Chocolate Chunk Quest Bar for 10 seconds.
- Using a rolling pin, roll the bar out to 1⁄4-inch thickness.
- Bake for 4 minutes, or until the bar is lightly crisped. Remove to cool.
- Break the crisped bar into pieces, place it in a mini blender, and process it into powder.
- In a medium-size mixing bowl, add Quest Vanilla Milkshake Protein Powder, the powdered Double Chocolate Chunk Quest Bar, almond meal, cocoa powder, zero-calorie sweetener, baking soda, and salt, and mix well.
- Add almond milk, vanilla extract, and red food coloring. Mix cake base until fully incorporated and the batter is dark red.
- Coat a 9-by-13-inch glass baking dish with nonstick cooking spray. Pour in batter.
- Bake 18 to 20 minutes, or until an inserted toothpick comes out clean and the cake is completely cooked and springy.
- Remove and let cool.
- Break the cake into small pieces, and place in a large mixing bowl.
Frosting
- In a medium-size bowl, add Quest Vanilla Milkshake Protein Powder, cream cheese, zero-calorie sweetener, sour cream, and vanilla extract.
- Mix until smooth.
Assembly
- Add frosting to the crumbled cake, and mix together until all frosting is incorporated.
- Cover bowl with plastic wrap and place in freezer for 20 minutes.
- Remove cake from the freezer. Take a small amount of cake batter and form eighteen walnut-sized balls.
- Break the chocolate into even-sized small pieces. Melt slowly over a double boiler or in a dry bowl that fits snuggly over a pot. (Water should not touch pot or bowl above it. Before placing the pot on top, simmer water in a pot on low heat, then turn off the heat and place the dry bowl or pot with chocolate in it on top, and stir when the chocolate starts to melt until chocolate is shiny and smooth)
- Once the chocolate is ready, remove cake balls from the fridge and carefully submerge each into melted chocolate. Gently tap the edge to remove excess. If chocolate begins to seize, simply return to double boiler. Place each pop on wax paper and insert lollipop sticks.
- Chill for 10 minutes in the freezer, or until chocolate hardens and creates a shell.
Nutrition Information:
Yield: 18 Serving Size: 1Amount Per Serving: Calories: 257Total Fat: 11gSaturated Fat: 4gTrans Fat: 0gUnsaturated Fat: 7gCholesterol: 10mgSodium: 695mgCarbohydrates: 31gFiber: 3gSugar: 26gProtein: 9g
The Nutritional Information may not be accurate.
RASPBERRY CHEESECAKE
It’s time to give cheesecake a guilt-free embrace. This creamy, scrumptious dessert is packed with 34g of protein and is an exclamation point to any special Valentine’s Day dinner. It’s a thoughtful gift for your sweet tooth, so feel the love and have a slice!


Raspberry Cheesecake:
Yields: 2 servings
Serving size: 1 slice
Prep time: 20 min
Cook time: 45 minutes
Ingredients:
Cake
1⁄ 2 cup Quest Vanilla Milkshake Protein Powder
1 Double Chocolate Chunk Quest Bar
1⁄ 2 cup almond meal
1 1⁄ 2 tablespoons unsweetened cocoa powder
3 tablespoons zero-calorie sweetener
1⁄ 2 teaspoon baking soda
1⁄ 4 teaspoon salt
1 cup unsweetened vanilla almond milk
2 teaspoons vanilla extract
1⁄ 2 tablespoon red food coloring
Coconut cooking spray
How to Make Protein Packed Raspberry Cheesecake:
Crust
- Preheat oven to 400°F.
- Unwrap and break the half White Chocolate Raspberry Quest Bar® into small pieces, and bake 3 to 4 minutes, or until just lightly crisped. Set aside to cool. Reset the oven to 325°F.
- In a small blender, process the Quest® protein chips to very fine crumbs. Add in the crisped Quest Bar® pieces, and blend again to crumbs.
- Add in almond meal, zero-calorie sweetener, and melted butter, and pulse to combine.
- Spray an 8-inch spring-form pan with cooking spray. Press dough into the pan’s base until covered. Set aside.
Filling
- Chop the 11⁄2 unwrapped White Chocolate Raspberry Quest Bars into small cubes, about pea sized. Set aside.
- In a blender, combine the Greek yogurt, ricotta, and cream cheese; blend until smooth and incorporated.
- Add in the eggs, egg whites, Quest® protein powder, and zero-calorie sweetener. Pulse several times until well incorporated.
- Puree the fresh raspberries in a blender.
Assembly
- Pour half of the filling over the crust.
- Sprinkle in the Quest Bar cubes, and pour the remaining filling on top.
- Spoon the raspberry puree on top in several places. Drag a knife through the puree to create a swirly effect.
- Bake for 45 to 48 minutes, or until cheesecake is still slightly jiggly in the center.
- Take the cheesecake out, and let cool for 1 hour.
- Place in refrigerator for at least 4 hours.
- Before serving, run a warm knife around the pan to loosen before unmolding.
- Serve with a fresh raspberry for garnish if desired.

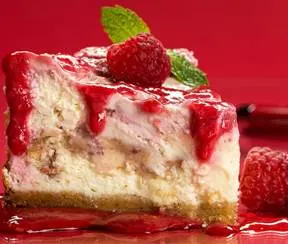
Protein Packed Raspberry Cheesecake
It's time to give cheesecake a guilt-free embrace. This creamy, scrumptious dessert is packed with 34g of protein and is an exclamation point to any dinner. It’s a thoughtful gift for your sweet tooth, so feel the love and have a slice!
Ingredients
Cake
- 1⁄ 2 cup Quest Vanilla Milkshake Protein Powder
- 1 Double Chocolate Chunk Quest Bar
- 1⁄ 2 cup almond meal
- 1 1⁄ 2 tablespoons unsweetened cocoa powder
- 3 tablespoons zero-calorie sweetener
- 1⁄ 2 teaspoon baking soda
- 1⁄ 4 teaspoon salt
- 1 cup unsweetened vanilla almond milk
- 2 teaspoons vanilla extract
- 1⁄ 2 tablespoon red food coloring
- Coconut cooking spray
Instructions
Crust
- Preheat oven to 400°F.
- Unwrap and break the half White Chocolate Raspberry Quest Bar® into small pieces, and bake 3 to 4 minutes, or until just lightly crisped. Set aside to cool. Reset the oven to 325°F.
- In a small blender, process the Quest® protein chips into very fine crumbs. Add in the crisped Quest Bar® pieces, and blend again to crumbs.
- Add in almond meal, zero-calorie sweetener, and melted butter, and pulse to combine.
- Spray an 8-inch springform pan with cooking spray. Press dough into the pan’s base until covered. Set aside.
Filling
- Chop the 11⁄2 unwrapped White Chocolate Raspberry Quest Bars into small cubes, about pea-sized. Set aside.
- In a blender, combine the Greek yogurt, ricotta, and cream cheese; blend until smooth and incorporated.
- Add in the eggs, egg whites, Quest® protein powder, and zero-calorie sweetener. Pulse several times until well incorporated.
- Puree the fresh raspberries in a blender.
Assembly
- Pour half of the filling over the crust.
- Sprinkle in the Quest Bar cubes, and pour the remaining filling on top.
- Spoon the raspberry puree on top in several places. Drag a knife through the puree to create a swirly effect.
- Bake for 45 to 48 minutes, or until cheesecake is still slightly jiggly in the center.
- Take the cheesecake out, and let it cool for 1 hour.
- Place in refrigerator for at least 4 hours.
- Before serving, run a warm knife around the pan to loosen before unmolding.
- Serve with a fresh raspberry for garnish if desired.
Nutrition Information:
Yield: 2 Serving Size: 1Amount Per Serving: Calories: 1328Total Fat: 81gSaturated Fat: 22gTrans Fat: 0gUnsaturated Fat: 55gCholesterol: 33mgSodium: 5914mgCarbohydrates: 105gFiber: 23gSugar: 69gProtein: 58g
The Nutritional Information may not be accurate.
Nutrition Info:
Calories: 300
Protein: 34g
Fat: 13g
Net Carb: 9g
Fiber: 7g
P/CAL: 45%
For further info on Quest Nutrition, check out Quest Nutrition
I received Quest Protein Powder in exchange for this post. All opinions are my own.