Deviled Egg Chicks: The Cutest Easter Appetizer That Always Steals the Show
These little chicks are egg‑stra adorable — and they’re ready to hatch right onto your Easter table.
Spring is in the air, the baskets are filling, and if your kitchen is anything like mine, Easter prep is officially underway. Whether you’re hosting a full Easter brunch, contributing to a spring potluck, or just want a fun kitchen project with the kids, these Deviled Egg Chicks are the kind of recipe that makes everyone stop mid‑conversation and say, “Oh my gosh, look at these!”
They’re whimsical. They’re nostalgic. They’re ridiculously cute. And best of all? They’re made with simple pantry staples you probably already have on hand. Think of them as classic deviled eggs dressed up for Easter — a playful twist that turns an everyday appetizer into a springtime showstopper.
If you love charming Easter crafts like my Easter Craft Fabergé Egg or festive kitchen projects like DIY for the Cutest Easter Eggs Ever, these Deviled Egg Chicks will fit right into your holiday lineup.
Let’s hatch some cuteness.

Why You’ll Love These Deviled Egg Chicks
These aren’t just adorable — they’re practical, delicious, and perfect for Easter entertaining.
Here’s why they’re a guaranteed hit:
- A picture‑perfect Easter appetizer or brunch side dish
- Made with simple, budget‑friendly ingredients
- Easy enough for kids to help assemble
- Classic creamy deviled egg flavor everyone loves
- Doubles as a springtime table centerpiece
- Ideal for Easter brunch, school parties, or family gatherings
If deviled eggs are already a staple at your celebrations, these chick‑shaped cuties add a seasonal twist that makes them unforgettable.
Ingredients
For Every Two Deviled Egg Chicks
- 2 hard‑boiled eggs
- Mayonnaise, to taste
- Salt, to taste
- Mustard, to taste (optional)
- 1 tablespoon reconstituted instant potato flakes or mashed potato
For Decorating the Chicks
- 2 thin carrot rounds, cut into small diamond shapes (beaks)
- 4 dark brown jimmies, raisins, capers, or cloves (eyes)
For the Nest
- Chinese noodles or shredded cabbage
How to Make Deviled Egg Chicks
Step 1: Cook the Eggs
For perfectly cooked eggs every time, follow my method for Instant Pot hard boiled eggs.
If boiling on the stovetop:
- Place eggs in a pot and cover with water.
- Add 2 tablespoons salt.
- Bring to a boil over medium‑high heat.
- Remove from heat and let eggs sit in the hot water for 10 minutes.
- Transfer to cool water and peel.
Step 2: Prepare the Egg Shell Halves
- Slice each egg across the middle.
- Gently remove the yolks and place them in a bowl.
- Trim a tiny slice off the bottom of the larger half so it stands upright.
- For a cracked‑shell effect, use kitchen shears or a knife to cut a zig‑zag pattern around the edges.
Step 3: Make the Deviled Egg Filling
Mash the yolks with:
- mayonnaise
- salt
- mustard (optional)
- instant potato flakes or mashed potato
Mix until smooth and creamy.
Step 4: Form the Chick Heads
Spoon or pipe the yolk mixture into the larger egg halves, shaping it into a rounded mound that resembles a chick’s head.
Step 5: Decorate the Chicks
- Insert carrot diamonds for beaks.
- Add jimmies, raisins, capers, or cloves for eyes.
Step 6: Build the Nest
Arrange your chicks on a platter lined with Chinese noodles or shredded cabbage for a charming nest effect.
Serve immediately or refrigerate until ready to enjoy.
Expert Tips for Perfect Deviled Egg Chicks
- Use slightly older eggs — they peel more easily.
- A piping bag creates smoother, rounder chick heads.
- Chill eggs completely before decorating to keep the filling firm.
- Wipe your knife between cuts when making zig‑zag shells for cleaner edges.
Variations & Creative Ideas
Colorful Chicks
Add a drop of natural food coloring to the yolk mixture for pastel‑colored chicks.
Spicy Deviled Egg Chicks
Mix in:
- paprika
- cayenne
- hot sauce
Herb Deviled Eggs
Fold in fresh herbs like:
- chives
- dill
- parsley
Serving Suggestions
These adorable deviled egg chicks shine at:
- Easter brunch spreads
- Spring baby showers
- School Easter parties
- Family holiday dinners
- Kids’ lunchboxes
Pair them with other spring favorites like:
- fresh fruit platters
- vegetable trays
- baked Easter breads
- festive treats like Bunny Bread or Rainbow Layered Ribbon Jello
FAQs
Can deviled egg chicks be made ahead of time?
Yes! Prepare the eggs and filling up to 24 hours ahead. Add decorations just before serving.
What can I use instead of potato flakes?
Mashed potato stabilizes the filling, but you can substitute:
- cream cheese
- extra mayonnaise
- Greek yogurt
How long do deviled eggs last?
Store in an airtight container in the refrigerator for up to 2 days.


Final Thoughts
These Deviled Egg Chicks prove that sometimes the simplest recipes bring the biggest smiles. With their playful personalities and classic deviled egg flavor, they’re the perfect Easter appetizer — nostalgic, creative, and irresistibly cute.
Whether you’re hosting Easter brunch, prepping a spring party platter, or looking for a fun kitchen activity with the kids, these little chicks are guaranteed to hatch compliments all around.
If you’re building out your Easter menu, you might also love exploring more springtime favorites in my Easter archives or pairing these chicks with savory dishes like Pineapple Ginger Stuffing or Stuffed Crown Roast.
Your Easter table is about to get a whole lot cuter.
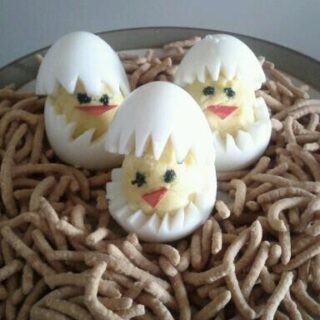
Deviled Egg Chicks – Cute Easter Deviled Eggs for Brunch & Spring Parties
These Deviled Egg Chicks are an adorable Easter appetizer made with hard-boiled eggs, creamy yolk filling, carrot beaks, and tiny edible eyes. Perfect for Easter brunch, spring parties, and kid-friendly holiday snacks, this cute deviled egg recipe turns a classic appetizer into a festive centerpiece.
Ingredients
- 2 hard-boiled eggs
- Mayonnaise, to taste
- Salt, to taste
- Mustard, to taste (optional)
- 1 Tablespoon reconstituted instant potato flakes or mashed potato
- 2 carrot rounds, thinly sliced and cut into diamond shapes, for beaks
- 4 dark brown jimmies, raisins, capers, or cloves, for eyes
- Chinese noodles or shredded cabbage, for nest
Instructions
- Prepare the hard-boiled eggs. You can make eggs in a pot, then cool, peel, and rinse them.
- Slice each egg across the middle. Carefully remove the yolks and place them in a small bowl.
- Trim a thin slice from the bottom of the larger egg white halves so they stand upright on a serving plate.
- If desired, use kitchen shears or a sharp knife to cut a zig-zag pattern around the top egg white halves to resemble cracked chick shells.
- Mash the yolks with mayonnaise, salt, mustard if using, and the reconstituted instant potato flakes or mashed potato until smooth and creamy.
- Spoon or scoop the yolk mixture into the bottom egg white halves, shaping it into a rounded mound to create the chick’s face.
- Add carrot pieces for beaks and dark brown jimmies, raisins, capers, or cloves for the eyes.
- Set the zig-zag egg white tops over the filling to create the hatched chick look.
- Arrange the chicks on a plate over Chinese noodles or shredded cabbage to make a nest. Serve immediately or chill until ready to serve.
Notes
Notes
For the best presentation, use eggs that peel easily and chill them before slicing.
A spoon works well for filling the eggs, but a melon baller can help create a more rounded chick shape.
Chinese noodles create a playful nest look, while shredded cabbage offers a fresher option.
Because the filling is mayonnaise-based, keep these Deviled Egg Chicks refrigerated until serving time.
If you need a reliable method for perfect eggs, start with eggs in a pot for easy prep.
Serving Suggestions
Serve these Deviled Egg Chicks as a cute Easter appetizer for brunch, holiday buffets, spring potlucks, or a kid-friendly snack board. They pair well with fresh fruit, crisp vegetables, and other light Easter party foods.
Tips
Use a sharp knife and wipe it clean between cuts for neater egg edges.
Cut the carrot beaks small so they look proportional to the chicks.
Add the eyes just before serving for the freshest appearance.
For extra stability, make sure the egg bottoms sit flat before filling.
This recipe was originally published February 15, 2012, and updated April 3, 2026, with improved instructions, updates, and new photos.
This recipe was originally published February 15, 2012, and updated April 3, 2026, with improved instructions, updates, and new photos.