
These Halloween cut-out cookies start with an easy roll-out cookie dough flavored with vanilla and just a hint of almond. Roll the dough to 1/4-inch thick, chill it until firm, then break out the pumpkins, ghosts, candy corn—or whatever cookie cutters are haunting your kitchen.
The dough is sturdy enough for cutting and decorating while still baking into buttery cookies that are delicious with icing, sprinkles, or absolutely nothing at all. And while we’re giving them the Halloween treatment today, the dough itself isn’t retiring on November 1. Change the cutters and you’ve got an easy cut-out cookie recipe for Christmas, Valentine’s Day, Easter, birthdays, and cookie-decorating days all year long.
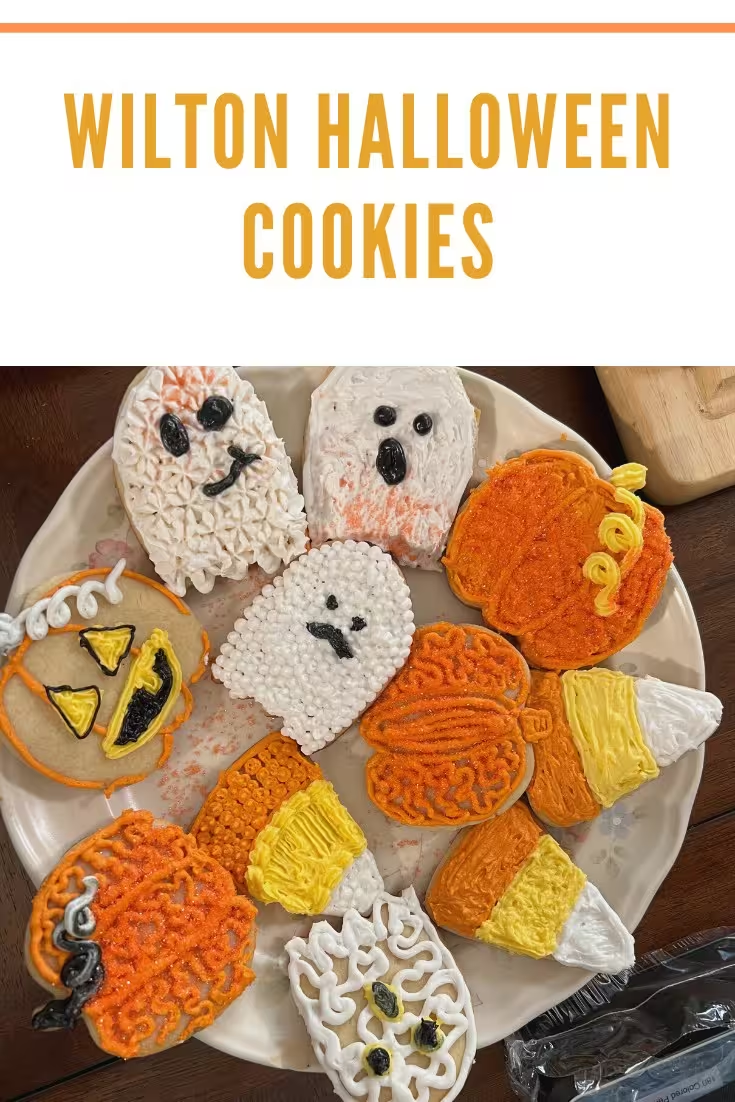
Why You’ll Love These Halloween Cut-Out Cookies
- Roll first, chill second: Rolling the soft dough before refrigeration means you aren’t wrestling a cold brick of cookie dough later.
- Easy 1/4-inch thickness: The cookies are substantial enough for decorating and easier to transfer without stretching your carefully cut shapes.
- Made for cookie cutters: Chilled dough is easier to cut cleanly into pumpkins, ghosts, candy corn, and other Halloween shapes.
- Simple ingredients: Butter, sugar, egg, flour, vanilla, baking powder, and salt do most of the work.
- Decorate your way: Use simple sanding sugar with the kids, pipe buttercream, or go full cookie artist with icing and gel colors.
- Not just for Halloween: Switch the cutters and use the same dough throughout the year.
Halloween Roll-Out Cookies at a Glance
- Prep Time: About 20 minutes
- Chill Time: At least 1 hour
- Bake Time: 11-13 minutes per batch
- Oven Temperature: 350°F (175°C)
- Dough Thickness: 1/4 inch
- Yield: About 18-24 medium cookies, depending on the size of your cutters and how thick you roll the dough
How to Make Halloween Cut-Out Cookies: Watch the Video
Want to see the dough go from mixing bowl to spooky cookie tray? Watch the video below to see how I mix and roll the dough, chill it for cleaner cuts, use the Halloween cookie cutters, bake the shapes, and get them ready for decorating. It’s especially helpful if you’re wondering how thick to roll the dough or what the cookies should look like before they go into the oven.
Ingredients for Roll-Out Cookie Dough
- 2 1/4 cups (281 grams) all-purpose flour, plus a little extra only if needed for the work surface or cutters
- 1/2 teaspoon baking powder
- 1/4 teaspoon salt
- 3/4 cup (170 grams) unsalted butter, softened to room temperature but not warm or greasy
- 3/4 cup (150 grams) granulated sugar
- 1 large egg, at room temperature
- 2 teaspoons pure vanilla extract
- 1/4 teaspoon almond extract, optional
A Quick Note About Measuring Flour
Too much flour can turn a tender cookie into a dry one in a hurry. For cup measurements, fluff the flour, spoon it gently into the measuring cup, and level the top with a straight edge instead of scooping directly from the bag.
For the most consistent result, weigh the flour at 281 grams. A digital kitchen scale takes the guesswork out of flour measurement and is especially handy when you’re making multiple batches for holiday baking.
Helpful Tools for Making Halloween Cut-Out Cookies
You don’t need a cart full of specialty equipment to make cut-out cookies, but a few tools make the rolling, cutting, and decorating much easier.
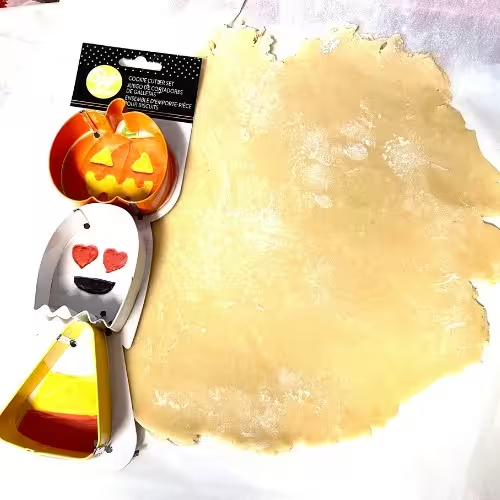
- Wilton Pumpkin, Ghost & Candy Corn 3-Piece Cookie Cutter Set — the Halloween shapes shown in this post.
- Adjustable rolling pin with thickness rings — especially helpful for keeping the entire sheet of dough at an even 1/4-inch thickness.
- Parchment sheets — useful for rolling, chilling, and baking with less sticking and less added flour.
- Rimmed baking sheets and cooling racks — useful when you’re working through several batches of cookie shapes.
- Stand mixer — convenient for creaming the butter and sugar and bringing the dough together without overworking it by hand.
🎃 Trick Out Your Cookie Kit
These are the tools I’d grab for easier rolling, cleaner Halloween shapes, and a whole lot more decorating fun.
As an Amazon Associate, I earn from qualifying purchases.
Want the full cookie setup?
Stand Mixer
•
Halloween Sanding Sugar & Sprinkles
Roll it. Cut it. Decorate it. Eat the evidence.
How to Make Roll-Out Cookie Dough for Halloween Cookies
1. Combine the Dry Ingredients
Whisk together the 2 1/4 cups flour, 1/2 teaspoon baking powder, and 1/4 teaspoon salt in a medium bowl. Set the mixture aside while you prepare the butter mixture.
2. Cream the Butter and Sugar
Using a hand mixer or stand mixer, beat the softened butter and granulated sugar for about 2 minutes, until smooth and creamy.
The butter should be soft enough to mix easily but should not look melted, shiny, or greasy. Butter that’s too warm can make cookie dough softer and more difficult to cut cleanly.
3. Add the Egg and Extracts
Add the egg, vanilla extract, and almond extract, if using. Beat until combined, about 1 minute, stopping to scrape down the sides and bottom of the bowl as needed.
The almond extract is optional. Leave it out if you prefer an all-vanilla cookie.
4. Add the Dry Ingredients
With the mixer on low, gradually add the flour mixture to the butter mixture. Mix only until a soft dough forms and no obvious streaks of flour remain.
Avoid continuing to beat the dough once everything is combined. Overmixing at this stage can make cut-out cookies less tender.
5. Roll the Dough Before Chilling
Divide the dough into two equal portions.
Place one portion on a sheet of parchment paper, cover with a second sheet, and roll the dough to approximately 1/4-inch thick. Repeat with the remaining dough.
An adjustable rolling pin with thickness rings makes this step wonderfully boring—in the best possible way. No thick cookies on one side of the pan and crispy little wafers on the other.
Rolling between parchment also means you can use less additional flour, which helps keep the dough from becoming dry after repeated rolling.
6. Chill the Rolled Dough
Place the rolled dough sheets flat in the refrigerator and chill for at least 1 hour. You can refrigerate the dough for up to 2 days if you want to do the mixing ahead of time.
Why roll before chilling? Soft, freshly mixed dough is much easier to roll evenly. Once it’s already 1/4-inch thick, chilling firms the dough so the cookie cutters can make cleaner shapes without asking you to attack a refrigerated dough brick with a rolling pin.
7. Cut the Halloween Shapes
Preheat the oven to 350°F (175°C) and line your baking sheets with parchment paper.
Peel away the top sheet of parchment and cut the chilled dough with your favorite Halloween cutters. I’m using the Wilton pumpkin, ghost, and candy corn cookie cutters shown in the photos.
Place the cutters close together so you get as many cookies as possible from the first roll. If a cutter begins sticking, dip just the cutting edge lightly in flour and tap off the excess before cutting again.
8. Transfer and Reroll the Scraps
Carefully lift the shapes onto a parchment-lined baking sheet. If the dough begins to soften while you’re working, return it to the refrigerator for a few minutes before continuing. Firm dough is much easier to move without stretching ghosts into mysterious blobs.
Gather the scraps gently, press them together, and reroll. Try not to add unnecessary flour or repeatedly work the scraps; the more flour and handling they receive, the less tender the finished cookies can become.
9. Bake the Cookies
Bake at 350°F for 11-13 minutes, adjusting slightly for the size and thickness of your cookie shapes.
Look for cookies that are set across the surface with edges that are just beginning to turn pale golden. For a softer cookie, don’t wait for deep browning.
Because ovens and cookie cutters vary, begin checking the first tray early. Once you know exactly how your oven handles a 1/4-inch cookie, use that first batch as your guide for the rest.
10. Cool Completely
Let the cookies rest on the baking sheet for about 5 minutes before carefully moving them to a cooling rack. Allow them to cool completely before decorating.
This matters. Warm cookies plus icing equals a tiny Halloween crime scene.
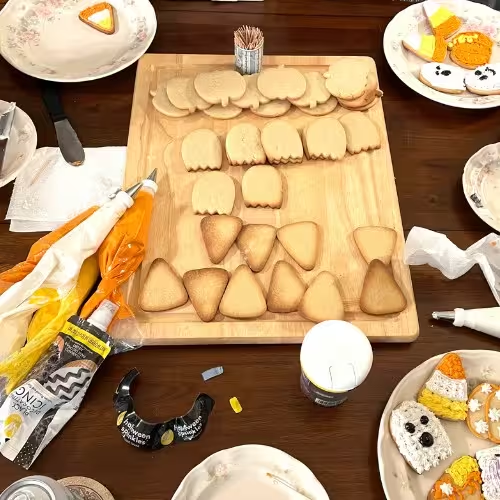
Easy Ways to Decorate Halloween Cut-Out Cookies
You can make these as simple or elaborate as you like. If you’re decorating with kids, there is absolutely no requirement that every ghost have symmetrical eyes. Frankly, a slightly unhinged ghost has character.
Easy: Icing and Halloween Sprinkles
Spread or drizzle completely cooled cookies with your favorite cookie icing, then add a Halloween sanding sugar and sprinkle mix before the icing sets.
This is the easiest approach for younger bakers and for anyone who would rather eat cookies than spend the evening auditioning for a cookie-decorating competition.
Medium: Piped Buttercream or Cookie Icing
A piping bag and decorating tip set gives you better control for outlines, faces, stripes, stems, and small details.
- Pumpkins: Orange icing, a green stem, and black jack-o’-lantern faces.
- Ghosts: White icing with black eyes and mouths.
- Candy corn: White, orange, and yellow icing in three distinct sections.
More Detailed: Outline and Fill
For smoother decorated cookies, divide your icing and tint it with concentrated gel food coloring. Gel colors provide strong color without requiring a large amount of liquid.
If you want to practice outlining, flooding, and icing consistency, my beginner cookie decorating guide walks through the process step by step.
How to Keep Halloween Cut-Out Cookies from Spreading
If your pumpkin goes into the oven looking ready for Halloween and comes out looking like a decorative dinner plate, check these common trouble spots.
- Keep the butter softened, not warm. If the butter looks oily or partially melted, it’s too soft.
- Measure flour carefully. Use the spoon-and-level method or weigh 281 grams.
- Chill the rolled dough thoroughly. Cutting warm, floppy dough makes clean shapes much harder to maintain.
- Don’t put dough on a hot baking sheet. Let pans cool between batches or rotate between two baking sheets.
- Keep the dough approximately 1/4 inch thick. Consistent thickness also helps the cookies bake at the same rate.
- Refrigerate again if needed. If the cut shapes feel soft after you’ve transferred them, a short trip back to the refrigerator can firm the dough before baking.
Why 1/4-Inch Dough Works So Well for Decorated Cookies
For this recipe, 1/4 inch is my sweet spot. It gives you a cookie sturdy enough to pick up, move, frost, stack, or let a child enthusiastically cover with half a container of sprinkles.
Thinner dough generally produces more cookies and can bake more quickly. Thicker dough needs more time in the oven. Whatever thickness you choose, consistency across the entire sheet matters more than chasing an exact number with a ruler every five seconds.
Make-Ahead Roll-Out Cookie Dough
Holiday baking is considerably more fun when every step doesn’t have to happen on the same day.
You can prepare and roll this dough, cover it well, and refrigerate it for up to 2 days. When you’re ready to bake, cut the chilled dough into shapes and continue with the recipe.
You can also freeze well-wrapped cookie dough for longer storage. For best quality, use frozen dough within about 2 months. Thaw it overnight in the refrigerator before cutting and baking.
How to Store Halloween Cut-Out Cookies
Let baked cookies cool completely before putting them into a storage container. Store undecorated cookies in an airtight container at room temperature for up to about 5 days.
If the cookies are decorated with an icing that dries firm, allow the decorations to set completely before stacking. Place parchment between layers to protect the designs.
Undecorated baked cookies can also be frozen for up to about 3 months. Cool them completely, place parchment between layers, and seal them well before freezing. Thaw at room temperature before decorating.
As an Amazon Associate, I earn from qualifying purchases and may earn from eligible Audible sign-ups.
Bake & Listen: Something Spooky While the Dough Chills
That hour of chilling time is practically begging for a story. Turn Halloween cookie day into a little bake-and-listen time while the dough firms up in the refrigerator. Pick something fun for the kids—or save the grown-up witchy story for the decorating session that somehow starts after everyone else goes to bed.
For Younger Bakers
My first pick is How to Catch a Witch: A Halloween Picture Book for Kids. It’s silly, festive, and just spooky enough to pair with pumpkins, ghosts, candy corn cookies, and a kitchen full of sprinkles.
For Older Kids Who Want Something Spookier
For kids ages 9–12 who are ready for ghost stories and a little more mystery, try Scary Stories for Kids Age 9-12: Spooky, Short Ghost Tales and Mysterious Adventures for Campfires, Sleepovers, and Halloween Fun. The short-story format works especially well during dough chilling, baking, and decorating.
For the Late-Night Cookie Decorator
If you’re frosting Halloween cookies at 11 p.m. because apparently that’s when adults make their best life choices, The Very Secret Society of Irregular Witches makes a wonderfully cozy, witchy companion.
Want to turn the whole baking session into story time? Listen with Audible while you roll, chill, bake, and decorate.
Roll it. Chill it. Press play.
One Roll-Out Cookie Dough, More Than One Holiday
Don’t send this recipe into storage with the plastic skeletons on November 1. The roll-out dough itself works with cookie cutters for all kinds of celebrations.
- Thanksgiving: Leaves, acorns, pumpkins, and turkeys
- Christmas: Trees, stars, snowflakes, ornaments, and stockings
- Valentine’s Day: Hearts, lips, X’s, and O’s
- Easter: Bunnies, eggs, flowers, and chicks
- Birthdays: Numbers, letters, stars, or cutters that match the party theme
The cookie cutter changes. The basic dough doesn’t have to.
Roll-Out Cookie Dough Troubleshooting
Why is my cookie dough too sticky to cut?
The dough may simply be too warm. Chill it until firm before adding more flour. If it remains unusually sticky after chilling, dust the cutter or work surface lightly with flour rather than working large amounts of extra flour into the dough.
Why is my chilled dough cracking?
Very cold dough can crack when bent or rolled. If you chilled the dough before rolling rather than using the preferred roll-first method, let it sit at room temperature for a few minutes until it is firm but workable.
Do I have to chill this roll-out cookie dough?
For this recipe, yes. Chilling firms the butter and makes the rolled dough easier to cut and transfer without stretching the shapes.
Should I roll cookie dough before or after chilling?
I prefer to roll first and chill second. Fresh dough rolls easily between sheets of parchment, and the already-flat dough chills faster and is ready for cookie cutters when you take it from the refrigerator.
How thick should I roll Halloween sugar cookies?
Roll this dough approximately 1/4 inch thick. An even thickness helps the cookies bake more consistently from one tray to the next.
How many cookies does this recipe make?
Expect approximately 18-24 medium cookies. The exact number depends on the dimensions of your cookie cutters, how closely you cut the shapes, and how thick you roll the dough.
Can I leave out the almond extract?
Absolutely. The almond extract adds a little bakery-style flavor, but the cookies are still delicious made with vanilla alone.
Can I use different cookie cutters?
Yes—and that’s one of the best things about roll-out cookie dough. Use the Halloween cutters now, then bring the recipe back out when the Christmas trees, Valentine’s hearts, Easter bunnies, birthday numbers, and random dinosaur requests arrive.
Ready to Roll, Cut, and Haunt the Cookie Tray?
Halloween cookies don’t need to be complicated to be memorable. Start with an evenly rolled sheet of chilled dough, keep your cutters close together, let the cookies cool before decorating, and remember that crooked ghost eyes are not a baking failure. They’re personality.
Whether you’re making a tray for a Halloween party, decorating cookies with the kids, or sneaking the last candy corn cookie after everyone goes to bed, this easy roll-out cookie dough gives you a dependable starting point for all the spooky creativity you can pile on top.
Halloween Cut-Out Cookies with Easy Roll-Out Cookie Dough

Easy Halloween cut-out cookies made with buttery roll-out cookie dough that holds its shape for pumpkins, ghosts, candy corn, and other festive cookie cutters. Roll the dough to 1/4 inch before chilling for clean cuts, sturdy cookies, and easy decorating.
Ingredients
- 2 1/4 cups (281 grams) all-purpose flour, plus a little extra if needed for rolling or cutters
- 1/2 teaspoon baking powder
- 1/4 teaspoon salt
- 3/4 cup (170 grams) unsalted butter, softened
- 3/4 cup (150 grams) granulated sugar
- 1 large egg, room temperature
- 2 teaspoons pure vanilla extract
- 1/4 teaspoon almond extract, optional
Instructions
- Whisk together the flour, baking powder, and salt in a medium bowl. Set aside.
- In a large bowl, beat the softened butter and granulated sugar with a hand mixer or stand mixer for about 2 minutes, until smooth and creamy.
- Add the egg, vanilla extract, and almond extract, if using. Beat for about 1 minute, scraping down the sides and bottom of the bowl as needed.
- With the mixer on low, gradually add the dry ingredients. Mix just until a soft dough forms and no streaks of flour remain.
- Divide the dough into two equal portions. Place each portion between sheets of parchment paper and roll to approximately 1/4-inch thick.
- Refrigerate the rolled dough flat for at least 1 hour, or up to 2 days.
- Preheat the oven to 350°F. Line baking sheets with parchment paper.
- Remove one sheet of chilled dough from the refrigerator. Peel away the top parchment and cut the dough with Halloween cookie cutters. If the cutters stick, dip the cutting edges lightly in flour and tap off the excess.
- Carefully transfer the shapes to the prepared baking sheets. Gather the scraps gently, reroll, and cut additional cookies. If the dough becomes soft, chill it again briefly before baking.
- Bake for 11-13 minutes, or until the cookies are set and the edges are just beginning to turn pale golden. Thinner or smaller cookies may bake more quickly.
- Let the cookies cool on the baking sheet for about 5 minutes, then transfer them to a wire rack to cool completely.
- Decorate the cooled cookies with icing, gel colors, sanding sugar, sprinkles, or other Halloween decorations as desired.
Notes
How Thick Should I Roll the Dough?
For these Halloween cut-out cookies, roll the dough to approximately 1/4 inch thick. This makes sturdy cookies that are easy to transfer and decorate while still staying tender.
Why Roll Before Chilling?
Fresh dough is much easier to roll evenly than a cold block of refrigerated dough. Rolling first and chilling second also helps the dough firm up faster and makes cutting cleaner shapes easier.
Keep the Shapes from Spreading
Use softened but not melted butter, measure the flour carefully, keep the dough chilled, and never place cut cookies on a hot baking sheet. If the dough softens while you're cutting, return it to the refrigerator for a few minutes.
Yield
This recipe makes approximately 18-24 medium cookies. The exact yield depends on the size of your cookie cutters, how closely you cut the shapes, and the thickness of your dough.
Make Ahead
The rolled dough can be refrigerated for up to 2 days. Well-wrapped dough can also be frozen for about 2 months. Thaw frozen dough overnight in the refrigerator before cutting and baking.
Storage
Store completely cooled cookies in an airtight container at room temperature for up to 5 days. Undecorated baked cookies can be frozen for up to 3 months. Place parchment between layers before freezing.
Helpful Tools
I use Wilton Pumpkin, Ghost & Candy Corn Cookie Cutters for the Halloween shapes shown here. An adjustable rolling pin with thickness rings makes it easy to keep the dough at an even 1/4 inch, and a piping bag and decorating tip set is handy for adding faces, outlines, and details.
Decorating Help
For more detailed icing techniques, see my beginner cookie decorating guide.
Nutrition Information:
Yield:
24Serving Size:
1 cookieAmount Per Serving: Calories: 177Total Fat: 7gSaturated Fat: 4gUnsaturated Fat: 3gCholesterol: 24mgSodium: 40mgCarbohydrates: 26gFiber: 1gSugar: 8gProtein: 3g
The Nutritional Information may not be accurate. This website provides approximate nutrition information for convenience and as a courtesy only. Nutrition data is gathered primarily from the USDA Food Composition Database, whenever available, or otherwise other online calculators.
Next Recipe to Try
Keep the creepy-cookie tray going with these Peanut Butter Spider Cookies—soft peanut butter cookies topped with chocolatey little spiders that are much more welcome in the kitchen than the real thing.