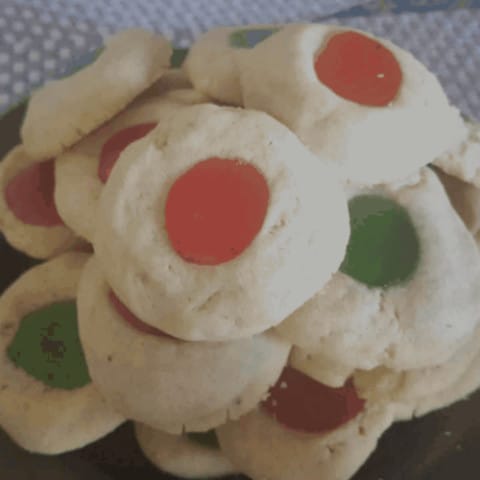
Indulge in the delightful world of Gummy Bear Thumbprint Cookies, our featured recipe today. These easy-to-make treats offer a burst of fun and flavor. Witness the enchantment as gummy candy transforms into a chewy, gooey delight within each cookie. For optimal results, we suggest using Haribo Gummies made in Turkey; their quality is unmatched. To amplify the festive spirit, choose a variety of colors or match them to specific themes like red and green for Christmas or red for Valentine’s Day. These cookies make a fantastic addition to your holiday baking repertoire and are sure to be loved by both kids and adults alike. In fact, they were once my four-year-old’s favorite Christmas cookies, adding a touch of joy to the season.
You may also enjoy other great recipes from our Pinterest Christmas Board, like these easy gummy thumbprint cookies.
Gummy Bear Thumbprint Cookies
Preparation Time: 20 minutes
Cooking Time: 10 minutes
Yields: 3 dozen cookies
Ingredients:
- 1 cup (2 sticks) unsalted butter, softened
- 1/2 cup packed light brown sugar
- 2 egg yolks
- 1 teaspoon vanilla extract
- 2 cups all-purpose flour
- 1/4 teaspoon salt
- 3 dozen gummy bears (one per cookie)


How to Make Gummy Bear Thumbprint Cookies
- Preparing the Pan:
- Preheat the oven to 350 degrees Fahrenheit.
- Line a baking sheet with parchment paper.
- Preparing the Cookie Dough:
- In a large bowl, cream together the softened butter and brown sugar.
- Add the egg yolks, one at a time, and stir well.
- Stir in the vanilla extract.
- Mix in the flour and salt, stirring until the dough is completely combined.
- Cover the bowl with plastic wrap and place it in the freezer for 10 minutes. This helps prevent cracks when forming the center cavity.
- Making the Cookies:
- Remove the cookie dough from the freezer.
- Using a small cookie scoop, roll the dough into tablespoon-sized balls.
- Optional: Roll the dough balls in sprinkles or colored sugar.
- Arrange the dough balls 1-1 1/2 inches apart on the prepared baking sheet.
- Press a deep hole in the middle of each cookie using your thumb. Ensure it is deep and wide enough to hold a gummy bear without spilling, but not too deep to crack the sides of the cookie excessively.
- Baking the Cookies:
- Place the baking sheet with the cookies in the preheated oven.
- Bake the cookies for 8-10 minutes or until they appear almost done.
- Remove the baking sheet from the oven or open the oven and pull it out slightly to reach the back row of cookies.
- Place a single gummy bear in each cookie cavity.
- Return the baking sheet to the oven and continue baking until the bottom of the cookies turns golden brown.
- The gummy bears will melt completely in approximately two minutes.
- Cooling the Cookies:
- Let the cookies cool on the baking sheet for a few minutes.
- Transfer the cookies to a wire rack to cool completely.
- Enjoy your Gummy Bear Thumbprint Cookies!
For Valentine’s Day Cookies, Make Gummy Bear Heart Cookies
Embrace the sweet romance of Valentine’s Day with our special Gummy Bear Heart Cookies. Follow the original recipe provided, with a delightful twist for this occasion. Rather than forming round cavities, shape the dough into one-inch balls and arrange them on prepared baking sheets. With your finger, gently press down twice on each ball, crafting a charming heart-shaped indent. Prepare for the magical touch—nestle two halves of gummy bears within each heart-shaped cavity, creating an adorable V-shaped arrangement. As the cookies bake, witness the gummy bears melt and meld, infusing the heart-shaped center with a burst of fruity delight. These love-filled treats are perfect for surprising your sweetheart or celebrating the joy of Valentine’s Day with family and friends. Spread the love with our Gummy Bear Heart Cookies this Valentine’s Day.
FAQs (Frequently Asked Questions) for Gummy Bear Thumbprint Cookies:
Q: Can I use salted butter instead of unsalted butter? A: It’s recommended to use unsalted butter in this recipe to have better control over the salt content. If you only have salted butter, you can still use it, but reduce or omit the additional salt called for in the recipe.
Q: Can I use dark brown sugar instead of light brown sugar? A: Yes, you can substitute dark brown sugar for light brown sugar. Just keep in mind that dark brown sugar has a slightly stronger molasses flavor, which may slightly alter the taste of the cookies.
Q: Can I use whole eggs instead of just egg yolks? A: The recipe specifically calls for egg yolks to achieve a tender texture. Using whole eggs may result in a slightly different texture and taste, but it should still work.
Q: Can I use a different type of flour? A: All-purpose flour works best in this recipe to achieve the desired texture. Using a different type of flour, such as whole wheat flour or gluten-free flour, may alter the texture and taste of the cookies.
Q: How should I store the cookies? A: Once completely cooled, store the cookies in an airtight container at room temperature. They will stay fresh for up to 5 days. If you prefer a longer shelf life, you can store them in the refrigerator for up to 1 week.
Q: Can I freeze the dough or baked cookies? A: Yes, you can freeze the cookie dough or baked cookies. To freeze the dough, shape it into balls and place them on a baking sheet lined with parchment paper. Freeze until solid, then transfer to a freezer bag or container. When ready to bake, place the frozen dough balls on a baking sheet and allow them to thaw for a few minutes before proceeding with the recipe. Baked cookies can be frozen in an airtight container for up to 2 months.
Q: Can I use different types of gummy candy instead of gummy bears? A: Absolutely! You can experiment with different types of gummy candy, such as gummy worms or gummy fruit slices. Just make sure they fit well into the cavity you create in the cookies.
Q: Can I make the dough in advance? A: Yes, you can prepare the cookie dough in advance. Once the dough is mixed and before freezing, wrap it tightly in plastic wrap and store it in the refrigerator for up to 3 days. When ready to bake, proceed with shaping the dough into balls and follow the baking instructions.
Q: Can kids help make these cookies? A: Yes, this can be a fun recipe for kids to participate in. They can help with measuring and mixing the ingredients, rolling the dough into balls, and creating the thumbprint cavities. Adult supervision is recommended for tasks involving the oven.

Easy Gummy Bear Thumbprint Cookies
These easy gummy bear thumbprint cookies are fun to make. The addition of the gummy bear to the thumbprint makes for a festive treat!
Ingredients
- 1 cup (2 sticks) unsalted butter, softened
- 1/2 light brown sugar, packed
- 2 egg yolks
- 1 tsp vanilla extract
- 2 cups all-purpose flour
- 1/4 tsp salt
- 3 dozen gummy bears, one per cookie
Instructions
Prepare the Pan:
- Preheat oven to 350-degrees Fahrenheit.
- Line a cookie sheet with parchment paper.
- Prepare the cookie dough:
- In a large bowl, cream together butter and brown sugar.
- Add egg yolks, one at a time.
- Stir in vanilla extract.
- Mix in flour and salt, stirring until completely combined.
- Cover bowl with plastic wrap and set in the freezer for 10 minutes.
Make the Cookies:
- Remove the cookie dough from the freezer.
- Using a small cookie scoop, roll cookies into tablespoon-sized balls.
- You can roll the dough into sprinkles or colored sugar if you like.
- Arrange cookies 1-1 1/2 inches apart on the cookie sheet.
- Using your thumb, press a deep hole in the middle of the cookie.
- Make it deep and wide enough so the gummy bears don’t spill out, but not so deep that you crack the sides of the cookie too much.
Bake the Cookies:
- Place cookie sheet with cookies in the preheated oven.
- Bake cookies for 8-10 minutes, or until the cookies look almost done.
- Removed the cookie sheet from the oven.
- Place a single gummy bear in each cookie cavity.
- Return cookie sheet back to the oven and bake until the bottoms are golden brown.
- The gummy bears will melt completely in about two minutes!
Cool the Cookies:
- Let cookies cool on the cookie sheet for a few minutes, then transfer to a wire rack to cool completely.
- Enjoy!
Notes
Harbo Gummy Bears (made in Turkey) are our favorite.
Nutrition Information:
Yield: 18 Serving Size: 1Amount Per Serving: Calories: 89Total Fat: 2gSaturated Fat: 1gTrans Fat: 0gUnsaturated Fat: 1gCholesterol: 22mgSodium: 45mgCarbohydrates: 16gFiber: 0gSugar: 5gProtein: 2g
The Nutritional Information may not be accurate.
More Great Cookie Recipes:
Strawberry Cream Cheese Cookies (From a Cake Mix)
Melted Snowman Cookies
Skinny Chunky Monkey Cookies
Peanut Butter Spider Cookies
Peanut Butter Cookies (the best ever!) Recipe
The Best Sugar Cookie Recipe
4 Ingredient Butterfinger Cookie Bars